|
Author
|
Topic: Dragon Models 1:72 Saturn V rocket model
|
CaptSpry
Member Posts: 33
From: San Diego, CA
Registered: Feb 2012
|
 posted 09-25-2012 05:37 PM
   
There is an obvious seem line, with a little love and care and being very careful, you should be able to separate it. |
tetrox
Member Posts: 142
From: London England
Registered: Jan 2008
|
posted 09-26-2012 12:09 AM
Thank you for the replies letting me know. I have one on order and am thinking of different ways to display and touch up paint work if necessary. |
tetrox
Member Posts: 142
From: London England
Registered: Jan 2008
|
posted 10-06-2012 06:40 PM
I received my Saturn V yesterday and am really disappointed with the model.I have followed this thread and whilst accept that it is big with a wow factor and looks like a Saturn V from 5 feet away, nearly everything below the SLA adaptor is just so inaccurate. From skinny F-1 engines, with short misshapen engine shrouds, unrealistic ullage rockets and feedline covers through to wrongly scaled skirts on the second stage and maybe they forgot their glasses when designing their third stage. I am in no way a rivet counter but cannot believe it would have cost any more to produce the parts they did correctly and have the thing checked out prior to release. Sorry about the rant but I really do not believe that many products in the mass produced space model related market show the same degree of accuracy that would be expected in other genres and are regarded more as toys. On the upside I like the box and the SLA, CSM, LES combo is really nicely detailed but gluing or wet painting the boost cover to a perfectly good Command Module... |
golddog
Member Posts: 210
From: australia
Registered: Feb 2008
|
posted 10-07-2012 03:06 AM
I finally managed to get mine in Australia today. Cost was $298 AUS. Personally think it is very well done but I'm not an expert on the detail. It matches well my 1/96 and 1/144 models |
model maker
Member Posts: 130
From: NEVADA , USA
Registered: May 2012
|
posted 10-07-2012 11:28 AM
I enjoy mine and was a little disappointed with the two seam lines and the fuzzy black overspray in some spots but as time has gone by I really don't notice it as much and have mine turned in a way to show the most detail and the seams are behind it. Can anyone tell me the best way to remove the "fuzzy looking black overspray onto the white areas? There are only a couple of spots but I would still like to clean it up. I heard some type of pencil erasers would do the trick, any ideas guys? |
tetrox
Member Posts: 142
From: London England
Registered: Jan 2008
|
posted 10-07-2012 02:46 PM
Unless you are prepared to repaint that whole area if things go wrong I would tend to leave things alone and turn the offending area away from you.After having my uncharacteristic fit of pique yesterday after receiving my model I decided very late in the evening that Its "six million dollar man" moment had arrived and today am the proud owner of a Dragon Saturn V box of bits, having disassembled it completely into all of its component parts. The obvious main problem with removing overspray on a prebuilt model is making things worse and it doesnt take a lot to alter the sheen of the original paint work which can stand out a mile. Having ownership of what is now a kit I have spent a little time experimenting on my second stage horizontal marking which looks like it was airbrushed on a moving bus with large overspray. The major problems involve handling the stages so plastic gloves were worn to avoid marking. I tried for my own use using: - White and clear pencil erasures both of which removed a little overspray but damaged the sheen of the paint below.
- Various mild solvents such nail polish remover pads (non acetone, acetone being very aggressive ) again I found remove overspray but leave a mark and needed some force.
- A flat edge of hobby blade does work but again alters the sheen as does VERY fine grit polishing abrasive paper.
Four methods did remove overspray but were liable to smudging if not careful, these being car body scratch paste, plastic polish, 4in1 hand and tool wipes and UPVC cleaner.I am at pains to make clear that I do not recommend any of the above methods as formulations of products differ and this is purely an experiment for my own curiosity, my intention is to remove all the paint work and start again. Having tried them I would leave alone as most methods seem to leave their own problems and solvents easily damage plastic and leave traces or you could embark on your own paint job if you feel confident. Now what to do with all these bits and pieces? |
tetrox
Member Posts: 142
From: London England
Registered: Jan 2008
|
posted 10-08-2012 02:03 AM
As a follow up to my previous post I personally found the overspray on the second stage horizontal lower skirt black marking to be the most noticeable as it combined with an unevenly painted marking.Again instead of having a life (or any sleep) I embarked upon an experiment with a Nobel prize clearly in mind. I cut some decal paper which had been previously painted for another project a semi gloss black into long 4mm wide strips. I used the strips to create a new straight upper edge to the marking, a technique discussed in another model building thread. The decal strips applied better than I had expected as the stringers on the model are not too deep, though a decal setting solution would help things further. The result is a nice crisp straight demarcation and looks much better than previously as well as being more forgiving if a mistake is made, though I had the advantage having no obstructions from feed lines to deal with. Again this was for my own amusement only and I would not wish others to damage their models however is much safer than using methods described in my previous post. |
model maker
Member Posts: 130
From: NEVADA , USA
Registered: May 2012
|
posted 10-08-2012 12:05 PM
Thank you. My overspray is only noticeable in three places and it is all on one section and that being the connecting section between the first and second stage so I really am fortunate in that regard. I can live with it even though it is on the side I like best to display and the two seams are hidden on the back side. I just thought this slight overspray could quickly be dealt with. You are right about making the area look worse trying to fix a small thing, I have done that more times then I like to admit. One other thing I noticed is how delicate the balance is for the CSM sitting on the SLA. One little jiggle here and there can cause it to fall off and get damaged. I wish there was a way it "locked" into place so it won't fall off and get damaged. I may put a slight adhesive that will hold it firmly but not permanent such as model cement. I have my Saturn V sitting in a corner on a 24 inch by 6 foot long piece of wood covered in a blue cloth. The walls AND ceiling in that display area have large sheets of flat black poster paper and the table top is 28.5 inches tall and the tip of the escape tower is 3/4 of an inch away from the ceiling. The walls when I come into the room I get to look UP to look at the CSM section. My Dragon 1/6 Neil Armstrong figure shares this space as well as my 1/48 Apollo spacecraft model from the 1970's that is the CSM sitting on the SLA with the LEM displayed inside. |
p51
Member Posts: 1655
From: Olympia, WA
Registered: Sep 2011
|
posted 10-08-2012 12:26 PM
quote:
Originally posted by model maker:
I wish there was a way it "locked" into place...
A friend of mine got one of these and it's the only one I have seen yet so far. He said the same thing in regard to the lack of way to lock the parts into place. He keeps his in a box because he said he can't leave it standing upright because, "one bump and I'll break it into a million pieces." I was surpised how loose the fit really was. I thought my die cast smaller scale Apollo 13 Saturn was poorly designed in regard to fit (it, too, comes apart way too easily) but it's mostly metal. After seeing one of these models I have changed my mind about getting one. |
Robert Pearlman
Editor Posts: 43351
From: Houston, TX
Registered: Nov 1999
|
posted 10-08-2012 12:31 PM
I've had mine standing since February, bumped it plenty of times, had the CSM go flying and the worse that happened were the thrusters separating (which was bound to happen). Now, I have my model positioned on carpet, and experiences will differ, but it isn't that fragile that a fall will always (or even perhaps, frequently) result in broken pieces. |
model maker
Member Posts: 130
From: NEVADA , USA
Registered: May 2012
|
posted 10-08-2012 12:53 PM
This may be the reason Dragon used plastic for the CSM as I have heard from those who used the Dragon Apollo 10 "metal" diecast on top of the Dragon Saturn V is that is much more top heavy and more prone to falling off. I have something called "Museum Gel." It is a clear, removable adhesive used to secure glass and crystal from breakage and theft. I may put a couple of small dabs of it inside the rim of the top of the SLA to hold it in place since it is removable. |
Jay Chladek
Member Posts: 2272
From: Bellevue, NE, USA
Registered: Aug 2007
|
posted 10-08-2012 03:19 PM
Micro Krystal Klear will do a similar job. It is a white glue, yet it dries with a glossier sheen than say Elmers glue. It is normally used to make windows on small models by gaping empty spaces, but it also works great as a temporary glue or something to glue small bits on that don't require much bonding strength. I've used it before with good results and the best thing I've found about it is it stays somewhat flexible. So a small bump won't break the bond. But, you can still intentionally pull the part off.It can be found easily enough in well stocked hobby shops as it is a Microscale brand product. All you need is a brush to apply it and it is water soluable, so residue can be cleaned off easily. |
Orthon
Member Posts: 144
From: San Tan Valley, Arizona 85143
Registered: May 2002
|
posted 10-08-2012 06:29 PM
Does anyone know if it is possible to buy replacement thruster pods for the 1:72 service module? One of mine broke off and disappeared into thin air. Thanks! |
tetrox
Member Posts: 142
From: London England
Registered: Jan 2008
|
posted 10-09-2012 08:03 AM
From what I understand, DragonCare are very obliging in the USA in response to this type of problem. |
WAWalsh
Member Posts: 809
From: Cortlandt Manor, NY
Registered: May 2000
|
posted 12-31-2012 12:36 PM
This should probably come with the lead -- "what did I do wrong."Based on the recommendations here, I purchased a Detolf display cabinet (I will say that despite the IKEA reputation for construction issues, it was easy to put together). I then finally unpacked the Dragon Saturn V, which I purchased a number of months ago. I put together the Saturn V. I tried to place it within the cabinet. I discovered that the escape rocket at the top makes the model about an inch too tall, if I use the base which comes with the model. Have I goofed this completely somewhere? Are those using the Detolf improvising a stand so that the Saturn V fits? On a different note, my initial reaction to the Dragon is disappointment. Two pieces had broken off the second stage during shipping and one of the SM thrusters has only three nozzles, not four. Getting the F1 engines in was not easy and, ultimately, I opted for subtle filing over brute force to get the engines in. The shroud for the LM section is also remarkably flimsy. Hope to add the Apollo 10 model in the near future, however, as it would be nice to have the LM visible. |
birds-or-shells
Member Posts: 35
From: Marlton, NJ
Registered: Feb 2008
|
posted 12-31-2012 05:09 PM
The base that comes with the Detolf cabinet is too high to allow the model to fit in the cabinet with the escape tower attached. You need to replace this base with one made of plywood not thicker than 3/8 inch. For my display I went to Home Depot and in the lumber department found 2' by 2' square sheets of plywood that are 3/8 inch thick which are identified as "3/8 2X2 BC Handypanel." They cost around $6.00. You should spray paint it flat black and then drill at the center point a hole using a 3/8" bit. Insert the rod that came with the model into this hole and use a hammer to pound rod into hole until it is flush with the bottom of the board — it should fit very tightly!As noted in earlier posts replacing the command module with one made of metal will make the model top-heavy. The best way to address this is by gluing each stage of the rocket together using "Micro Kristal Klear" which is manufactured by Micorscale Industries, Inc. It costs about $3.00 and can be found in modeling shops, online retailers and eBay. The benefit of this particular adhesive is it provides a flexible joint and it is not permanent so you can still take things apart if ever want to. To use the glue apply it to each joint to be attached using a #1 or #3 fine sable paint brush which are only a $1.00 and can be found at any craft store. Without the glue the whole rocket will fall over and break — trust me, I know! quote:
Originally posted by WAWalsh:
Two pieces had broken off the second stage during shipping and one of the SM thrusters has only three nozzles, not four.
Mine also arrived damaged. Three of the five "LH-2 Feed Line Fairing" were broken off on the S-II Second Stage (I had no idea what these pieces were called but was able to find an image using Google).I contacted the retailer (Flying Mule) who will send me a replacement Second Stage when it becomes available. Alternatively I could have contacted Dragon customer support. In the meanwhile I reattached these pieces using "Micro Kristal Klear" manufactured by Micorscale Industries, Inc. The repair looks so good I may not even bother replacing the second stage. Regarding the missing thruster - if you do a mash-up with the Apollo 8 and/or Apollo 11 models you will end up with extra thrusters. |
WAWalsh
Member Posts: 809
From: Cortlandt Manor, NY
Registered: May 2000
|
posted 01-01-2013 10:29 PM
Thanks. I had the same pieces broken off (two, not three); nice to know what they are. |
sev8n
Member Posts: 236
From: Dallas TX USA
Registered: Jul 2012
|
posted 01-02-2013 11:33 AM
Add me to the list of those who received their kit with broken fairings. In my case they were not only broken but missing, I was able to get replacements through Flying Mule. |
Madon_space
Member Posts: 668
From: uk
Registered: Sep 2002
|
posted 01-11-2013 05:45 AM
Got mine for Christmas along with the Apollo 10 command/service module 1:72 scale.The issues are there as everyone has mentioned but to be honest I am not really that bothered as I just love the size of this thing so I won't be making any changes to it any time soon. |
cspg
Member Posts: 6219
From: Geneva, Switzerland
Registered: May 2006
|
posted 03-12-2013 02:59 PM
Model kit is announced. Dragon’s announcement of a 1/72 scale pre-finished replica of a Saturn V rocket in its Space Collection created a huge buzz among space aficionados! Even in miniature form, it was absolutely enormous, as the completed model stood an unbelievable 1.5m tall. Now eager model builders can get in on the action with a full kit version of the Saturn V. As the longest, heaviest and most powerful rocket ever produced, the original Saturn V stood 110.6m high and had a diameter of 10.1m. The Saturn V was at the heart of NASA’s Apollo and Skylab programs between 1967 and 1973. It was able to launch a 45-tonne payload into space beyond Low Earth Orbit. A total of 13 Saturn V launches took place, every one of them a success, plus they safely delivered 24 astronauts to the Moon.Builders and owners of this Saturn rocket from Dragon will cause jaws to drop, while the model will without fail draw gasps of astonishment! The model includes the Command/Service Module (CSM) and Launch Escape System. All the relevant detail is carefully reproduced on the three rocket stages, and the model comes with accurate decals to provide the relevant markings. This Saturn V kit must become a centerpiece of any space fan’s collection, and as such it comes with a stable circular base to allow it to be freestanding on the floor. This spectacular and massive kit will send ambitious modelers into orbit! |
the clocks running
Member Posts: 382
From: Rochester, NY
Registered: Jan 2012
|
posted 03-12-2013 04:02 PM
Great news! Now we need someone to make a detail kit to render a realistic 1/72 scale rendition of this bad boy. |
sev8n
Member Posts: 236
From: Dallas TX USA
Registered: Jul 2012
|
posted 03-12-2013 07:33 PM
The images on the Dragon site show the same misshapen F-1 engine fairings and eight ullage motors on the SI/SII interstage. I don't see any corrections/improvements over the initial release. |
Jay Chladek
Member Posts: 2272
From: Bellevue, NE, USA
Registered: Aug 2007
|
posted 03-12-2013 11:33 PM
I'm not expecting them to make any improvements to the parts at all given this seems to be Dragon's style (why would they? It sold well enough as a pre-built model). But, I will still buy this anyway as an unbuilt kit means I don't have to fiddle around with taking pre-assembled bits apart or strip incorrect paintjobs and repaint things. As a model builder, I can fix what I need to, which is why I build and don't necessarily just collect.The only question now is... what will they charge for the kit? |
the clocks running
Member Posts: 382
From: Rochester, NY
Registered: Jan 2012
|
posted 03-12-2013 11:41 PM
Dragon's USA website states that the model kit price is $139.99.The other big question that I have is who will make a mod kit for this model?  |
Planetary
Member Posts: 24
From: Huntington Beach, CA, USA
Registered: May 2013
|
posted 05-07-2013 01:00 AM
I picked up the Dragon 1/72 Saturn V model kit at my local Hobby Store (about $140) a couple weeks ago. My initial thoughts -- there's good news and bad news about this kit even for those familiar with the pre-built release...Pros — - It's a huge kit and comes in a very large box and as those who bought and have the pre-built display know, it does looks very impressive due to the sheer size.
- It *does* come with the full Dragon Apollo spacecraft including a LM (with the revised Ascent Stage part that corrects a facet), basically the Apollo 11 "lunar Flight" kit. No astronauts.
- It includes a transparent SLA adapter, both upper and lower part (which includes the instrument unit ring). In fact, the entire sprue that includes the SLA is clear plastic which includes a clear transparent Boost Protective cover (so you can see the CM under it) and LES!
- Much of the way the 3 stage bodies are engineered will make it easier than other smaller scale Saturn V models to paint the black roll patterns. Basically, the ribbed parts are complete one-piece rings like say, the Revell 1/96 kit while the smooth tank bodies are two half parts so obviously some sanding and smoothing will be in order to make the joints look smooth.
- It appears the SII and its Interstage have a really clean separation joint unlike the pre-build so one can actually show the stage without the Interstage hiding much of the J2 engines. However, the upper SII/SIVB Interstage is molded as one piece to the top ribbed part of the SII stage unlike the Revell 1/96 kit.
- Casting looks sharp. No warps or blems and detail fwiw, is clean. The entire kit is molded in light gray plastic. There is a long aluminum tube about 5/16 dia included that appears to run through the center 1st stage engine the length of that stage for support to the base.
Cons — - As expected from seeing the pre-built model, general detail is sparse, what's there is often wildly inaccurate and overall, the rocket is mostly toy-like especially regarding the engines. Going stage by stage...
Stage 1 on the body there is no access doors, launch hold down recessed areas on the thrust structure, or other detail parts that could have easily been sculpted as part of the thrust structure. In fact, there's no markings or locator holes so any side could be Station 1. This lack of outside detail carries for all three stages. The only outside detail on the 1st stage is the two long tunnels that are 2 piece parts, one for each side. The top tank dome looks ok, but it appears to be set up to fit far too low in the top of the stage instead of nearly flush with the top. The bottom thrust structure plate isn't perfect, but of the 3 stages, it's the least objectionable. Stage 2 is also featureless on the outside, you could pretty much locate the 5 fuel tunnels anywhere around the stage you want. Same with the up to 8 rockets on the outside of the Interstage. Most problematic is the SII's thrust structure which is similar to the Airfix 1/144 kit. There's more detail (if a bit random) on the thrust structure but the center J2 engine inserts into a recessed hole in the heat shield which is round (like the Airfix kit) instead of the more accurate "stop sign" shape and there is no cruciform structure for the 4 outside J2 engines to fit upon. The J2 engines are fair representations, but are cast as one piece, limiting detail. Oddly, there's only 5 identical J2 engines — the SIVB has an even more rudimentary looking J2 engine specifically for that stage. The top of the SII stage has *both* the tank dome and the (painted yellow) brace used for lifting the stage as seen on the display rocket at KSC. It shouldn't be a big deal to simply move the tank dome up to the proper height and omit the other part if desired. The top and bottom "ribbed halves of the 3rd stages are identical parts, same size and height, even same part number. You can get away with it for the SIVB thanks to the "spacer" ring (even though it's noticeably of a larger diameter). On the other hand, the top half of the 2nd stage with the conical SII/SIVB Interstage — it does not have any placement markings or parts for the 4 retro-rocket "bumps". Stage 3 features the same wildly inaccurate, simplified thrust structure (spherical tanks are molded into the structure as round "bumps") and simple looking J2 engine as the pre-build. Its also missing some key "bits" on the outside of the aft section, most notably the two pointed Ullage Retro Rockets. At least it includes the 2 APS thruster housings. Because the outside of the stage is so generic, it would be *very* easy to scratch build it into a Skylab workshop. The Instrument Unit is basically a featureless blank ring molded as part of the bottom half of the SLA as in most other Saturn V kits. I don't know if the ribbed ring that sits between the SIVB and the SLA/IU is considered by Dragons wizards as the IU or even if it's supposed to be used. I'll have to measure the stage to see if it adds or completes to the proper length of the stage. - There are no photo etched SM antenna parts as usually included with the various Apollo CSM/LM kits.
- Decals are rudimentary for the Saturn V. Basically you get the Fin ABCD marks, I, II, III, III 1st stage locators, Flag, USA and United States markings for the 1st and 2nd stages, and the standard Apollo CSM/LM decals. Interestingly, the LM window and flag decals are printed on a small white paper sheet, perhaps enforcing the thought that including an LM was a last minute decision.
- Various accuracy issues with the Apollo spacecraft, especially the LM has been beaten to death so I won't rehash them here.
Summarizing, this kit is all about size, not accuracy. I'd place the accuracy and detail on a par with and maybe even below the 1/144 Airfix or Monogram kits. IMO, the Revell 1/96 kit remains the overall best kit of this subject. Quite frankly, the 3 stages are almost featureless tubes that are ideal for adding as much detail parts as one wants with a minimal amount of reworking the kit's exterior stage body parts. I think there is a lot of opportunity for super detailing for the scratch builders among us which includes almost unlimited after market parts if someone eventually makes them — starting with something similar to the Neware 1/96 multi-media detail kit in the larger 1/72 scale and the new 1/72 decal set (which will be sold through CultTVman) to fully revamped engines for all three stages all the way to meticulously re-doing the SII and SIVB thrust structures pretty much from scratch and even scratch building an Instrument Unit! There is no way a really decent multi-media upgrade set will cost under $200, and if Neware goes all our and provides new F1 and J2 engines which this kit sorely needs, I'd guess $350 minimum. Here are photos of the parts from the big 1/72 Dragon Saturn V kit. Up on more exploration, I found a few more... Interesting things. There's clearly more fun (or hair pulling) to be had, but check out the photos for yourself. |
robert_l
Member Posts: 168
From: Dundee,Scotland
Registered: Jul 2008
|
posted 05-07-2013 11:06 AM
I just put my Saturn V in the Deltof case without the base. I did not need to make a smaller base as the rocket stands okay in the case. |
Jay Chladek
Member Posts: 2272
From: Bellevue, NE, USA
Registered: Aug 2007
|
posted 05-16-2013 01:26 PM
I acquired my Dragon Saturn V kit yesterday. Wow, it is HUGE! I won't go into the accuracy issues all that much here except to say that for anyone who has done space models for awhile knows that accurization work is usually part of the game. It is an understood evil. I've seen some very well done kits of spacecraft, but I've never come across a styrene kit that is completely accurate, especially for manned spacecraft and rocket launchers.Given my own background, I can work with what I see. Most of what seems to be the accuracy problems seems to be more a lack of detail as opposed to outright wrong detail. I like that as it means I can spend more time adding stuff rather than removing what was wrong first and relocating it. I really like the fact that Dragon decided to offer not only the SLA, but also the BPC in clear. That will make for a very nice touch as I can paint it half and half so the silver taped exterior of the CM can show through the white BPC in order to help point out that YES, they are two different things. I paid about $135 for mine at a local hobby shop that got it in for me. Compared to spending over 200 for a pre-build and having to spend time taking it apart, fixing what was wrong and doing a full repaint in the process, this is a relative bargain. So now I can build the Saturn V I've always wanted in a scale to rival my own physical size. |
Meademan
Member Posts: 24
From: Gatwick, West Sussex, UK
Registered: Oct 2012
|
posted 05-17-2013 03:15 PM
I've been wanting one of these for a long time and have been working on a little project of my own with this rocket.I have to say I'm really pleased with the display I now have. |
dcshoe
New Member Posts: 1
From: Seattle, WA USA
Registered: May 2013
|
posted 05-18-2013 08:40 AM
I now have Dragon's 1/72nd scale Saturn V, and here are my impressions. Molded in Dragon's usual light grey, the kit is by far the most accurate Saturn V kit out of the box. The parts of the rocket that have external corrugations or ribbing are slide-molded, allowing much better definition. As a kit, it more readily facilitates corrections and additions than the pre-built version, has more detail, and as it requires painting and decaling, you're more likely to get it done the way you want.No kit is perfect, including this one, and while Dragon has reproduced nearly all the visible detail on the three rocket stages, they left off some details, possibly the result of simplifications to the original pre-assembled model. Their earlier space kits exhibit the same symptoms. Many will want to add details like the EVA light missing from the Command Module, the RTG for the LM descent stage, the four separation rockets at the S-II to S-IVB adapter, and perhaps drill out and replace the molded-on S-IVB helium tanks with spheres. All this depends on how much you choose to make visible and how you plan to display the finished model. The five F-1 engines are usually shown "bare," as does Dragon. They are slide-molded, as are the smaller J-2s, and well detailed. On the actual Saturns the F-1s were wrapped with insulation to help control the heat load from the other engines; many will sacrifice some accuracy and not cover up the detail. Adding plumbing from solder and wire will make a big difference in this scale, as will adding internal inter-stage details like piping, junction boxes, and the computer and control components in the Instrument Unit, visible when the LM is removed. It seems that the kit provides most of the parts from their earlier 1/72nd scale Apollo 10 kit, including the Launch Escape System with a transparent boost protective cover, a clear LM adapter section to show as much of the LM as desired, and the full LM and CSM with all markings. The metal antenna dishes for the SM are omitted, as they are in the Apollo 10 kit. These would be visible only if the adapter stage were left completely clear, or if the CSM were removed for separate display. I plan to leave only one segment of the LM adapter clear, the quadrant opposite the antennas. All the stages can be fixed together, left separate or disassembled for examination as desired. The kit comes with a full set of reasonably accurate markings. A stable circular base with an aluminum support tube is provided to allow it to be freestanding on the floor, for most of us about the only place it will fit. Even the average mantelpiece will likely not be long enough to display it JSC-style. A quick build out of the box, you could easily spend two or three hundred hours detailing it out. Seeing what others have done with the old Revell 1/96th scale kit, I expect there will be some spectacular museum-quality displays before long. It will be interesting to see what the after-market firms do with this. |
the clocks running
Member Posts: 382
From: Rochester, NY
Registered: Jan 2012
|
posted 05-18-2013 01:18 PM
Thanks to everyone that has purchased the Dragon 1/72 scale Saturn V kit and described it.I plan on purchasing the kit next week but am going to wait to assemble the model because I am very interested in purchasing an extensive mod kit. I have a feeling that the mod kits may be two to three times the cost of the actual Dragon model kit! |
Meademan
Member Posts: 24
From: Gatwick, West Sussex, UK
Registered: Oct 2012
|
posted 05-19-2013 11:06 AM
I think for the money it's a great model and I'm sure with some super detailing kits, can be made mighty impressive.It's shear size alone seemingly makes up for its minor deficiencies as it is. |
Meademan
Member Posts: 24
From: Gatwick, West Sussex, UK
Registered: Oct 2012
|
posted 05-19-2013 11:19 AM
I recently purchased a pre-built Saturn V from my local hobby shop, and I remembered seeing a post on cS a few months ago about how to display it along with the Detolf display case from Ikea. I also remembered seeing a display option with a printed LUT background and LED lighting from Ikea, so I contacted the member who originally produced it.He is still producing it, so he had one printed and sent it to me. It is beautiful — I was absolutely blown away. The detail on the image is absolutely incredible! The image is perfectly to scale for the Saturn V, and the perspective showing it proceeding down the crawlerway at KSC really brings the rocket to life! I was able to purchase some foam board from a local craft store, and using only a blade and some double-sided tape, I was able to get it installed very easily. The foam backing is a perfect fit behind the support bars of the Detolf. The LUT background is about 11" taller than the Detolf case because of the crane. To solve that, I took the crane and mounted it to a smaller piece of foam board and put it on top of the case. It really completes it! He also produced an mobile launcher platform (MLP) for me as well. Since he designed the MLP around the Detolf dimensions, it fits perfectly! There is just enough space inside the case to have it fit snugly. He has even shaved off the back of the MLP to allow it to fit with the support bars. It might have fit anyway, but I didn't want to take any chances. Lastly, the lighting was the last step. I purchased a couple of different lighting solutions from Ikea. The strip lighting was perfect for mounting to the top of the cabinet, and it lights up the SV beautifully, especially at night! The LED "spots" that I purchased fit perfectly inside the MLP to help illuminate the F1s that are otherwise partially hidden. The great thing is that all of these lights have the ability to change colors. So, I am able to show the F1s surrounded by orange light, like they have just been lit! I am really glad that I purchased all of the above to compliment my Dragon SV. Although the faults of the model have been pointed out here, the overall scale of the rocket is what makes it an eye catcher. The Detolf, LED lighting, and LUT background really make this an impressive overall display. I would highly recommend anyone to do the same! All I need to do now is swap out the top with the transparent SLA with the LEM inside and its done. |
Jay Chladek
Member Posts: 2272
From: Bellevue, NE, USA
Registered: Aug 2007
|
posted 05-22-2013 09:48 AM
Who is the one doing the backdrop? I may or may not go this route, but I have to admit, this is a very tempting display idea. |
keymichael1855
Member Posts: 176
From: Virginia Beach, VA, USA
Registered: Feb 2012
|
posted 05-22-2013 11:21 AM
I am the one producing the LUT background and the MLP kit. If you would like one, please send me a message. Thanks! |
FlyAndFight
Member Posts: 16
From: Miami, FL
Registered: Jun 2013
|
posted 07-02-2013 08:43 PM
This weekend I received the LUT and MLP from Michael and was simply blown away by the crisp detailing found on display photo. I don't know how he did it but it is super clear and sharp. I also received the MLP set as well, which came with the modified shadow box (modified by Michael) and that looks fantastic, too. It will fit perfectly in the Ikea Detolf display case that I will be using.Thanks again, Michael! |
ilbasso
Member Posts: 1522
From: Greensboro, NC USA
Registered: Feb 2006
|
posted 07-02-2013 11:21 PM
I second that! I received my LUT backdrop and Mobile Launcher box from Michael over the weekend. I appreciate his willingness to pre-configure the shadow box that serves as the "skeleton" of the Mobile Launcher. I don't have any woodworking tools (or skills), so it was a real blessing that Michael provided the box and did the woodworking for me at an insanely reasonable price. I completed the ML this morning. I misread the instructions, and the cardboard I used for the ML top platform was too thick. I used some of the cardboard box from the Detolf display case - that was about twice as thick as it needed to be. (Michael subsequently told me that he uses diaper boxes.) As a result, there was an uncovered gap along the bottom of the ML sides. I covered this up with strips of black electrical tape, and it's not noticeable if you aren't looking for it. Thanks, Michael, for making this available! Can't wait to finish working on the LUT backdrop this week! |
Daugherty54
Member Posts: 596
From: Cabot, Arkansas, USA
Registered: Sep 2010
|
posted 08-06-2013 11:43 PM
I've attached a 1/72 cutaway shuttle to my full stack and display the Saturn V with it. It gives a nice comparison of scale.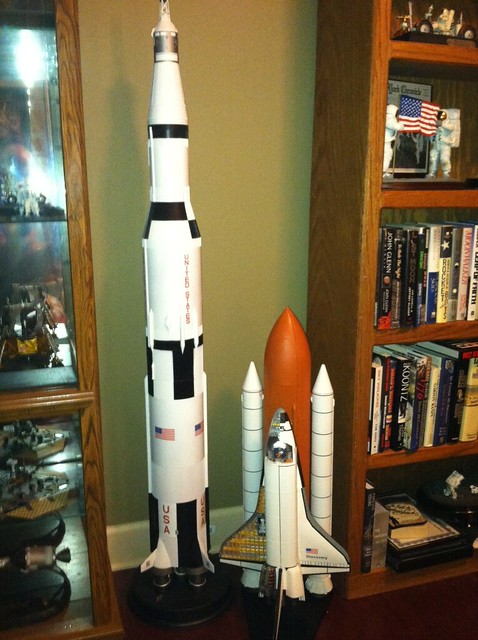 |
LVM Studios
Member Posts: 46
From: Oss, The Netherlands
Registered: Sep 2011
|
posted 08-29-2013 11:40 AM
LVM Studios has released a batted F1 engines detail kit for the Dragon Saturn V 1/72. |
keymichael1855
Member Posts: 176
From: Virginia Beach, VA, USA
Registered: Feb 2012
|
posted 03-17-2014 09:16 PM
After designing a 1:48 scale SLA for a friend of mine, I decided to scale it down, adapt it to fit the 1:72 Dragon kit/prebuilt, and add an equally detailed Instrument Unit. As many of you know, the Dragon SLA/IU is missing a lot of surface detail.Also, the upper part of the LES tower is missing a lot of surface detail as well on the Dragon. I have a 3D printed part that fits nicely on top and finished off the spacecraft end nicely. If you are interested in these parts to upgrade your Dragon kit or prebuilt, here is a link to the parts in my shop on Shapeways: Here is a link to the upper portion of the LES tower.Should you have any comments or questions, please let me know — I'm glad to help. Thanks! |
Docdrew
Member Posts: 25
From: Scottsdale, AZ
Registered: Aug 2013
|
posted 07-27-2014 05:44 PM
I'm having a difficult time getting the F-1s to attach to the base/heatshield. The knobs seem to be too big to fit into their respective holes. I would appreciate any help/ideas on how to accomplish this without breaking something. Thanks. |


