|
Author
|
Topic: Dragon Models 1:72 Saturn V rocket model
|
cycleroadie
Member Posts: 452
From: Apalachin, NY USA
Registered: May 2011
|
 posted 01-25-2012 06:02 PM
   
I picked up a Detolf for mine too, the model comes tomorrow. |
Oldbru
Member Posts: 26
From: Phoenix, AZ
Registered: Aug 2006
|
posted 01-25-2012 06:20 PM
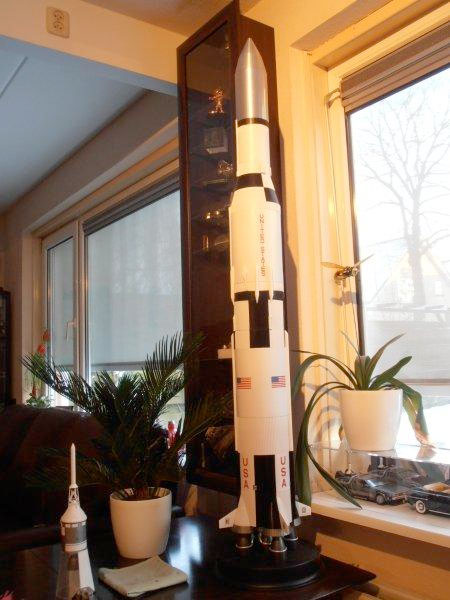
The base I used is about 3/4" thick. After painting, I drilled a hole for the aluminum tube that comes with the kit and used 5 minute epoxy to glue it to the base to make sure it is secure. Using that thickness of base, there is about a 1/4" space from the tip of the model to the inside of the case. As far as painting the fins, I used Scotch tape (the one with a matte finish) and put it over the letters on the fins. I used an Exacto knife, trimmed around the letters and peeled away the tape from the letters. I used Testors metallic silver in a spray can, sprayed the fins then peeled the tape off the letters. It worked out great with nice sharp edges where it was masked off. I used a brush and gun metal silver for the S-IVB rockets. |
GACspaceguy
Member Posts: 2501
From: Guyton, GA
Registered: Jan 2006
|
posted 01-26-2012 02:03 PM
That is a great display.If I can make a suggestion, replace the incandescent light with an LED (if you can find an LED that will work). What I found was the incandescent light produces a lot of heat that heats up the air at the top of the case. That heated air then finds a way out of the case and cooler air is drawn in, this recycling of air also brings with it airborne dust (not implying anything about the cleanliness of your house). That dust then settles out and you have to clean inside the case. With a LED light the temperature is reduced greatly, the circulation is reduced greatly and the dust accumulation is reduced greatly. Just words of experience that I wanted to pass along. The only issue is finding a LED replacement that fits your needs. |
garyd2831
Member Posts: 640
From: Syracuse, New York, USA
Registered: Oct 2009
|
posted 01-26-2012 02:40 PM
Just received my Saturn V. It has some foul spots in the painting, but I'm still please with my purchase. This would of cost around $1500 I'm guessing to have some professional model builder to construct out of wood with half the detail.I would probably suggest using a thicker gauge of plastic in the Saturn's first and second stages for longevity. This plastic does seem like it will become brittle over time. How hard would it be to construct a Skylab faring for the top of the S-IVB section? |
Oldbru
Member Posts: 26
From: Phoenix, AZ
Registered: Aug 2006
|
posted 01-26-2012 04:31 PM
Here is a pic showing the newly added LED lighting. Looks a lot better! (Thanks Fred!) I used the "Dioder" from Ikea. It has four LED strips which you can arrange in a square and comes with two-sided tape to mount them. I also put in a backdrop of black foam core board to make the model stand out more.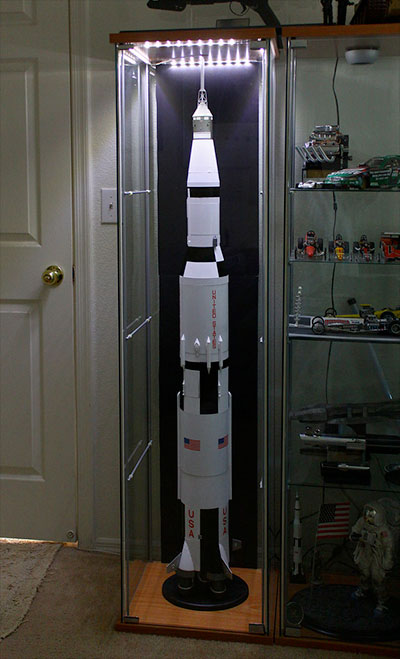 |
garyd2831
Member Posts: 640
From: Syracuse, New York, USA
Registered: Oct 2009
|
posted 01-26-2012 04:40 PM
SWEET  |
Kevmac
Member Posts: 267
From: College Station, TX
Registered: Apr 2003
|
posted 01-26-2012 05:27 PM
Ditto!!Just got mine today, too. I hate to be a copycat, but someday I want it to look like that too. Thanks again for raising the bar for the rest to us to aspire to. |
garyd2831
Member Posts: 640
From: Syracuse, New York, USA
Registered: Oct 2009
|
posted 01-26-2012 08:31 PM
I just solved NASA SLS's problem with my new and improved Saturn V. I quickly threw together the main part of the Saturn V and placed some 1/72 scale shuttle boosters I had laying around and set them up along side the mighty rocket.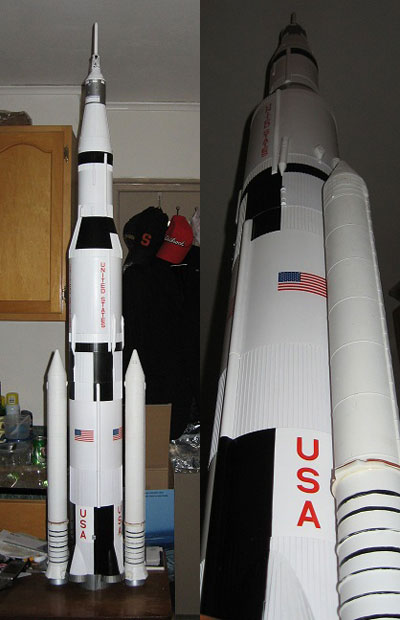 |
Jay Chladek
Member Posts: 2272
From: Bellevue, NE, USA
Registered: Aug 2007
|
posted 01-26-2012 09:38 PM
SWEET!!!!  I got a chance to look at one of these up close tonight. Indeed I find it tempting, but I want to wait for the kit. But, once I get that kit, I figure I will clear all my projects off and get it done as soon as possible the way I want it. By the way, those strip lights are a nice idea. I can also see putting a set or two down low near the base to light it up kind of like the xenon flood lights on the night before a launch. Still, the display idea is most cool. |
Daugherty54
Member Posts: 596
From: Cabot, Arkansas, USA
Registered: Sep 2010
|
posted 01-27-2012 08:04 PM
How long does assembly take? Mine was just delivered, and I want to get started but I have a home project involving paint and stain that will take most of the weekend. |
Oldbru
Member Posts: 26
From: Phoenix, AZ
Registered: Aug 2006
|
posted 01-28-2012 12:05 PM
It didn't take long to assemble, maybe under a half hour. I did glue the first stage engines on to make sure it was stable. |
Larry McGlynn
Member Posts: 1263
From: Boston, MA
Registered: Jul 2003
|
posted 01-28-2012 05:19 PM
Got mine in on Friday. Took about ten minutes to assemble. It is in the study and the ancient sacrificial offerings will begin at the base of this monster at midnight. |
Daugherty54
Member Posts: 596
From: Cabot, Arkansas, USA
Registered: Sep 2010
|
posted 01-28-2012 10:32 PM
For those who haven't received yours, this is a very easy assembly. I used a hobby knife to shave a bit of the opening for the fins and engines to fit on the first stage. I also used a touch of glue for the engines on the second stage to hold them in.My SLA and CSM are a bit loose so it would literally be a 5 minute job to replace with the Apollo 10. Like others there are a few paint issues but nothing that I can't live with. This is a massive display model, even though the detail is definitely weak. I don't regret the cost at all. |
garymilgrom
Member Posts: 1966
From: Atlanta, GA
Registered: Feb 2007
|
posted 02-01-2012 08:57 AM
Here's mine beside the 1/72 Monogram Shuttle stack. This is a beautiful Saturn V, in glorious scale at a great price.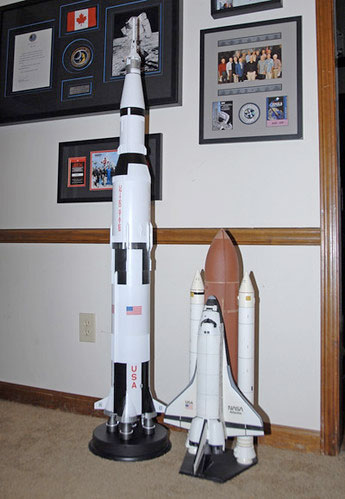 |
apolloprojeckt
Member Posts: 1452
From: Arnhem, Netherlands
Registered: Feb 2009
|
posted 02-01-2012 12:22 PM
Ah, it's done I see, and Gary was it easy to snap it together? |
garymilgrom
Member Posts: 1966
From: Atlanta, GA
Registered: Feb 2007
|
posted 02-01-2012 12:55 PM
The first stage engines were difficult to snap in until you rocked them back and forth so all of the part fit into the socket. Don't forget to do the center engine first.After all it's not every day you install a set of F-1 engines! The rest of the model was easy to snap together. It's not too sturdy, I would build it near where you're going to display it. Mine was delivered without the engines for the second stage but that doesn't matter to me or the way it's displayed. |
cycleroadie
Member Posts: 452
From: Apalachin, NY USA
Registered: May 2011
|
posted 02-01-2012 01:23 PM
Assembly: Like Gary said the 1st stage engines are tedious to get in, but you'll figure it out. The four fins also required a little working back and forth to get them flush. I put a dab of glue on the second stage engines as they were too easily dropped out, same with the SIVB engine. I'll post pics in a few days, working out my display stand and the case now. |
Robert Pearlman
Editor Posts: 43351
From: Houston, TX
Registered: Nov 1999
|
posted 02-01-2012 01:26 PM
quote:
Originally posted by garymilgrom:
Mine was delivered without the engines for the second stage but that doesn't matter to me or the way it's displayed.
If you contact Dragon Care, you should be able to receive the missing engines. |
glcanon
Member Posts: 12
From: Houston
Registered: Mar 2011
|
posted 02-01-2012 03:47 PM
My UPS guy didn't have any problems. Big box, but it's light. Frankly, I don't see why they're allowed to call it diecast which implies metal. But I understand using plastic keeps the price down, same with substituting a plastic CSM. After Gary said he didn't receive second stage engines, I opened mine to be safe (I'm in the process of relocating so it will go right back in the box). Where the halves are glued together, it will need some work. I guess the painters never could figure out a way to tape off the corrugated panels so there was no over-spray, you can see it baffled them. A detailer could spend weeks or more on this, but unless he builds a stand to display it in pieces, all his work will be invisible. Thus I'll be spending on time only on the exterior and F-1s. I think I'll eventually purchase several Ikea Detolf glass cases like Mike showed us; they match my existing Ikea cabinets which were discontinued; they're not the same height, but I can set them up on opposite sides of the room. I have the Bandai shuttle, but I'm doubtful Dragon would do anything so detailed. I have all the 1/72 scale shuttle kits but I've been waiting for someone to do one and save me the trouble. I'll wait two more years before I start. With a few exceptions, almost everything I have is 1/72 scale, so this works nicely. One day I'll get around to building my 1/72 B-1 and B-2 bombers, not sure how I'll display them though, wingspan issues. |
mode1charlie
Member Posts: 1176
From: Honolulu, HI
Registered: Sep 2010
|
posted 02-02-2012 01:52 AM
Just got mine. There is definitely an overspray issue (not terrible for anyone still trying to decide whether or not to get it, but it's there). One question. I haven't futzed around with it much as I don't have the space to display it at the moment, but as I will want to replace the CSM with the Apollo 10, I looked at the LM Adapter and ring above the IU to figure out where it should be separated. I gave it a cursory tug, but it appears to be glued in there pretty good. Any suggestions on how to separate those two without breaking something? Or am I alone in finding it tricky? The F-1s are alright but definitely could use a little more detail (maybe I'm just spoiled by the Accurate Models' 1:20 scale version). Anyone who can whip up some aftermarket details (any 3D printing whizzes out there?) would get a fair price from me - and I bet there are others... Overall, though, it's pretty good and I'm happy with it. |
garymilgrom
Member Posts: 1966
From: Atlanta, GA
Registered: Feb 2007
|
posted 02-02-2012 07:03 AM
I think this model is being unfairly criticized. I have some expensive (over $1,000) models from the best model makers, and they all have some flaws compared to the actual vehicles.The size of this model means you're going to view it from a fair distance. It looks great from 5 feet away — a Saturn V almost as tall as me, in my living room, for $220 including delivery? That's a fantastic value — white fins, overspray and all (I did not even notice the overspray issue on mine). |
glcanon
Member Posts: 12
From: Houston
Registered: Mar 2011
|
posted 02-02-2012 08:33 AM
quote:
Originally posted by mode1charlie:
Any suggestions on how to separate those two without breaking something?
Just stick 3 or 4 fingers in the smaller hole at top and rotate the assembly around as you gently pull 90 degrees from vertical plain. You'll hear popping. When it finally separates it will pop loose and surprise you. There were only three tiny spots holding it on, which looked more like paint spots than glue spots. Wouldn't surprise me if those three paint spots were all that was holding it together. From 5 to 6 feet away, it is hard to discern the flaws, so it passes the 5 foot rule. If you have it in a case, it will keep people back far enough not to notice most. |
GACspaceguy
Member Posts: 2501
From: Guyton, GA
Registered: Jan 2006
|
posted 02-02-2012 09:18 AM
quote:
Originally posted by garymilgrom:
It looks great from 5 feet away — a Saturn V almost as tall as me, in my living room, for $220 including delivery? That's a fantastic value — white fins, overspray and all (I did not even notice the overspray issue on mine).
I agree with Gary, for this price point it is a wonderful model. I find it strange that they did not mold the fins silver but as they came loose it is an easy fix. Well easy for me as Jackie is in the process of painting them and making new decals.
I have no over spray and try as I may, the SLA will not break loose. That is fine by me as I have other display plans rather than the Apollo 10 replacement. |
glcanon
Member Posts: 12
From: Houston
Registered: Mar 2011
|
posted 02-02-2012 07:03 PM
quote:
Originally posted by Oldbru:
Here is a pic showing the newly added LED lighting.
Would you be so kind as to advise the diameter of your wooden base, and the internal dimensions of the Ikea Detolf (not height, but glass to glass measurement, looks like around 15" inches). Thanks in advance!
|
Robert Pearlman
Editor Posts: 43351
From: Houston, TX
Registered: Nov 1999
|
posted 02-02-2012 09:11 PM
Interesting factoid: You can fit the boxes for almost all the other Dragon "Space Collection" models released to date in the shipping box for the 1:72 Saturn V. Here's a quick shot of assembled model... 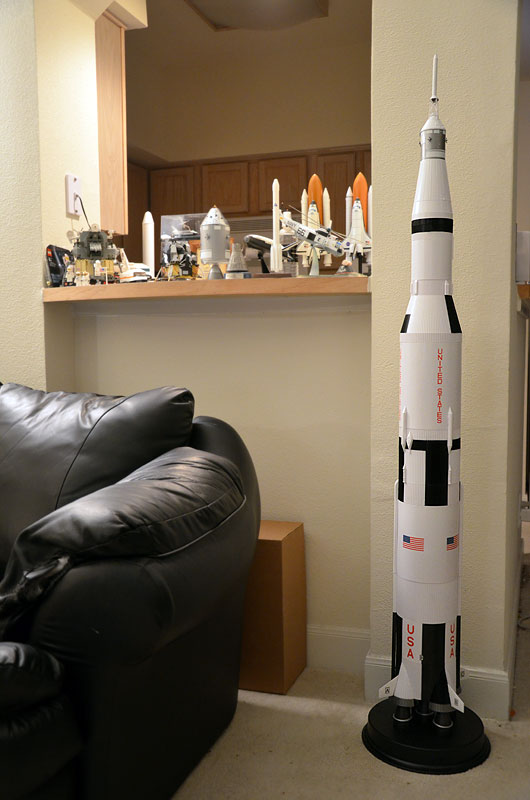 |
Oldbru
Member Posts: 26
From: Phoenix, AZ
Registered: Aug 2006
|
posted 02-02-2012 10:48 PM
quote:
Originally posted by glcanon:
Would you be so kind as to advise the diameter of your wooden base, and the internal dimensions of the Ikea Detolf (not height, but glass to glass measurement, looks like around 15" inches).
The case is 15 1/4" wide and 13 1/2" deep, glass to glass. My base I used is 10" wide, 3/4" thick. |
glcanon
Member Posts: 12
From: Houston
Registered: Mar 2011
|
posted 02-02-2012 11:53 PM
Is your base round or oval? This closeup of your base makes it kinda look oval. |
Oldbru
Member Posts: 26
From: Phoenix, AZ
Registered: Aug 2006
|
posted 02-03-2012 09:50 AM
The base is oval and measures about 7" front to back. |
apolloprojeckt
Member Posts: 1452
From: Arnhem, Netherlands
Registered: Feb 2009
|
posted 02-04-2012 10:11 AM
The cones for the Saturn V are ready for paint and than we have the Saturn V Skylab version.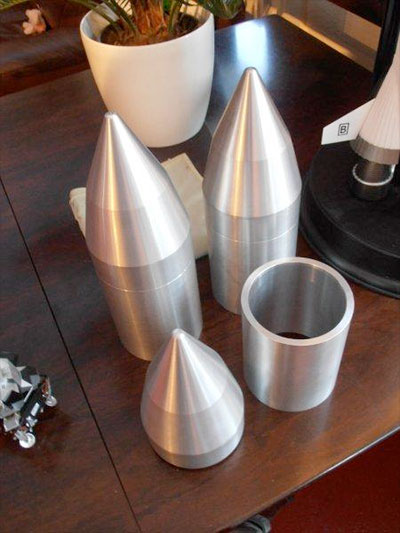 
|
tetrox
Member Posts: 142
From: London England
Registered: Jan 2008
|
posted 02-04-2012 12:58 PM
The shrouds look great, are they available to order from you? |
apolloprojeckt
Member Posts: 1452
From: Arnhem, Netherlands
Registered: Feb 2009
|
posted 02-04-2012 01:38 PM
I have sent you an email. For others, use the size of the shroud of the Saturn Skylab 1/144 kit from Airfix, go to a local CNC worker and let them make it. Let the CNC worker see the three stages of the 1/72 Saturn v for the right size adapter ring. It's below a little smaller. Normal cost for this work, material and CNC work is $60 to $90 dollars. The price for aluminum or plastic is almost the same I found out. |
Jay Chladek
Member Posts: 2272
From: Bellevue, NE, USA
Registered: Aug 2007
|
posted 02-04-2012 02:02 PM
I just hope that CNC'ed Skylab shroud doesn't fall off, because if it is as heavy as I think it is, it could flatten that Delorean diecast sitting behind it. |
apolloprojeckt
Member Posts: 1452
From: Arnhem, Netherlands
Registered: Feb 2009
|
posted 02-04-2012 02:39 PM
Jay, the aluminum shroud is 125 grams heavier than Dragon's 1/72 Apollo 10 CSM, LM and LES. |
cycleroadie
Member Posts: 452
From: Apalachin, NY USA
Registered: May 2011
|
posted 02-04-2012 03:15 PM
I did paint the fins stainless steel, they were easy since they came separate, I didn't do any other detailing as I haven't done any scale model work in many years.It's a good piece for the money I think, yes there are more details they could do, but unless you want to pay a lot more, I don't think you could expect it. |
Fexturbjet
Member Posts: 16
From: Trinity, FL, USA
Registered: Feb 2012
|
posted 02-07-2012 11:30 AM
Already bought two Detolf cases and the LEDs in anticipation of the delivery of my Saturn V. Also got a Dioder LED set of four low profile LED lights that I will install with the two sided stickies to the top of one of the cases.The fellow who got the idea for the Ikea cases, simply brilliant. This is going to be a standard for anybody showing off these rockets. Has anybody thought of using the hard paper LUT in this case as of yet or has anybody even built one of these LUTs? I am considering it if it is truly that detailed like some pictures show. Could be an issue based on the platform height. Any thoughts or input would be appreciated. |
the clocks running
Member Posts: 382
From: Rochester, NY
Registered: Jan 2012
|
posted 02-07-2012 11:03 PM
The newest addition to my collection from The Flying Mule. I had a great experience shopping with them! 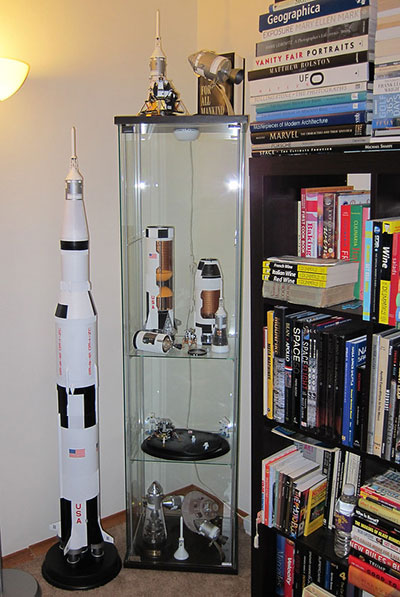 |
GACspaceguy
Member Posts: 2501
From: Guyton, GA
Registered: Jan 2006
|
posted 02-08-2012 06:54 PM
We have completed or display of this wonderful model. You can see it here. |
Fexturbjet
Member Posts: 16
From: Trinity, FL, USA
Registered: Feb 2012
|
posted 02-12-2012 06:11 PM
Got back home for the night between flights this week and the "big box" was there at home. Didn't have time to build it to final assembly but did mock assemble it. Was able to separate the CM adapter easily enough. Small amount of glue or maybe paint as mentioned is all that holds it together.Found the inner orange tank ends for two of the stages came loose but are easy enough to glue back (if there is a desire to display horizontally like the real thing). Seems to have all the engines included. Model does look cool and lets face it, who among you Saturn V lovers wouldn't want a 600 lb gorilla to show off? Given some of the inner details, makes me think of buying another for horizontal display. Detolf on either side and a mid level shelf to display another between the two horizontally is an idea. Got the four LED strips and the four pack Dioder low profile LED's. Like the idea of using them at an angle at the bottom to shine up to the rocket. Quick question for those guys who are swapping the top with the Apollo 10 CM/LM clear display: was that a model kit or a die cast version? Model number if you have it would be great. |
PeterO
Member Posts: 401
From: North Carolina
Registered: Mar 2002
|
posted 02-18-2012 08:04 AM
The Apollo 10 set is available both as catalog #50380 pre-built with diecast SM shell, and as catalog #11003 model kit with a plastic SM. The only differences are the shell of the SM, and the docking probe, which are plastic in the kit. Neither version has the S-band antenna, which I stole from my Apollo 7 diecast and modified to represent the stowed configuration. |
Cunumdrum61
Member Posts: 38
From: Australia
Registered: Jan 2012
|
posted 02-20-2012 12:10 PM
I have been doing some scale measuring of the Saturn V model and Dragon has got it incorrect with the SLA and the Instrument Unit. Those people that want to add the LEM to the kit would be advised to get the Dragon kit with the CSM and SLA without the black section at the bottom or remove it from the kit. This is in fact part of the Top Skirt which they included in their separate kit and used this by mistake I think. Dragon has made the error of including it in the kit which is incorrect as it is there molded in the third stage already supplied. The Saturn V measures out correctly with the extra piece removed. I have measured it against the official NASA dimensions of the Saturn V using the stations measurements as reference. What you will need to do is mask and paint the bottom section of the SLA black but do not paint the dog tooth hinge section, mask the top section to a straight line. I hope all this makes sense to someone and on a lighter note I cut down my base supplied in the kit and the Saturn V fits in the Ikea display case perfectly. No custom base required. Just measure 0.25 inch below the top and mask with 0.25 inch masking tape. Scribe the line until you cut through and then lightly sand the bottom level and you’re done. Photo enclosed. Hope this info helps someone out. More to come as I rework the kit. |