|
Author
|
Topic: FameMaster 4D Vision cutaway Saturn V model
|
Michael Ritter
Member Posts: 48
From: Long Island, NY USA
Registered: Dec 2007
|
 posted 10-26-2011 03:48 PM
   
At $176 I couldn't wait to get this piece ordered, even with the 1/72 behemoth coming out. Now if I could only find a Bandai Saturn V for a good price I would be set. |
Sam Que
Member Posts: 173
From: Chicago, IL, United States
Registered: Feb 2009
|
posted 10-26-2011 05:56 PM
Phil's Hobby Shop price is now at $263.99. Apparently their stock is being sold off. Glad I got mine at $218. |
John K. Rochester
Member Posts: 1292
From: Rochester, NY, USA
Registered: Mar 2002
|
posted 10-29-2011 08:02 AM
A few hints for you who are building the Saturn: - Put a dab of glue on the copper colored braces on the first stage engines or they will keep popping off all during the rest of the assembly.
- Put the clear pieces on before you assemble the stage halves, that way you can clean any fingerprints off of the inside before final assembly.
- Be very careful when placing the upper section of the service module to make sure the hole lines up for the little side piece that connects the service to the command module, once you get it in place it's a bear to move again.
- I painted the command module with Testor's chrome to give it a more authentic look.
Hope these have helped! |
Kevmac
Member Posts: 237
From: College Station, TX
Registered: Apr 2003
|
posted 10-30-2011 12:07 AM
I was passing thru the Orlando Airport Saturday and saw this model for $215 at the NASA gift shop in the main terminal. Probably the same price at the Kennedy Space Center gift shop. |
SpaceAholic
Member Posts: 4172
From: Sierra Vista, Arizona
Registered: Nov 1999
|
posted 11-03-2011 12:14 AM
I'm attempting to assemble the S-IC... The main S-IC structure was received in the box as a single piece vs. the assembly diagram which shows the S-IC main body prior to assembly as being split to allow installation of the tank domes. Anybody encounter a similar scenario and if so how did you manage to install the tank domes? Thanks. |
SpaceAholic
Member Posts: 4172
From: Sierra Vista, Arizona
Registered: Nov 1999
|
posted 11-03-2011 06:52 PM
Rephrasing the preceding question... on page 07 of the assembly instructions (S-IC), Parts 21 and 22 are shown as two separate halves. Is it necessary for the two halves of the first stage to be separated to install the tank domes, and if so how are the stage halves separated? |
Michael Ritter
Member Posts: 48
From: Long Island, NY USA
Registered: Dec 2007
|
posted 11-05-2011 04:53 PM
Received my Saturn V from Phil's Hobbyshop yesterday. I'm looking forward to putting this together. |
kosmo
Member Posts: 355
From:
Registered: Sep 2001
|
posted 11-05-2011 06:53 PM
quote:
Originally posted by SpaceAholic:
Is it necessary for the two halves of the first stage to be separated to install the tank domes, and if so how are the stage halves separated?
The top of the first stage has a solid 2" to 3" wide ring (alternating black and white markings) holding the two halves together. This needs to be gently removed before the two halves can be separated. Be patient when working the two halves apart, it takes some time, but they will come apart. Also as a note, the second stage is the same way and there is no part #46 (on page 9) it is already molded to the stage body. |
SpaceAholic
Member Posts: 4172
From: Sierra Vista, Arizona
Registered: Nov 1999
|
posted 11-05-2011 07:16 PM
Got it...thanks for getting me back on my way Kosmo! |
Ironman One
Member Posts: 70
From: Ormond Beach, FL USA
Registered: Sep 2011
|
posted 01-25-2012 12:18 PM
I purchased mine today at my hobby shop for a low $190. Nice kit, however I feel the display stand is a little large and distracting. The name plaque on the stand has more emphasis on on 4D Vision rather than the subject of the model itself. Also some pieces fit either to tight or to loose. Makes a good display model. |
the clocks running
Member Posts: 376
From: Rochester, NY
Registered: Jan 2012
|
posted 01-25-2012 10:25 PM
I love this model. It looks great in my display case. The IU (Instrument Unit) even detaches and includes good detail. |
the clocks running
Member Posts: 376
From: Rochester, NY
Registered: Jan 2012
|
posted 04-26-2012 01:56 PM
I made this modification to the Command Module using Bare-Metal Foil's Ultra Bright Chrome. The scale is a little off for the Mylar because the model is 1/100 scale. Enjoy!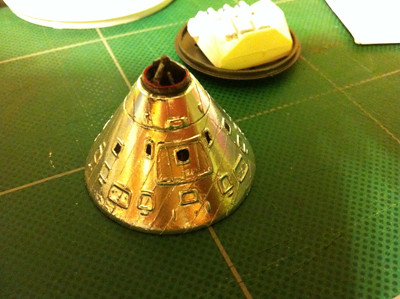 
|
apolloprojeckt
Member Posts: 1382
From: arnhem netherlands
Registered: Feb 2009
|
posted 04-26-2012 02:19 PM
That look much better and richer appearance. Well done!! |
the clocks running
Member Posts: 376
From: Rochester, NY
Registered: Jan 2012
|
posted 04-26-2012 02:33 PM
Thank you Pascal! This is the first time that I actually used Bare-Metal foil. I had to cut and place each individual strip to get an authentic appearance. It is far from perfect but demonstrates more of a realistic appearance for the CM. |
sev8n
Member Posts: 223
From: Dallas TX USA
Registered: Jul 2012
|
posted 03-26-2013 11:43 AM
I received notice today this model has been restocked and is available from a number of online outlets, including hobbylinc.com (no affiliation). |
cspg
Member Posts: 5920
From: Geneva, Switzerland
Registered: May 2006
|
posted 03-26-2013 03:45 PM
You can save almost $60 by buying at amazon.com v. hobbylinc... |
Docdrew
Member Posts: 19
From: Scottsdale, AZ
Registered: Aug 2013
|
posted 08-24-2013 07:37 PM
I recently started to build this model and have run into a problem. I've assembled the F-1 engines. They're supposed to be attached to a circular piece (part #8) that makes up the bottom of the first stage. Each engine has a peg (gimbal) and an oval part (interface panel) that fits into their respective holes on the circular piece. My problem is that the engines don't seem to fit properly in that they don't go in far enough to snap in or stay in place. I don't know whether the pegs are too thick or if I'm not pushing them in hard enough. I'm afraid to push any harder because I don't want to break an engine. I would appreciate any help with this situation. Thanks. |
the clocks running
Member Posts: 376
From: Rochester, NY
Registered: Jan 2012
|
posted 08-24-2013 10:18 PM
I found the same problem when assembling the F-1 engines. I gently used direct pressure and snapped the engines into place. The parts are properly built, however, they require more pressure than you would expect to align properly. Be careful and you will finish this step just fine. All the best!  |
Docdrew
Member Posts: 19
From: Scottsdale, AZ
Registered: Aug 2013
|
posted 08-25-2013 04:49 PM
Thanks for your response. I used a little Vaseline on the pegs per J. Rochester and, with a little more pressure, I got them in. |
the clocks running
Member Posts: 376
From: Rochester, NY
Registered: Jan 2012
|
posted 08-26-2013 05:58 AM
Glad you were able to install the F-1 engines. |
the clocks running
Member Posts: 376
From: Rochester, NY
Registered: Jan 2012
|
posted 08-27-2013 12:03 AM
Try my Bare-Metal Foil (Ultra Bright Chrome) trick on the Command Module. Take a look at the photos above. It is pretty easy! |
Docdrew
Member Posts: 19
From: Scottsdale, AZ
Registered: Aug 2013
|
posted 08-31-2013 09:22 PM
While working on the main body of the first stage I've discovered that the large clear piece has several long scratches on it. Is there a way to contact the company to request a replacement piece? Thanks. |
the clocks running
Member Posts: 376
From: Rochester, NY
Registered: Jan 2012
|
posted 09-01-2013 12:41 PM
I would contact the dealer that you purchased the item from or if Dragon is the US distributor for this brand you could also also contact them at Dragon Care ([email protected]). All the best! |
CaptSpry
Member Posts: 33
From: San Diego, CA
Registered: Feb 2012
|
posted 09-01-2013 06:34 PM
Try emailing [email protected]. I had a very successful outcome with the company ordering a replacement part of the 4D Space Shuttle - so I would think you should have no trouble getting the damaged part for your Saturn V, hopefully. It was delivered promptly too - very good service! |
CaptSpry
Member Posts: 33
From: San Diego, CA
Registered: Feb 2012
|
posted 09-01-2013 06:35 PM
Just so you know, this is not a Dragon product, you have to go through Fame Master. |
Docdrew
Member Posts: 19
From: Scottsdale, AZ
Registered: Aug 2013
|
posted 09-02-2013 01:46 PM
I went to Famemaster's web site and used the Enquiry function to send them a message. If I don't get a response I'll try the sales email. Thanks. |
the clocks running
Member Posts: 376
From: Rochester, NY
Registered: Jan 2012
|
posted 09-02-2013 07:35 PM
My mistake, I thought Dragon was the distributor in the US. I hope that you receive the replacement parts soon. |
BMckay
Member Posts: 2920
From: MA, USA
Registered: Sep 2002
|
posted 12-04-2013 06:07 AM
I have a 4D Saturn V Rocket, unassembled and missing some parts I think. Could be used for parts. Let me know if you are interested. |
Docdrew
Member Posts: 19
From: Scottsdale, AZ
Registered: Aug 2013
|
posted 12-21-2013 07:11 PM
Here's the story: - 9/5 -- received email reply
- 9/23 -- notified me that wrong part was sent to Famemaster
- 9/30 -- correct part mailed out (via turtle express)
- 11/21 -- received part; in much better condition than original part; several minor scratches which really can't be seen when in place on rocket
|
Docdrew
Member Posts: 19
From: Scottsdale, AZ
Registered: Aug 2013
|
posted 12-24-2013 06:59 PM
I need some help on assembly of the third stage.
When you place the J-2 engine with LOX tank into the bottom of the stage it seems like it doesn't fit or lock into any particular place, i.e. you can rotate it any way you want. Is this true or am I missing something?The top of the fuel tank (part 60) has two long stems (part 61) that extend downward toward the LOX tank. It is unclear if these need to be oriented in any particular way. When you place the top of the fuel tank into position the stems spread apart and slide along the side of the LOX tank. What are these, and should they be on the opposite side of the transparent window or the same side? Thank you. |
Planetary
Member Posts: 22
From: Huntington Beach, CA, USA
Registered: May 2013
|
posted 01-05-2014 08:32 PM
I don't know if it's been mentioned, but on the last run of this model, the inaccurate third stage exterior has been corrected so that the main body part is smooth, not the ribbed Stringers running the entire length of the stage. As seen in this photo, the Instrument Unit exterior is still wrong but it's not as egregious as issue as the whole stage having stringers like before. 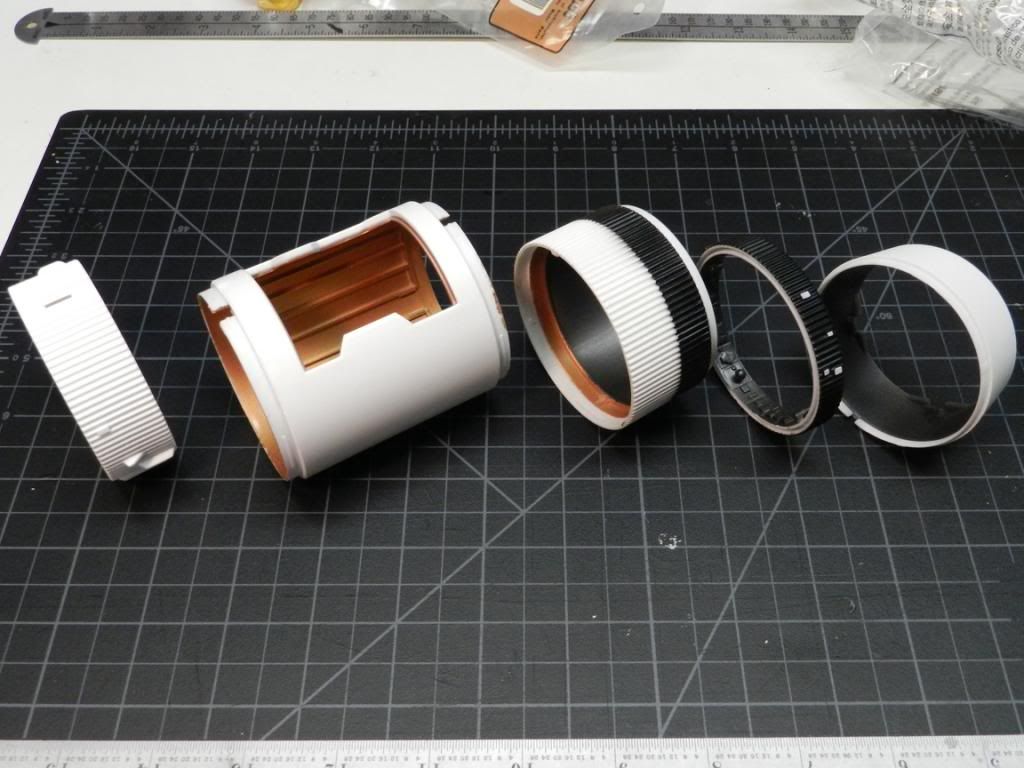 |
sev8n
Member Posts: 223
From: Dallas TX USA
Registered: Jul 2012
|
posted 01-07-2014 12:35 PM
quote:
Originally posted by Planetary:
I don't know if it's been mentioned, but on the last run of this model, the inaccurate third stage exterior has been corrected so that the main body part is smooth, not the ribbed Stringers running the entire length of the stage.
I wonder if FameMaster would offer this corrected part to owners of the earlier release? Alternatively, how hard would it be to remove the stringers from the original part and repaint? |
mike_nz
New Member Posts: 9
From: Canterbury, New Zealand
Registered: Jun 2012
|
posted 01-08-2014 02:07 AM
I contacted them regarding this as soon as I received the model and noticed the error. They issued a replacement part as soon as the new parts were produced. I was very impressed with their prompt service and handling of it all. I think the email address I used was [email protected]. This was back in Jan 2012. |
sev8n
Member Posts: 223
From: Dallas TX USA
Registered: Jul 2012
|
posted 01-09-2014 11:56 AM
Thanks Mike, I will try contacting them. |
Peter
Member Posts: 13
From: Milwaukee,WI
Registered: Aug 2001
|
posted 01-09-2014 09:27 PM
In case anyone is looking... I just got one for $113.74 from ModelCars.com (plus got another 5% off using a coupon found on their site).Shipping was not included in that price. |
jjknap
Member Posts: 254
From: Bourbonnais, IL USA
Registered: Apr 2011
|
posted 01-09-2014 10:43 PM
Thanks for the heads-up on the low price. I ordered one as well. |
Kal-El
New Member Posts: 8
From: Plainfield, Illinois 60544
Registered: Dec 2012
|
posted 01-10-2014 12:54 AM
Thanks for the info on the third stage. I need to check mine. I still have mine in the box. I did purchase mine around early 2012. |
cspg
Member Posts: 5920
From: Geneva, Switzerland
Registered: May 2006
|
posted 01-10-2014 02:23 PM
quote:
Originally posted by Peter:
In case anyone is looking... I just got one for $113.74 from ModelCars.com
Went to their website and ended up buying something else (and I really mean something else!) from another company via Amazon. You owe me $120.  |
Constellation One
Member Posts: 115
From: Lorain, Ohio, USA
Registered: Aug 2008
|
posted 01-11-2014 08:58 AM
I ordered on from modelcars last night. I've never used this company before. I hope they are legit.It seems their price is significantly lower than other places. I checked out shipped to Ohio for $120. I hope I didn't get scammed. |
Peter
Member Posts: 13
From: Milwaukee,WI
Registered: Aug 2001
|
posted 01-11-2014 05:11 PM
They are legit. I worried about the low price too. But it showed up this week and I'm currently building stage 2. Looks great. |


