|
Author
|
Topic: FameMaster 4D Vision cutaway Saturn V model
|
sev8n
Member Posts: 233
From: Dallas TX USA
Registered: Jul 2012
|
 posted 01-07-2014 12:35 PM
  
quote:
Originally posted by Planetary:
...the inaccurate third stage exterior has been corrected
I wonder if FameMaster would offer this corrected part to owners of the earlier release?Alternatively, how hard would it be to remove the stringers from the original part and repaint? |
mike_nz
Member Posts: 16
From: Canterbury, New Zealand
Registered: Jun 2012
|
posted 01-08-2014 02:07 AM
I contacted them regarding this as soon as I received the model and noticed the error. They issued a replacement part as soon as the new parts were produced. I was very impressed with their prompt service and handling of it all. I think the email address I used was [email protected]. This was back in Jan 2012. |
sev8n
Member Posts: 233
From: Dallas TX USA
Registered: Jul 2012
|
posted 01-09-2014 11:56 AM
Thanks Mike, I will try contacting them. |
Kal-El
New Member Posts: 8
From: Plainfield, Illinois 60544
Registered: Dec 2012
|
posted 01-10-2014 12:54 AM
Thanks for the info on the third stage. I need to check mine. I still have mine in the box. I did purchase mine around early 2012. |
tetrox
Member Posts: 142
From: London England
Registered: Jan 2008
|
posted 01-12-2014 12:34 PM

Peter I just ordered one from Modelcars like yourself, I was curious did yours arrive with the corrected third stage stringers? Many thanks. |
sev8n
Member Posts: 233
From: Dallas TX USA
Registered: Jul 2012
|
posted 01-17-2014 06:56 PM
quote:
Originally posted by Docdrew:
The top of the fuel tank (part 60) has two long stems (part 61) that extend downward toward the LOX tank. It is unclear if these need to be oriented in any particular way. When you place the top of the fuel tank into position the stems spread apart and slide along the side of the LOX tank. What are these, and should they be on the opposite side of the transparent window or the same side?
If I understand your question I believe these are supposed to represent the LH2 propellant utilization mass sensor and flight instrumentation probes, this according to the David Weeks drawings. The lower ends are close to the tank wall and the tops are slanted towards the center of the tank. The horizontal "legs" are braces that attach to the tank wall and support the vertical probe. As for the radial positions each is roughly opposite each vertical row of helium spheres. Unfortunately the entire third stage is incorrectly "clocked", I don't have my notes handy as to which way and how much it is off. |
Docdrew
Member Posts: 25
From: Scottsdale, AZ
Registered: Aug 2013
|
posted 01-25-2014 09:53 PM
I successfully completed this model today and am feeling pretty good about it since I haven't built a model in quite some time. Thanks to everyone who posted tips and answered my emails. A few comments:While it's nice that Fame Master includes educational information in the assembly guide, it would be even better if they would label more parts with their official name and/or function, e.g. parts 56 and 57 -- helium spheres, or part 61 -- instrumentation probe/fuel level sensor. I think that the way Fame Master designed the lunar module is incredible. It's amazing to see the finished product after assembling 33 small irregular pieces. After final assembly there are two things that are a little disappointing: 1) No matter how much I adjust the launch escape rocket I can't get it to look perfectly straight from all directions, and 2) The words on the label of the base/stand are slightly misaligned because the letters on the left half are slightly lower than the letters on the right half. |
the clocks running
Member Posts: 382
From: Rochester, NY
Registered: Jan 2012
|
posted 01-26-2014 12:37 PM
quote:
Originally posted by Docdrew:
No matter how much I adjust the launch escape rocket I can't get it to look perfectly straight from all directions.
I found that by placing the Launch Escape Tower on fairly loose that it maintained a straight line. Be careful not to apply very much pressure when installing or it will break. |
Planetary
Member Posts: 24
From: Huntington Beach, CA, USA
Registered: May 2013
|
posted 08-27-2014 06:28 PM
I had some free time last weekend so I spent a couple evenings putting together my 4D Apollo Saturn V display. I did some very basic modifications and re-painting, mostly to do with the Apollo spacecraft itself.I shaped and painted better windows on the CM and covered it with Bare Metal Chrome foil (as well as the aft end of the Service Module) and extensively repainted the LM as well as gold foiling the Descent Stage, all of which greatly adds to the overall look of the finished display with only a few hour's work. I also repainted the inside orange tank domes w/Testors Metalizer Aluminum and Magnesium for the three stages as well as the SII heatshield. I left the outside upper tank domes on the SI and SII stages orange. Also, I fixed the "clocking/alignment" issue with the SIVB stage in relation to the rest of the stack by cutting out new notches on the bottom of the stage. I considered and may yet do so adding detail to the otherwise blank Boost Protective Cover. The only unsolvable problem is that the LM cannot be properly oriented in it's shroud due to the space the attach points for the four panels take up inside. You pretty much have to turn the LM about 20 - 45 degrees for it to fit down in the shroud (the front of the LM should line up exactly with the back of the CSM). It really builds into a great, reasonably accurate display and with a minimal amount of custom work and painting, can be made to look even more outstanding... |
keymichael1855
Member Posts: 176
From: Virginia Beach, VA, USA
Registered: Feb 2012
|
posted 08-28-2014 09:00 AM
Wow, you have done some great modifications to make that model much more accurate — nice work! You mentioned about possibly adding some more detail to the smooth BPC. I don't know if it would interest you or not, but I have created a fully detailed BPC/LES at that scale that fits the CM perfectly.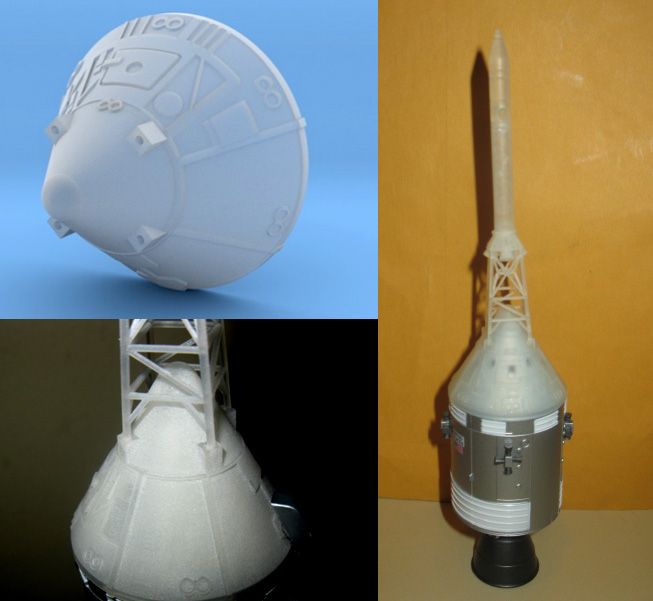 The link to the matching LES tower is in the description. Just let me know if you have any questions. Keep up the good work! |
Planetary
Member Posts: 24
From: Huntington Beach, CA, USA
Registered: May 2013
|
posted 10-25-2014 09:08 PM
Okay, so I finally got around to ordering and including "keymichael1855's" Shapeways 3D printed LES and BPC parts (ultra frosted detail, by the way). These were my very first 3D printed parts I've worked with so I went for something not only easy but if I screwed them up, not a big dent on the wallet. They are a *huge* upgrade over the featureless respective parts included with the FameMaster Saturn V. I have posted more detailed thoughts about the parts and working them in the dedicated Michael Key thread. But overall, I am very pleased with the product and will buy more 3D printed upgrade parts for my 1/96 and 1/72 Saturn kits in the near future. |
bdipaolo
Member Posts: 89
From:
Registered: Oct 2010
|
posted 10-29-2014 11:11 PM
Planetary, your work is great. But everyone should know that Michael Key created (with some small input from me) on Shapeways a perfect 3D print of the CM, BPC and LES in 1:100 for this model that is a light year or a million ahead improvement to an otherwise great model. Get yours and be at peace with the cosmos. |
keymichael1855
Member Posts: 176
From: Virginia Beach, VA, USA
Registered: Feb 2012
|
posted 10-30-2014 09:41 AM
Barrett, Planetary did give me "props" for the printed parts in his post. I think he just used my user name instead of my real name. And you didn't have "small input," it was LARGE input! After all, you were the one that gave me accurate dimensions and test fit the parts for me, allowing me to offer the parts to others. If I had to buy every kit to test fit parts, I'd be broke!!! So thanks to everyone out there (there are several) who have helped me with producing upgrade parts! |
NASA Glenn
Member Posts: 79
From: Cleveland OH
Registered: Feb 2007
|
posted 07-06-2018 02:00 PM
Does any have an instruction booklet for the Famemaster cutaway Saturn V that you would be willing to part with? |
Guswastheman
Member Posts: 85
From: Gresham, OR
Registered: Apr 2011
|
posted 07-06-2018 02:27 PM
Sent you an email.
|


