|
Author
|
Topic: FameMaster 4D Vision cutaway Saturn V model
|
Obviousman
Member Posts: 438
From: NSW, Australia
Registered: May 2005
|
 posted 11-06-2010 08:29 PM
   
Outstanding! That's a great display area. |
Obviousman
Member Posts: 438
From: NSW, Australia
Registered: May 2005
|
posted 11-07-2010 04:25 AM
I notice neither of you used the supplied base. Any particular reason? |
contra
Member Posts: 318
From: Kiel, Germany
Registered: Mar 2005
|
posted 11-07-2010 07:49 AM
I just think it looks better without it. The base is pretty much only a black plastic box and you put the rocket on top of it. Also the base does not support the model against tipping over in anyway. To make sure the model is safe I ordered a custom made display case. |
GACspaceguy
Member Posts: 2474
From: Guyton, GA
Registered: Jan 2006
|
posted 11-07-2010 04:49 PM
Simple answer, the base was too big for the curio we put it in. |
GoesTo11
Member Posts: 1309
From: Denver, CO
Registered: Jun 2004
|
posted 11-08-2010 10:25 PM
Did you have any assembly difficulties I should know about? |
Apolloman
Member Posts: 148
From: Ledignan, Gard (30), France
Registered: Mar 2009
|
posted 11-09-2010 04:18 PM
I have not had any problems at the general assembly except for the SLA (two parts white, colorless and two parts with notches). There is a certain sense to follow because the parties are already peer (the two white and two sets of even colorless). But how can I put in there with a pair one piece right and left. |
FireballXL5
Member Posts: 18
From: Marcy, NY, USA
Registered: Apr 2010
|
posted 11-15-2010 02:59 PM
Tranquility base here, the Eagle has landed!I have finally received my Saturn V a few days ago and began building it and ran into the normal problems that you guys have posted and was much less frustrating reading the posts! Two small minor glitches: the clear piece below the SLA adapter had stress cracks in it and I was also missing from the backside one small plastic strip! Called my hobby shop dealer and we opened up another kit. I took what I needed gave him the bad piece back. He made an RMA for the kit to go back. Anyone else have this problem? |
Obviousman
Member Posts: 438
From: NSW, Australia
Registered: May 2005
|
posted 11-16-2010 04:03 AM
Which part number was missing? The strip that was meant to be on the S-II stage? |
FireballXL5
Member Posts: 18
From: Marcy, NY, USA
Registered: Apr 2010
|
posted 11-16-2010 11:06 AM
Yes, I don't have the instruction manual as I forgot to get it back from the hobby shop and the one out of the new kit was warped and needed to be glued in place as it would not stay snapped in. Thanks for asking. |
Philip
Member Posts: 5952
From: Brussels, Belgium
Registered: Jan 2001
|
posted 11-30-2010 01:36 AM
How long did it take for a complete built? |
Robert Pearlman
Editor Posts: 42982
From: Houston, TX
Registered: Nov 1999
|
posted 12-12-2010 10:01 AM
FameMaster's 4D series are less model kits as they are construction toys. Think LEGO more than Revell, but with much more detailed snap together pieces.As a comparison, the target age group for the 4D Vision shuttle is 14+, whereas the target age for LEGO's recent Space Shuttle Adventure is 16+. |
Jake
Member Posts: 464
From: Issaquah, WA U.S.A.
Registered: Jun 2002
|
posted 12-15-2010 05:40 PM
Looks like these are real nice models...! |
cspg
Member Posts: 6210
From: Geneva, Switzerland
Registered: May 2006
|
posted 12-16-2010 09:32 AM
Wouldn't owners of this model have preferred that the Saturn was half painted on one side and see-through on the other? The see-through part looks sprayed paint and it doesn't look that nice. |
Obviousman
Member Posts: 438
From: NSW, Australia
Registered: May 2005
|
posted 12-17-2010 07:27 PM
No - it's quite good. Certainly better than anything I could produce. |
Kevin 61
New Member Posts: 5
From:
Registered: Nov 2010
|
posted 12-26-2010 01:56 PM
Construction was pretty straightforward and took me about an hour an a half. The instructions are not the best I've ever seen but I guess this is supposed to be a bit of a "puzzle" and if that is the intention then they were successful in making it so. I managed to figure it out and only had to deconstruct a couple of steps when I found out I had used the wrong part... fortunately I didn't glue anything. My only quibble with the kit as far as detailing goes is that the entire third stage has the corrugated texture molded in and, unless I'm misremembering things, the center portion should be smooth. that's kind of a major detailing screw up on what otherwise is a very nicely done model. Other than that it's very cool and will display nicely. I built about four of the Monogram 144th scale kits as a kid and none of them ever turned out as nicely as this one did (of course the fact that I'm 49 instead of 12 probably has a lot to do with that). I'm not quite sure why this thing is so expensive for what you actually get. I suppose they charge that amount for it simply because they know that the market will bear paying that much. I know I didn't really think twice about it. Anyway, I'm so glad to have this to display as I've wanted a big Saturn around the house for years and now I have one. |
ilbasso
Member Posts: 1522
From: Greensboro, NC USA
Registered: Feb 2006
|
posted 04-18-2011 04:12 PM
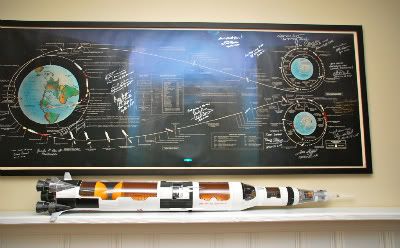
I've had mine since before Christmas, awaiting construction for the time when I had moved to my new house and had a place for this monster model.It went together pretty smoothly. I stood on the shoulders of giants, i.e., learned from the trials and tribulations of other cS'rs who assembled theirs earlier. For example, I used a couple drops of super glue to hold the LM plume deflectors in place. The "missing" part 46 on the S-II stage is in fact already attached to the side of the stage - it's one of the tunnels running along the stage. The piece will come off if you pull on it. My only misstep was not checking the alignment tab of the IU before putting the SLA panels in place - I had to pull them off and rotate the assembly 180 degrees. My model was missing the ascent engine for the LM, and one of the SLA panels had a broken tab that was supposed to hold it to the S-IVB stage. As noted in earlier posts, the paint isn't perfect (for example, the inside of one of the F-1 engines was not completely sprayed). But these are minor complaints. The model looks great, and it was certainly less work, with a better end product, than trying to get the Revell 1/96 Saturn V into good shape. I'm all about the instant gratification! I hope that Fame Master cranks these out again soon for everyone who didn't get one the first time around. I'll need to build some supports, but here's the model next to my 5-foot vintage poster!
 |
stsmithva
Member Posts: 1933
From: Fairfax, VA, USA
Registered: Feb 2007
|
posted 04-18-2011 11:19 PM
Great work, Jonathan! (Also, nice "giant shoulders" reference.) |
Gilbert
Member Posts: 1328
From: Carrollton, GA USA
Registered: Jan 2003
|
posted 04-19-2011 03:14 PM
Your poster and model combination would make a great Project Apollo display or exhibit in a museum. Super cool! |
GACspaceguy
Member Posts: 2474
From: Guyton, GA
Registered: Jan 2006
|
posted 10-23-2011 03:37 PM
My second Saturn V 4D has arrived and the plan for this one is to make it a Skylab version. We picked up an old 1/100 scale Skylab model from Lunar Legacies. It has no solar panels and some where in its life someone thought it a good idea to paint it all white, including the interior items. Our plan is to leave the inside the white paint color, paint the outside correct and add the nose fairing that is half transparent. That way the multiple docking adaptor and the ATM will be visible. |
John K. Rochester
Member Posts: 1292
From: Rochester, NY, USA
Registered: Mar 2002
|
posted 10-29-2011 08:02 AM
A few hints for you who are building the Saturn: - Put a dab of glue on the copper colored braces on the first stage engines or they will keep popping off all during the rest of the assembly.
- Put the clear pieces on before you assemble the stage halves, that way you can clean any fingerprints off of the inside before final assembly.
- Be very careful when placing the upper section of the service module to make sure the hole lines up for the little side piece that connects the service to the command module, once you get it in place it's a bear to move again.
- I painted the command module with Testor's chrome to give it a more authentic look.
Hope these have helped! |
SpaceAholic
Member Posts: 4437
From: Sierra Vista, Arizona
Registered: Nov 1999
|
posted 11-03-2011 12:14 AM
I'm attempting to assemble the S-IC... The main S-IC structure was received in the box as a single piece vs. the assembly diagram which shows the S-IC main body prior to assembly as being split to allow installation of the tank domes. Anybody encounter a similar scenario and if so how did you manage to install the tank domes? Thanks. |
SpaceAholic
Member Posts: 4437
From: Sierra Vista, Arizona
Registered: Nov 1999
|
posted 11-03-2011 06:52 PM
Rephrasing the preceding question... on page 07 of the assembly instructions (S-IC), Parts 21 and 22 are shown as two separate halves. Is it necessary for the two halves of the first stage to be separated to install the tank domes, and if so how are the stage halves separated? |
kosmo
Member Posts: 388
From:
Registered: Sep 2001
|
posted 11-05-2011 06:53 PM
The top of the first stage has a solid 2" to 3" wide ring (alternating black and white markings) holding the two halves together. This needs to be gently removed before the two halves can be separated. Be patient when working the two halves apart, it takes some time, but they will come apart. Also as a note, the second stage is the same way and there is no part #46 (on page 9) it is already molded to the stage body. |
SpaceAholic
Member Posts: 4437
From: Sierra Vista, Arizona
Registered: Nov 1999
|
posted 11-05-2011 07:16 PM
Got it...thanks for getting me back on my way Kosmo! |
Ironman One
Member Posts: 73
From: Ormond Beach, FL USA
Registered: Sep 2011
|
posted 01-25-2012 12:18 PM
I purchased mine today. Nice kit, however I feel the display stand is a little large and distracting. The name plaque on the stand has more emphasis on on 4D Vision rather than the subject of the model itself. Also some pieces fit either to tight or to loose. Makes a good display model. |
the clocks running
Member Posts: 382
From: Rochester, NY
Registered: Jan 2012
|
posted 01-25-2012 10:25 PM
I love this model. It looks great in my display case. The IU (Instrument Unit) even detaches and includes good detail. |
the clocks running
Member Posts: 382
From: Rochester, NY
Registered: Jan 2012
|
posted 04-26-2012 01:56 PM
I made this modification to the Command Module using Bare-Metal Foil's Ultra Bright Chrome. The scale is a little off for the Mylar because the model is 1/100 scale. Enjoy!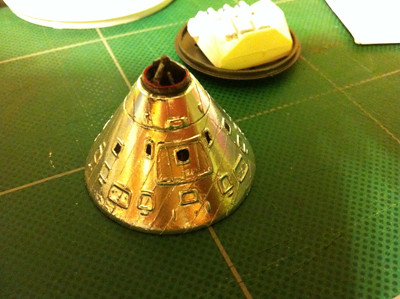 
|
apolloprojeckt
Member Posts: 1447
From: Arnhem, Netherlands
Registered: Feb 2009
|
posted 04-26-2012 02:19 PM
That look much better and richer appearance. Well done!! |
the clocks running
Member Posts: 382
From: Rochester, NY
Registered: Jan 2012
|
posted 04-26-2012 02:33 PM
Thank you Pascal! This is the first time that I actually used Bare-Metal foil. I had to cut and place each individual strip to get an authentic appearance. It is far from perfect but demonstrates more of a realistic appearance for the CM. |
Docdrew
Member Posts: 25
From: Scottsdale, AZ
Registered: Aug 2013
|
posted 08-24-2013 07:37 PM
I recently started to build this model and have run into a problem. I've assembled the F-1 engines. They're supposed to be attached to a circular piece (part #8) that makes up the bottom of the first stage. Each engine has a peg (gimbal) and an oval part (interface panel) that fits into their respective holes on the circular piece. My problem is that the engines don't seem to fit properly in that they don't go in far enough to snap in or stay in place. I don't know whether the pegs are too thick or if I'm not pushing them in hard enough. I'm afraid to push any harder because I don't want to break an engine. I would appreciate any help with this situation. Thanks. |
the clocks running
Member Posts: 382
From: Rochester, NY
Registered: Jan 2012
|
posted 08-24-2013 10:18 PM
I found the same problem when assembling the F-1 engines. I gently used direct pressure and snapped the engines into place. The parts are properly built, however, they require more pressure than you would expect to align properly. Be careful and you will finish this step just fine. All the best!  |
Docdrew
Member Posts: 25
From: Scottsdale, AZ
Registered: Aug 2013
|
posted 08-25-2013 04:49 PM
Thanks for your response. I used a little Vaseline on the pegs per J. Rochester and, with a little more pressure, I got them in. |
the clocks running
Member Posts: 382
From: Rochester, NY
Registered: Jan 2012
|
posted 08-26-2013 05:58 AM
Glad you were able to install the F-1 engines.Try my Bare-Metal Foil (Ultra Bright Chrome) trick on the Command Module. Take a look at the photos above. It is pretty easy! |
Docdrew
Member Posts: 25
From: Scottsdale, AZ
Registered: Aug 2013
|
posted 08-31-2013 09:22 PM
While working on the main body of the first stage I've discovered that the large clear piece has several long scratches on it. Is there a way to contact the company to request a replacement piece? Thanks. |
the clocks running
Member Posts: 382
From: Rochester, NY
Registered: Jan 2012
|
posted 09-01-2013 12:41 PM
I would contact the dealer that you purchased the item from. |
CaptSpry
Member Posts: 33
From: San Diego, CA
Registered: Feb 2012
|
posted 09-01-2013 06:34 PM
Try emailing [email protected]. I had a very successful outcome with the company ordering a replacement part of the 4D Space Shuttle - so I would think you should have no trouble getting the damaged part for your Saturn V, hopefully. It was delivered promptly too - very good service! |
Docdrew
Member Posts: 25
From: Scottsdale, AZ
Registered: Aug 2013
|
posted 09-02-2013 01:46 PM
I went to Famemaster's website and used the enquiry function to send them a message. If I don't get a response I'll try the sales email. Thanks. |
Docdrew
Member Posts: 25
From: Scottsdale, AZ
Registered: Aug 2013
|
posted 12-21-2013 07:11 PM
Here's the story: - 9/5 -- received email reply
- 9/23 -- notified me that wrong part was sent to Famemaster
- 9/30 -- correct part mailed out (via turtle express)
- 11/21 -- received part; in much better condition than original part; several minor scratches which really can't be seen when in place on rocket
|
Docdrew
Member Posts: 25
From: Scottsdale, AZ
Registered: Aug 2013
|
posted 12-24-2013 06:59 PM
I need some help on assembly of the third stage.
When you place the J-2 engine with LOX tank into the bottom of the stage it seems like it doesn't fit or lock into any particular place, i.e. you can rotate it any way you want. Is this true or am I missing something?The top of the fuel tank (part 60) has two long stems (part 61) that extend downward toward the LOX tank. It is unclear if these need to be oriented in any particular way. When you place the top of the fuel tank into position the stems spread apart and slide along the side of the LOX tank. What are these, and should they be on the opposite side of the transparent window or the same side? Thank you. |
Planetary
Member Posts: 24
From: Huntington Beach, CA, USA
Registered: May 2013
|
posted 01-05-2014 08:32 PM
I don't know if it's been mentioned, but on the last run of this model, the inaccurate third stage exterior has been corrected so that the main body part is smooth, not the ribbed Stringers running the entire length of the stage. As seen in this photo, the Instrument Unit exterior is still wrong but it's not as egregious as issue as the whole stage having stringers like before. 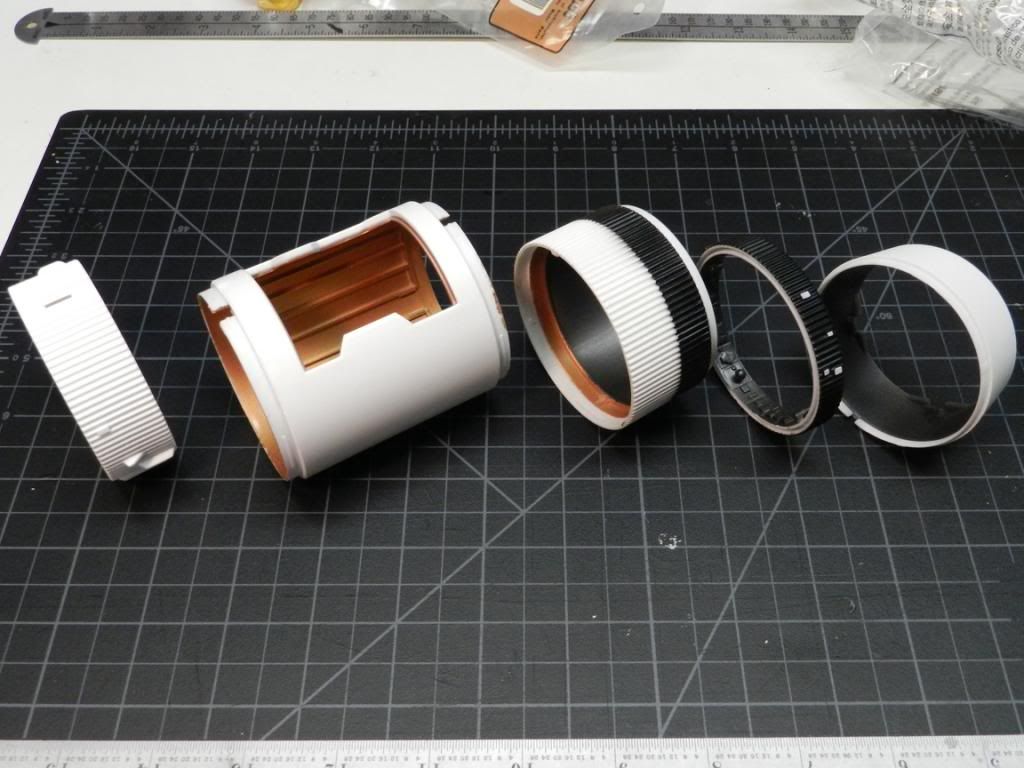 |


