|
Author
|
Topic: Michael Key's 3D printed models, dioramas
|
keymichael1855
Member Posts: 176
From: Virginia Beach, VA, USA
Registered: Feb 2012
|
 posted 06-26-2013 02:48 PM
   
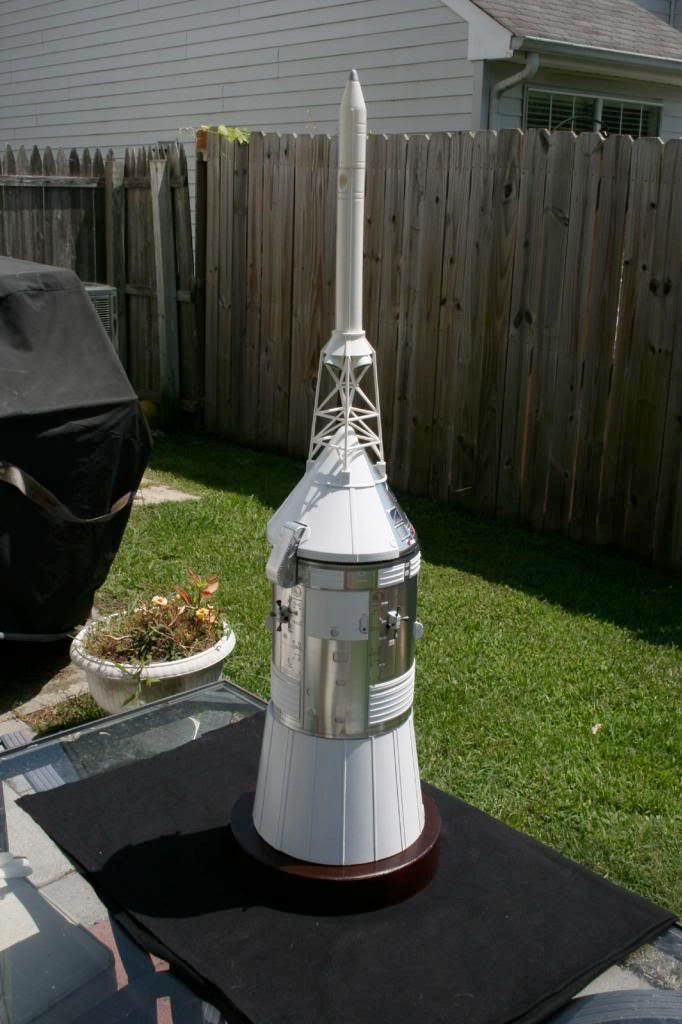
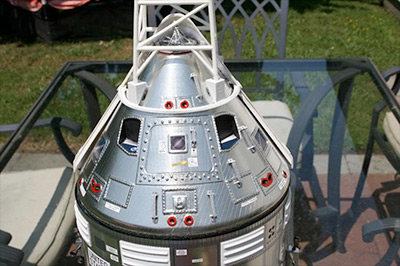
I've provided a lot of 3D printed models for several members here on cS, but I also do a little building myself. I've always admired the work of everyone here on the forum, and have been waiting for the right model project of my own to take the plunge and post pictures. So, here it is! It is a 1:24 Scale Apollo CSM/BPC/LES/SLA display in launch configuration. It is made from a combination of materials. I started with my own 3D printed models, and added in some scratch built components out of more traditional materials as well. I was able to traditionally print a 2D map of the SM skin onto a metallic plastic to achieve the realistic metal finish. I could type 3 or 4 pages explaining the build from concept to completion, but I think I'll just let the pictures do the talking. If you have any questions or comments, please let me know. I want to give a special thanks to Steve Nichols for the beautiful Bare Metal Foil job. It really finished off the project beautifully, and that was way beyond my capabilities! If you would like to see more pictures, you can see them here. 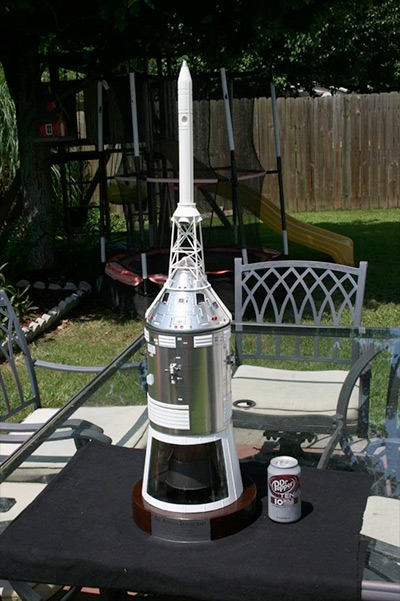 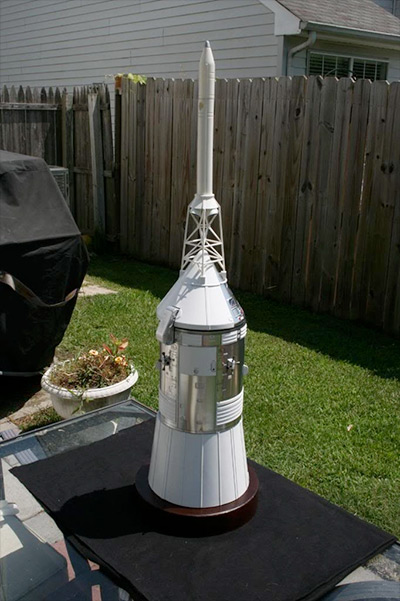

|
Norman.King
Member Posts: 375
From: Herne Bay, Kent, UK
Registered: Feb 2010
|
posted 06-26-2013 03:24 PM
Absolutely beautiful, wonderful detail - superb! |
Skyforce1
Member Posts: 200
From: Vineland NJ, USA
Registered: Aug 2009
|
posted 06-26-2013 04:50 PM
WOW!! |
apolloprojeckt
Member Posts: 1447
From: Arnhem, Netherlands
Registered: Feb 2009
|
posted 06-26-2013 04:58 PM
Looks great!!!
|
Retro Rocket
Member Posts: 445
From: Santa Paula, Ca,. USA
Registered: Dec 2007
|
posted 06-26-2013 05:13 PM
Looks fantastic!! 3D is really the way to go. Were these printed by Shapeways? What material? I'm waiting for my first parts from them, I tried one in stainless steel. |
mode1charlie
Member Posts: 1169
From: Honolulu, HI
Registered: Sep 2010
|
posted 06-26-2013 05:31 PM
Nicely done! |
Retro Rocket
Member Posts: 445
From: Santa Paula, Ca,. USA
Registered: Dec 2007
|
posted 06-26-2013 06:30 PM
Here's the big question. Will you do a LEM?How much to have all that printed? It's really a great model, do you think producing a few of these would be possible? |
history in miniature
Member Posts: 600
From: Slatington, PA
Registered: Mar 2009
|
posted 06-26-2013 06:45 PM
Michael she looks great, thanks for allowing me to be a part of the build. — Steve |
keymichael1855
Member Posts: 176
From: Virginia Beach, VA, USA
Registered: Feb 2012
|
posted 06-27-2013 10:21 AM
Thanks for the kind words everyone — it is truly impressive in person and I am very proud of her! And Steve thank you for the finishing touch on the CM BMF — at this scale it would've looked incomplete without it!RR, you are correct in guessing that the printed parts came from Shapeways. I have been 100% satisfied by the quality of the 3D prints as well as the customer service — I highly recommend them! As for printed materials, I used a little bit of each. The large components (structural shell, CM, and LES portions are all White, Strong, and Flexible (their 2nd cheapest material). Some of the other medium sized pars (engine, radiator panels) are the WSF polished. This is my favorite material because of the price and the ease of smoothing it for painting. Some of the other smaller parts (Umbilical, RCS engines, fins, HGA components, docking mechanism) are in either Frosted Detail or Frosted Ultra Detail. The bulkhead is actually printed in their cheapest material, Full Color Sandstone using a color image that I created in Photoshop. I've never tried their stainless material. At this scale, the only thing that would be affordable in that material are the handles! The cost of the materials for this build isn't for the squeamish — it was about $1K. 3D printing cost is all about volume, and these models are big! RR, absolutely, producing more of these is definitely possible. Everything for the build is available. Or, if you would like one fully built, just let me know and I can make that happen too. Lastly, regarding a LM... I won't rule it out, but the LM is a difficult model to produce because of all of the crazy shapes and angles of the ascent stage. Something to keep on the backburner though. Thanks! |
FlyAndFight
Member Posts: 16
From: Miami, FL
Registered: Jun 2013
|
posted 07-02-2013 08:40 PM
Hello Michael! What a beautiful work of art! |
mode1charlie
Member Posts: 1169
From: Honolulu, HI
Registered: Sep 2010
|
posted 07-03-2013 06:41 AM
Very impressive! |
spacerace776
Member Posts: 21
From: manchester uk
Registered: Feb 2013
|
posted 07-03-2013 08:35 AM
Outstanding work, well done Steve. Keep the great work up. |
garymilgrom
Member Posts: 1966
From: Atlanta, GA
Registered: Feb 2007
|
posted 07-03-2013 12:05 PM
The cutaway BPC is a superb idea. The entire model is wonderful. Kudos! |
the clocks running
Member Posts: 382
From: Rochester, NY
Registered: Jan 2012
|
posted 07-03-2013 12:10 PM
Wow that's big! Awesome model of the Apollo spacecraft. |
Meademan
Member Posts: 24
From: Gatwick, West Sussex, UK
Registered: Oct 2012
|
posted 07-08-2013 05:48 PM
I knew Michael had this going as a project some time ago, and hats off to him on this one. It's a fantastic model and I'm lucky enough to say that I'm now the proud owner of it.An Apollo Service Module worthy enough to complement the same scale Command Module, BPC and LES tower assembly Michael already offers through his Shapeways shop. I have followed the build of this closely and Michael has been really good at keeping me informed on what he was thinking and how he was going to achieve it, and I have to say the final result he has created is nothing
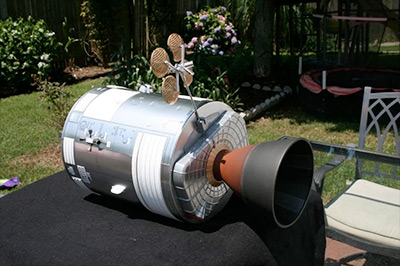
short of incredible. He's overcome some really difficult technical challenges to make this as good as it is. The SM skinning is a work of art in itself, duplicating the exterior detailing and reflective qualities found on the real thing perfectly. It's fantastic. It looks like it really has been assembled in the same plant as the real moon going vehicles, just scaled down. I could write a lot about what I know Michael put into this model to make it happen but here are a few items that stand out for me... The cutaway BPC was a great idea and still allows the launch configuration to be shown with the LES tower whilst allowing the beautifully Mylar skinned CM by Steve Nichols, (thank you Steve), to still be visible. The photo detailed bulkhead that sits below the CM heat-shield is a really nice touch, as is the cutaway window in the SLA, allowing the engine bell to be viewed along with the HGA in its launch configuration, something I don't think anyone will have ever seen before either modelled or for real?! Michael also had the idea to put a photo etched mirror inside the base of the SLA depicting the top down view of the LEM housed inside the top of the S-IVB. How clever is that? This is an exceptional model by anyone's standards. It's the only 1/24 model of the Saturn V available and look what you get for the money. Essentially the top third of the S-IVB upwards. The entire elegant and purposeful end of the Apollo Saturn V stack built to a scale which is imposing and detailed to perfection. When I first saw it I even suggested he call the Director of NASA because this model really should be on his office desk, its that good! Michael worked tirelessly on this design from all of his own CAD work, thinking problems through, a bit of trial and error, having all the parts manufactured and finally finding a way to assemble it so that anyone can now
build one of these with basic modelling skills. The parts are available on a piece by piece basis so the kit can be built up and assembled as funds permit, and what a great model you'll have by the end of it. I already know
a number of people who have made a start on theirs and so before long I'd expect to see more pics of these popping up on here. Once I get it in place in my collection I will add some more pics.
|
bdipaolo
Member Posts: 89
From:
Registered: Oct 2010
|
posted 07-08-2013 06:14 PM
Can someone explain how the "print a 2D map of the SM skin onto a metallic plastic" works? It is really fantastic. |
keymichael1855
Member Posts: 176
From: Virginia Beach, VA, USA
Registered: Feb 2012
|
posted 07-09-2013 08:29 PM
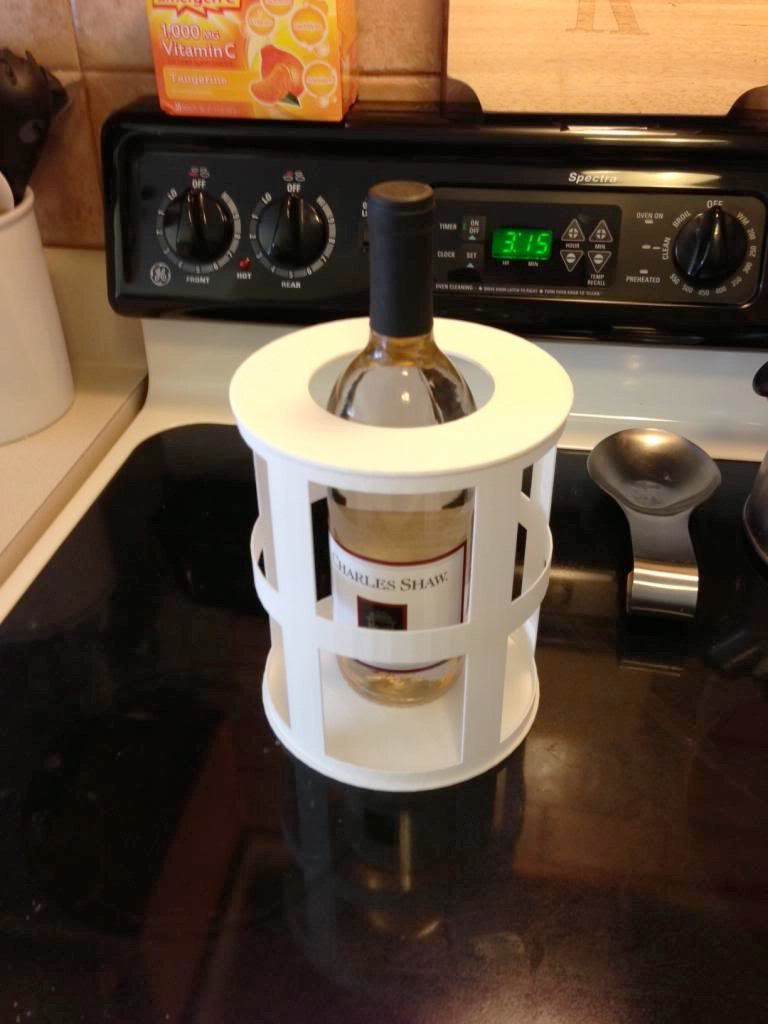
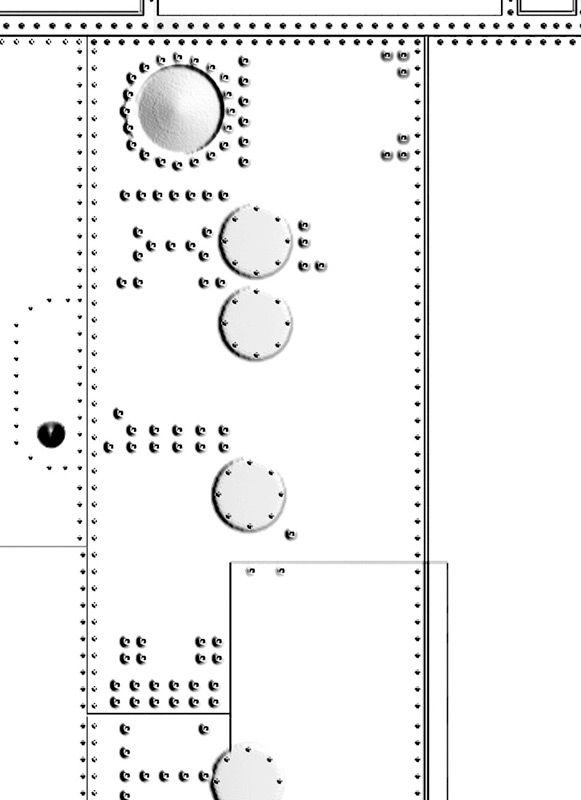
Mike, thanks for the nice write up on the CSM. I hope that it arrives safely, and please do post some pics of it in your collection. It surely has come a long way since this: When I first sent Mike pictures of the printed parts after they arrived, he warned me to keep it out of the kitchen so that my wife wouldn't think the structural shell was a wine chiller — hence the wine bottle pic! Barrett, as for the metal skin printing, here is a crash course. The printer that the skin is printed on is large flatbed printer that is capable of printing on just about any surface. As with most printers, it doesn't print white. So, when a black and white image is printed on a surface, the blacks and grays print normally, but the whites are seen by the printer as transparent and allow the metal to show. So, the image of the SM that I created has all of the panel lines and details in black, and the rest is white. This is a small portion of the image:  When it is printed on the metal surface, here is how it looks: 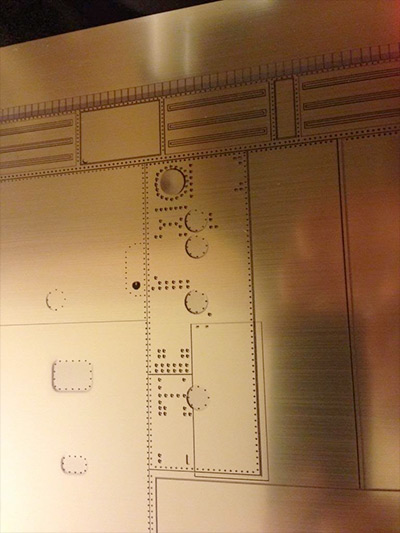 Hopefully that makes sense. If you have any questions, please let me know. |
bdipaolo
Member Posts: 89
From:
Registered: Oct 2010
|
posted 07-10-2013 05:00 PM
Simply amazing. |
keymichael1855
Member Posts: 176
From: Virginia Beach, VA, USA
Registered: Feb 2012
|
posted 08-07-2013 04:11 PM
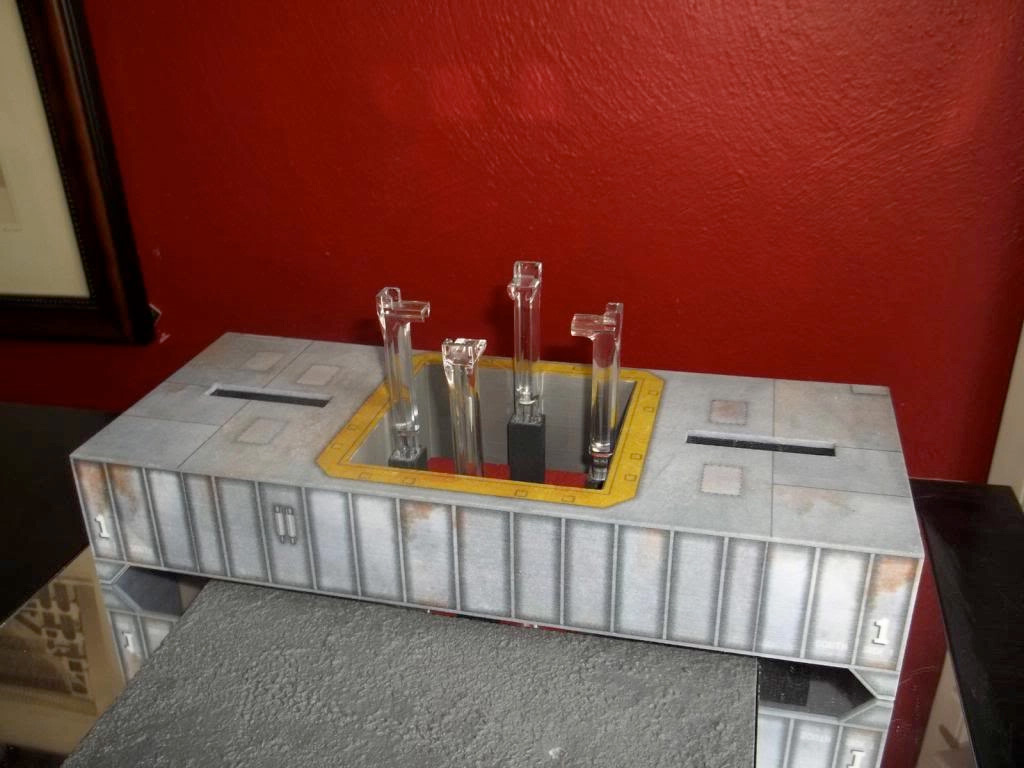
Many of you have ordered my LUT background and MLP kit for the Dragon 1:72 Saturn V seen here:Hopefully you are all enjoying them! I've had several people ask if I had anything similar in 1:144 scale for the Bandai SV. The LUT printed background is a definite yes, so just let me know if you would like one. I have an MLP solution as well. Here it is: 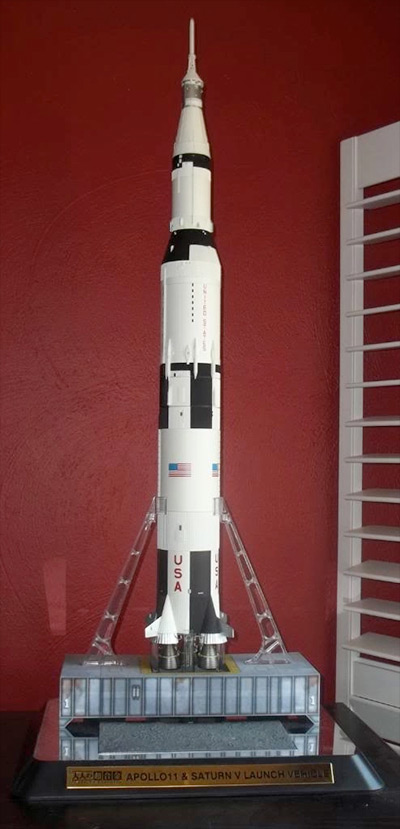 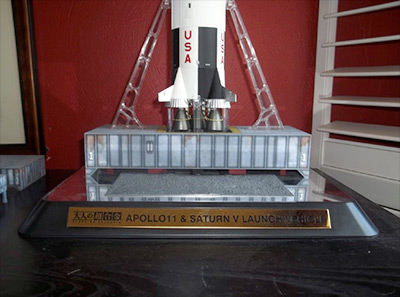


While this is much more expensive than the 72 scale "kit," this 3D printed concept has been designed to fit perfectly within the existing Bandai stand. As you will see, the MLP has pegs that fit into the Bandai mirror base. In addition, the clear acrylic supports all fit into the MLP, allowing the structural integrity to be maintained as Bandai intended. There is no assembly required. Just take it out of the box, insert the clear supports, insert your SV, and display! If anyone is interested, please let me know. Thanks! |
keymichael1855
Member Posts: 176
From: Virginia Beach, VA, USA
Registered: Feb 2012
|
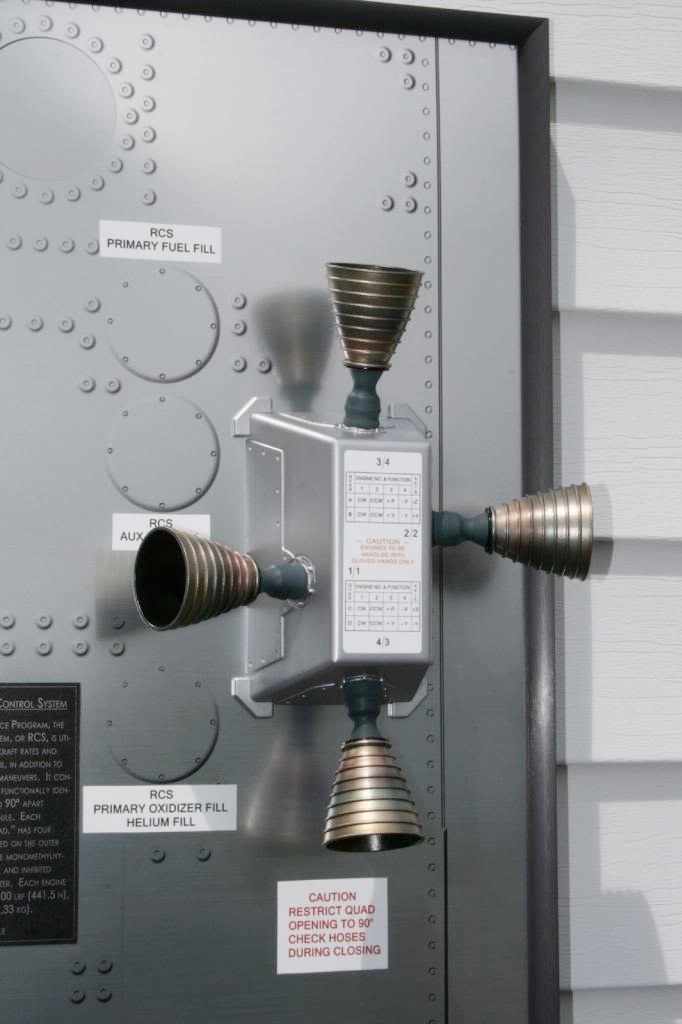
posted 09-15-2013 09:40 PM
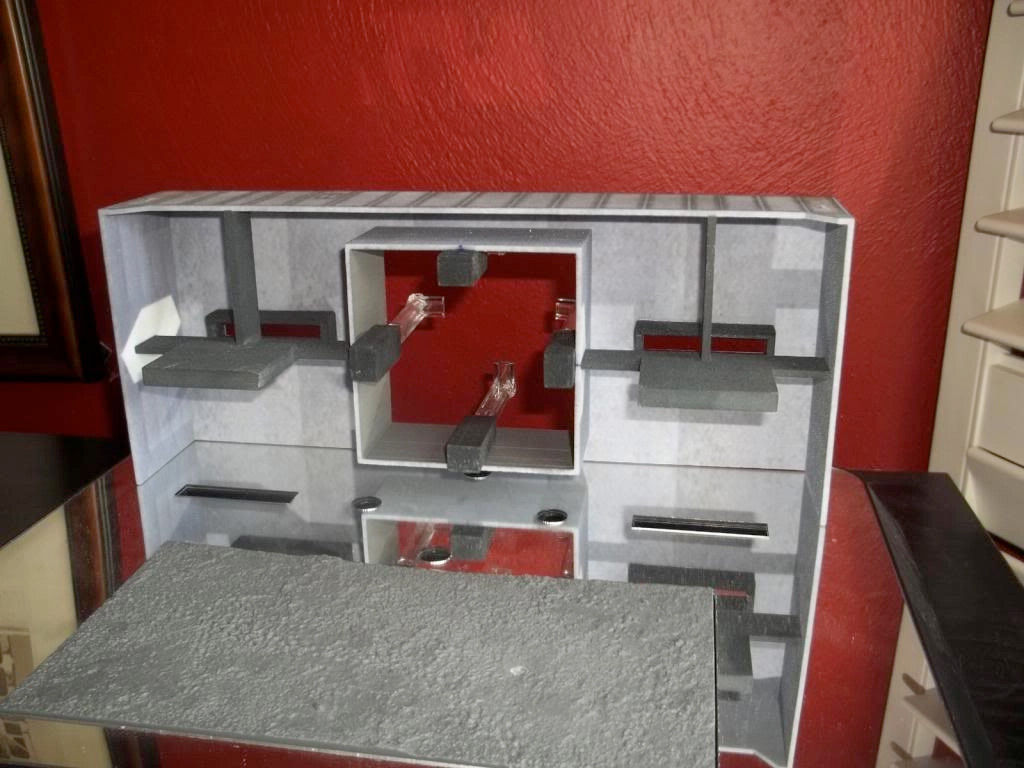
I know that Pascal has done several versions of the RCS using some of my 3D printed models, but I wanted to show you my interpretation. Pascal produced a 1:2 full quad, but this one is slightly smaller at 1:3 scale. The overall size of the display is about 15" X 23".The housing and engines are 3D printed models, and the background is the same metallic skin that I used for the 1:24 CSM. I created the image for it in a photo program and it was traditionally printed onto the surface. 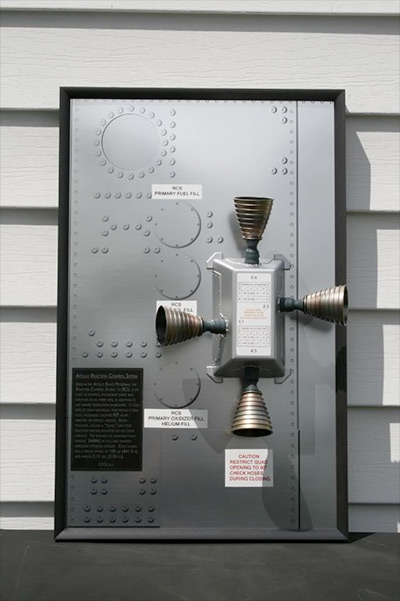 
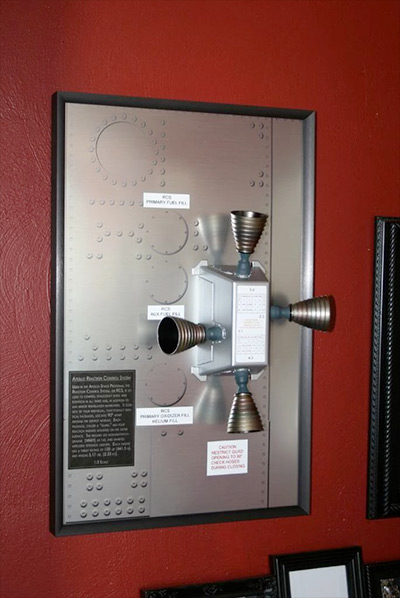
Let me know what you think. |
apolloprojeckt
Member Posts: 1447
From: Arnhem, Netherlands
Registered: Feb 2009
|
posted 09-16-2013 12:43 AM
Very nice Michael!!!! |
mode1charlie
Member Posts: 1169
From: Honolulu, HI
Registered: Sep 2010
|
posted 09-16-2013 03:38 AM
Wow, nicely done! |
GACspaceguy
Member Posts: 2474
From: Guyton, GA
Registered: Jan 2006
|
posted 09-16-2013 04:25 AM
Fantastic work! |
SpaceAholic
Member Posts: 4437
From: Sierra Vista, Arizona
Registered: Nov 1999
|
posted 09-16-2013 05:08 AM
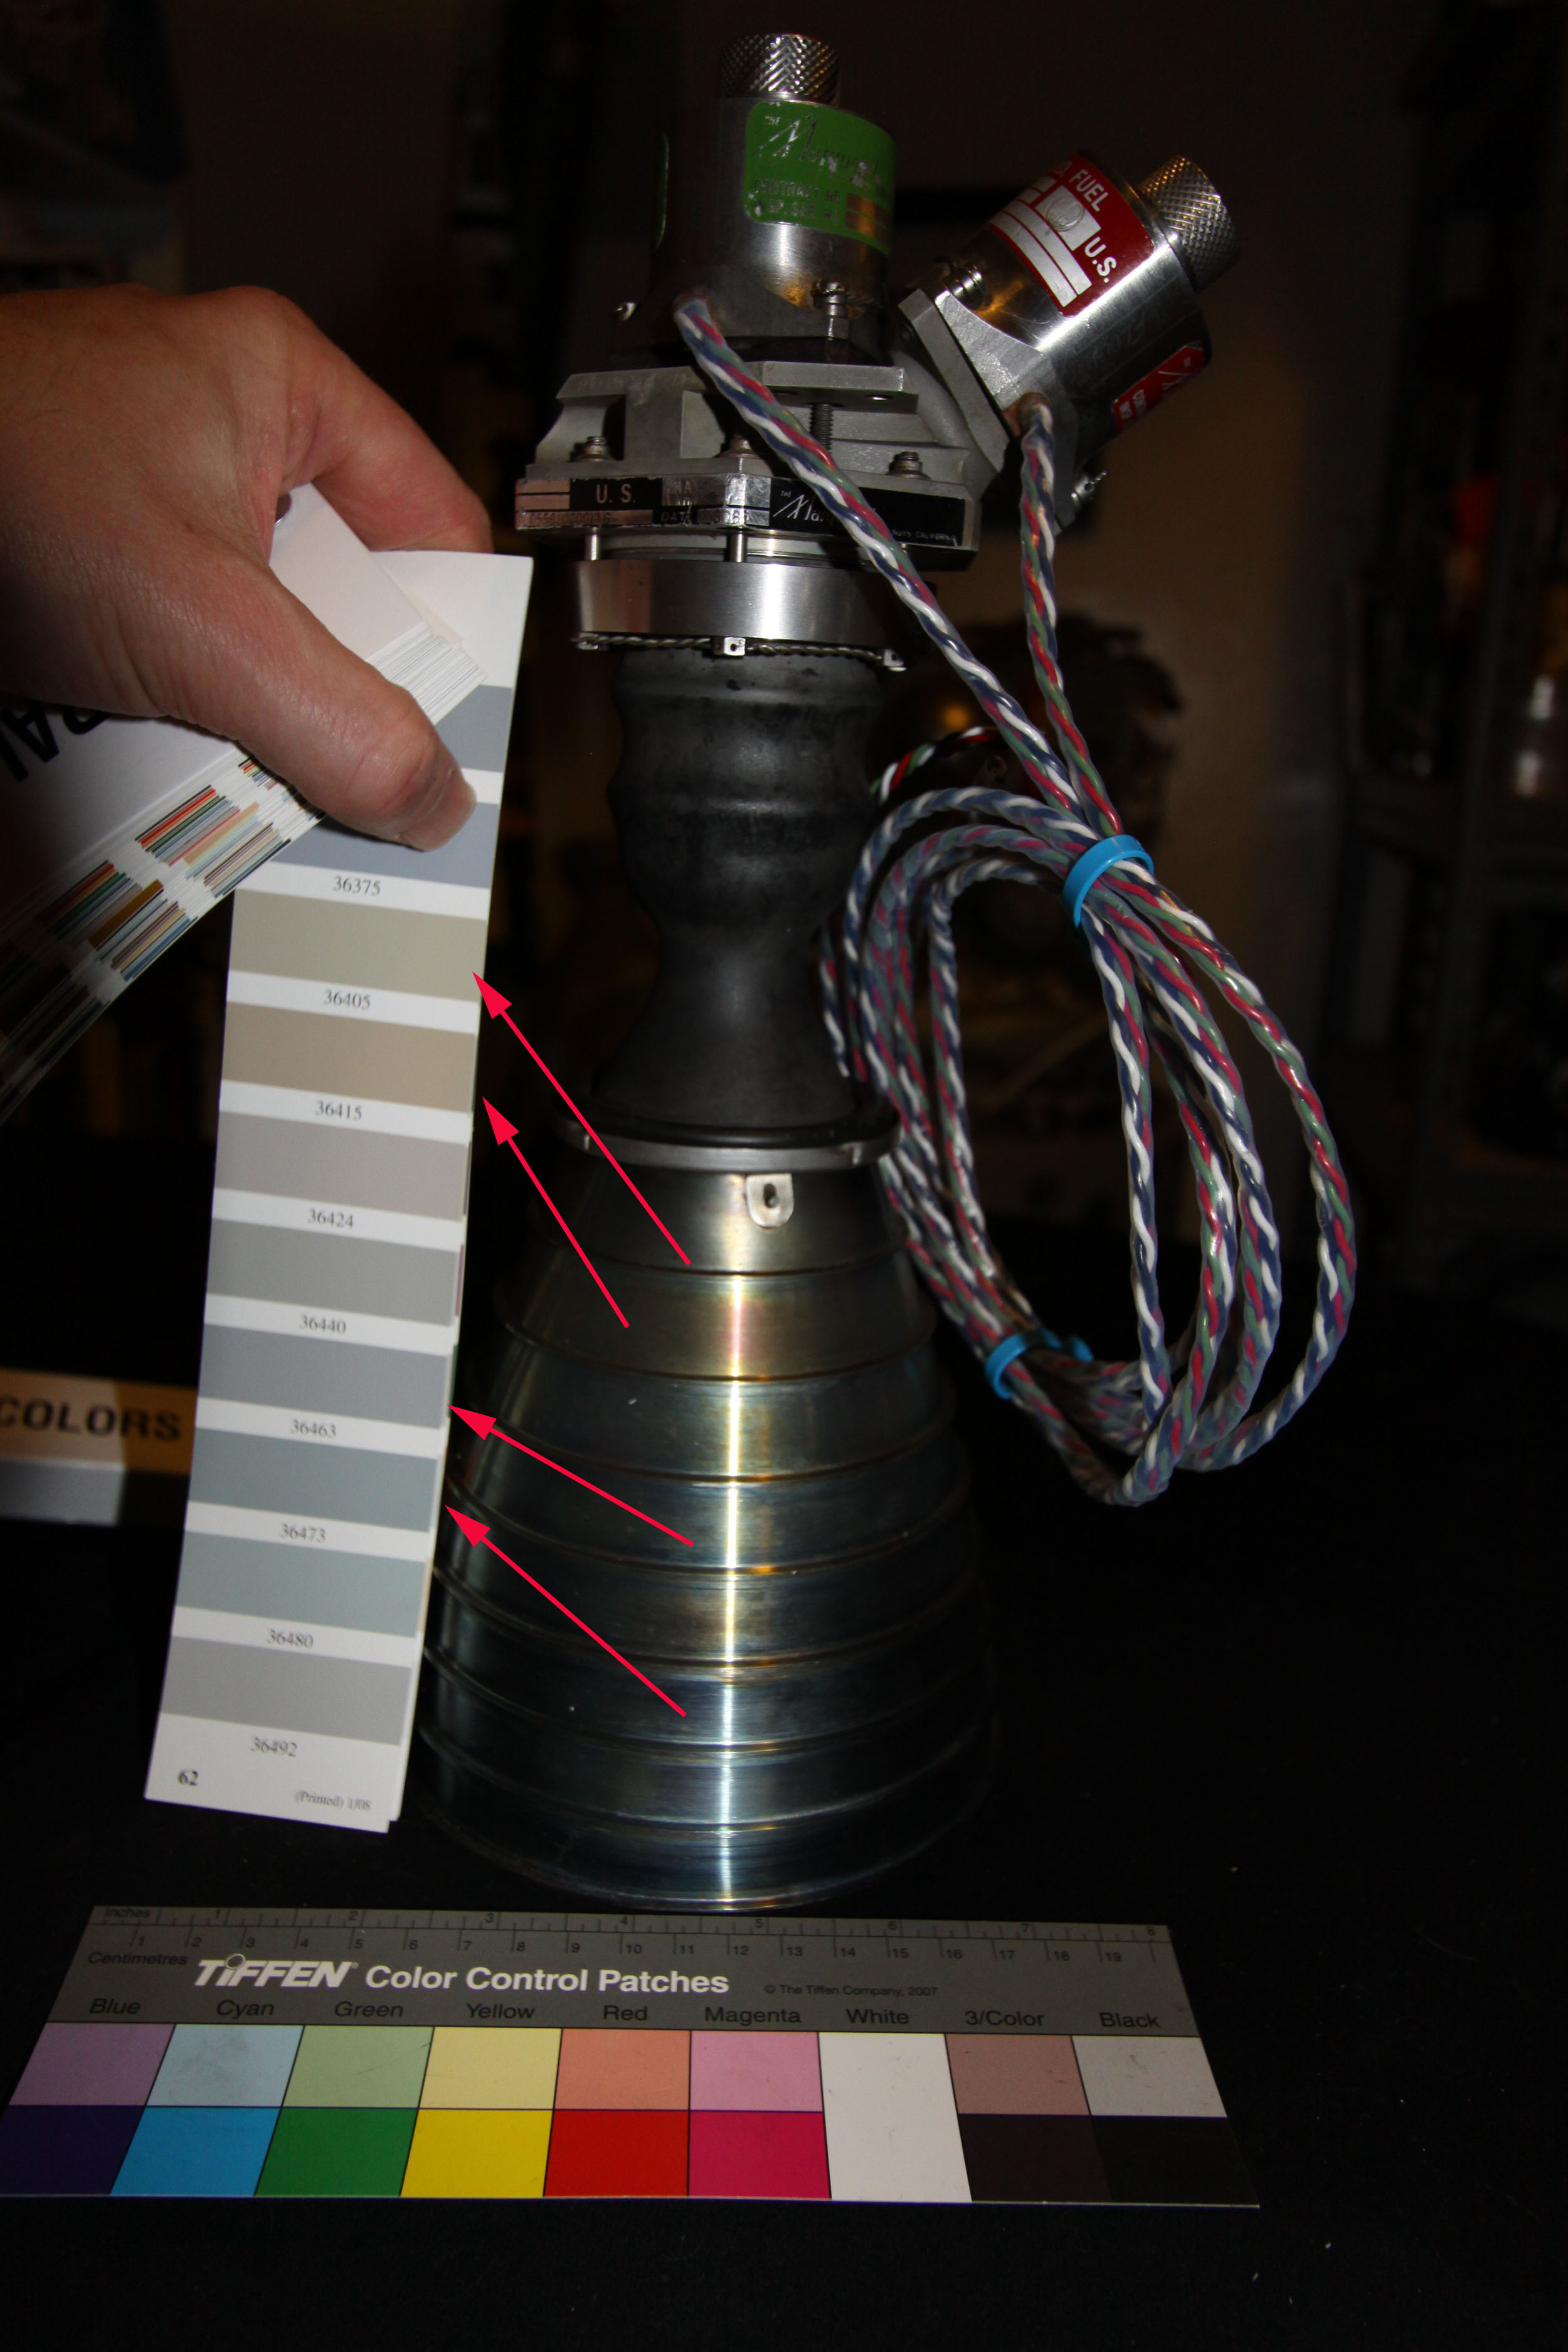
Color looks spot on Michael... here's an attempted reference test shot against the real thing with Fed Standard color deck: |
history in miniature
Member Posts: 600
From: Slatington, PA
Registered: Mar 2009
|
posted 09-16-2013 02:36 PM
Beautifully done Michael. |
Meademan
Member Posts: 24
From: Gatwick, West Sussex, UK
Registered: Oct 2012
|
posted 09-17-2013 06:05 PM
This is a wonderful display piece and something I've been hankering after for some time and its turned out better than I could ever have imagined it would.When Michael designed and made the skinning for his 1:24 CSM model which looks incredibly realistic, the natural progression of the idea was to scale it up and have a go at making what would look like a real cut out section of the spacecraft to hang on your office wall... and just look how it turned out. It's great. The 1:3 scale is just about perfect. It's large enough to have some presence whilst not being so huge it doesn't look ridiculous hanging on the wall of your office. In fact, I'd hazard a guess that most people who see it, wouldn't even think it a smaller scale to the original spacecraft itself, which clearly it isn't being smaller, but even so, it has that unique 'wow' factor all the same. The skinning making up the background looks real enough with the 3D rendered panel lines, rivets as well as the satin reflective qualities of the metal finish itself. On top of all that, the RCS engine bells have a real nice hot metal effect, true to the real life bells themselves which turn this colour after a few firings. They look perfectly used. Also, what's unique about this piece is that its both a model and a picture of sorts which makes it a perfect compliment to anyone's model display collection because it looks like a real piece of Apollo hardware hanging on your wall. I love it. It looks great and has already drawn plenty of admiring comments from everyone who's seen it... even the wife! So it must be good. Another commendation for Michael's design ideas and hard work... I can't wait to see the other models he's got in pipeline. They afford us all the opportunity to own a real slice of the Apollo programme. |
mode1charlie
Member Posts: 1169
From: Honolulu, HI
Registered: Sep 2010
|
posted 09-17-2013 06:50 PM
Is the 1:3 RCS display available for sale, and if so where? Thanks. |
keymichael1855
Member Posts: 176
From: Virginia Beach, VA, USA
Registered: Feb 2012
|
posted 09-20-2013 10:08 AM
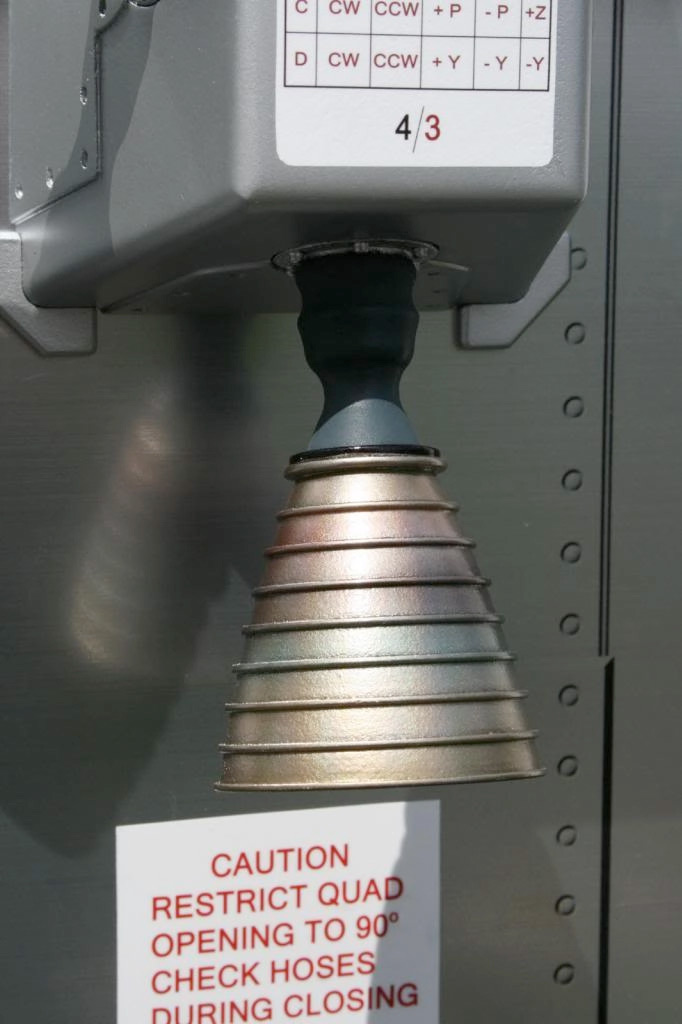
Thanks for the kind words everybody! Mike, I'm so glad that you are happy with it. This display was a great little project!
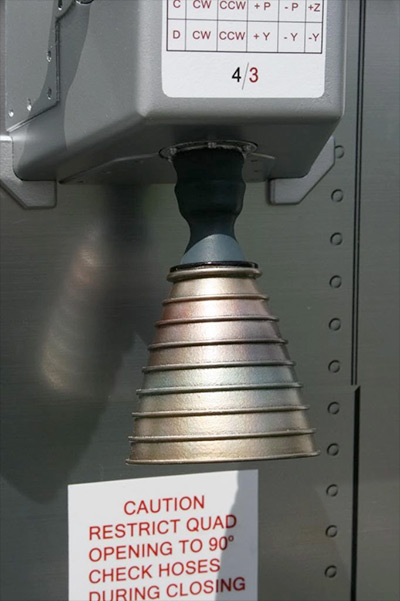
I did a lot of testing on the bells before I got the color just where I wanted them. I used a combination of Alclad Chrome and Brass for the base color, and lightly misted on Hotmetal Blue, Red, and Violet to give a little color variation. I also sprayed a layer of Holomatic Chrome as well. The camera doesn't pick it up like your eye does, but when the light hits them the right way, it has a rainbow effect that is spectacular. I'll post a video from YouTube — it's still subtle, but maybe it will come through.More projects coming very soon... Thanks! |
c11esh
Member Posts: 34
From: UK
Registered: Mar 2009
|
posted 10-04-2013 07:32 AM
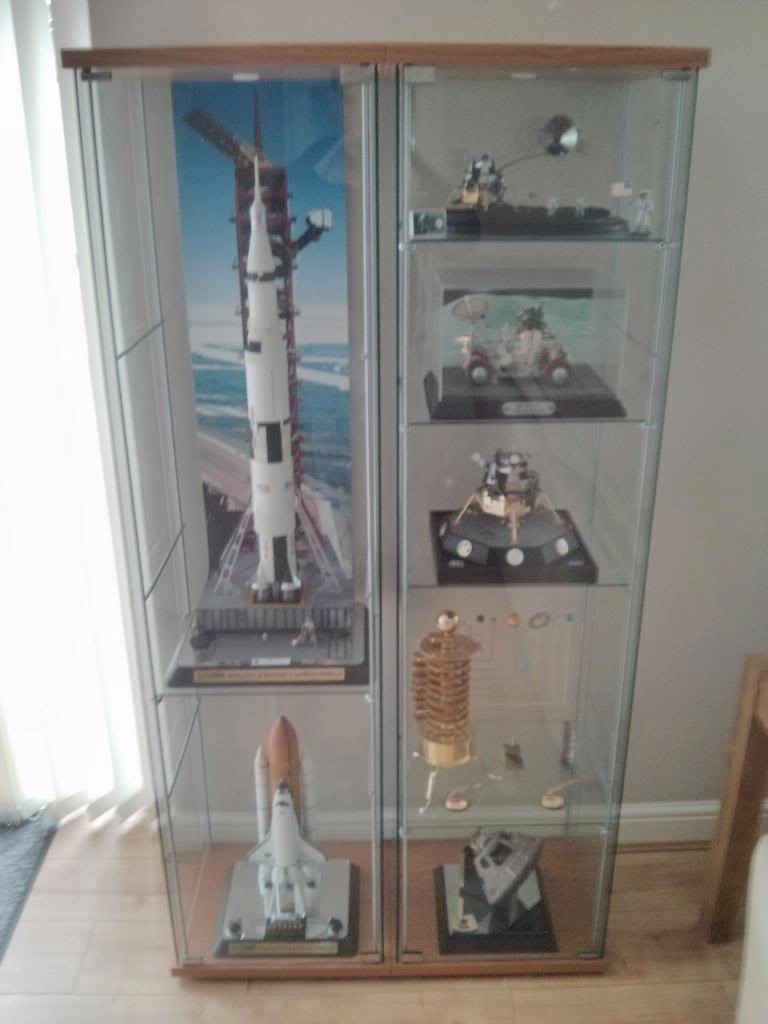
I recently purchased a MLP and LUT for my Bandai Saturn V. I had seen the results on the Dragon 1:72 which unfortunately I didn't have the room for, but was hoping for similar results on the Bandai. I have not been disappointed and am very happy with the results Michael was a pleasure to deal with and very helpful. Thanks Michael. 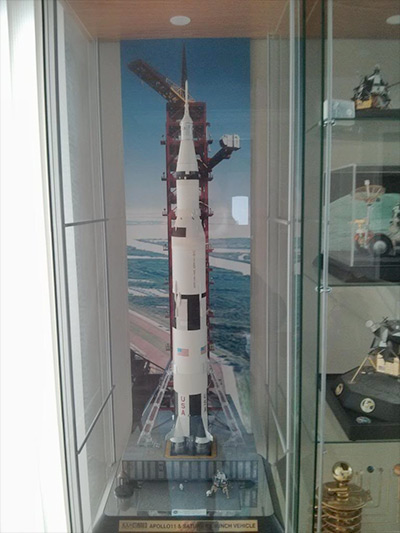 
|
apolloprojeckt
Member Posts: 1447
From: Arnhem, Netherlands
Registered: Feb 2009
|
posted 10-04-2013 07:47 AM
Very nice result!!! |
Norman.King
Member Posts: 375
From: Herne Bay, Kent, UK
Registered: Feb 2010
|
posted 10-04-2013 11:35 AM
That looks really cool. I wonder if I have space to squeeze in one of those Ikea cabinets?  |
c11esh
Member Posts: 34
From: UK
Registered: Mar 2009
|
posted 10-04-2013 12:32 PM
You cannot go wrong with them and some 5mm wire grips to adjust the shelves  |
Cliff Lentz
Member Posts: 655
From: Philadelphia, PA USA
Registered: Mar 2002
|
posted 10-06-2013 08:56 AM
Very nice. I'm sure I wouldn't put the shuttle model in that case. I probably would try to find another Apollo piece to fit in there. That's why my collection is out of hand! |
keymichael1855
Member Posts: 176
From: Virginia Beach, VA, USA
Registered: Feb 2012
|
posted 10-06-2013 04:18 PM
Earle, you are welcome and many thanks for the kind words! I was more than happy to produce the items for you, and I think the display items really add to the beauty of the Bandai Saturn V. I am so glad that you are happy with it, and thanks for posting pictures of your great collection. Looks like I need to look into a similar MLP concept for the Bandai shuttle that you have there. |
keymichael1855
Member Posts: 176
From: Virginia Beach, VA, USA
Registered: Feb 2012
|
posted 10-17-2013 01:42 PM
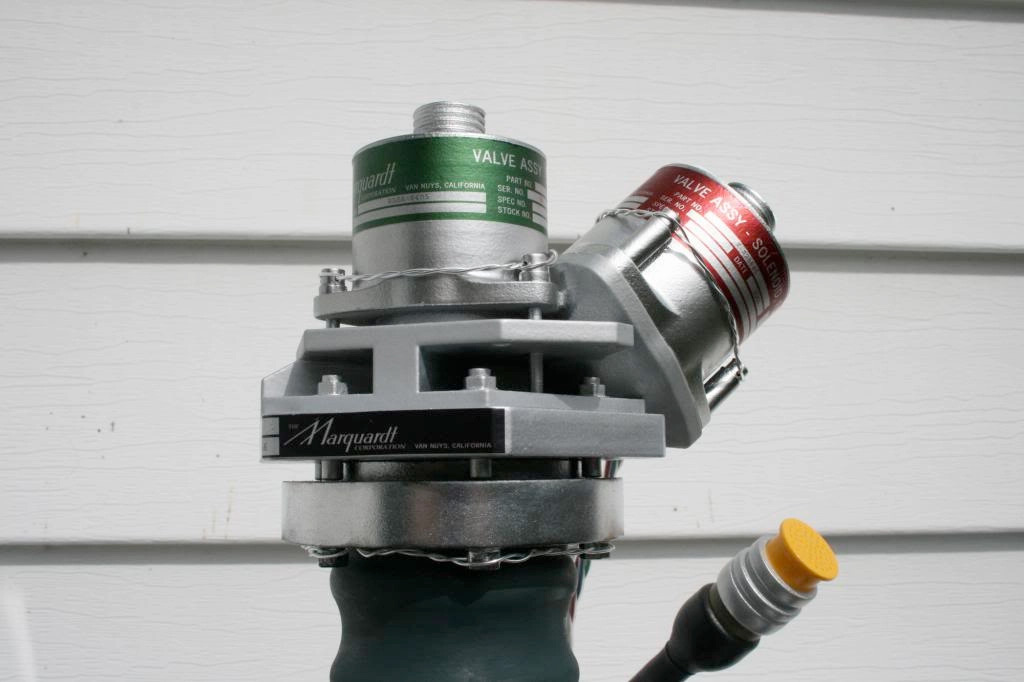
I've been wanting to build up one of my 1:1 3D printed RCS engines for a while now, but I knew that I didn't quite have all of the skills to produce it. So, I enlisted the help of Steve Nichols, and we did a joint collaboration on the build.
I built the base, prepped and sprayed the bell, and did the multi-colored/red wiring. Steve painted and detailed the rest of the engine. I asked him to pay special attention to the top of the engine, and spray it with several different shades of Alclad metal shades to represent the real thing as closely as possible. He used a combination of Chrome, Polished Aluminum, and Silver. The paint was perfect, the decals were perfectly straight, and the safety wiring was very realistic. He did a beautiful job, and I couldn't have been happier with his work. Thanks for your help Steve! This will be a new addition to a fellow cS member's collection. Comments are welcome. Thanks! --Michael 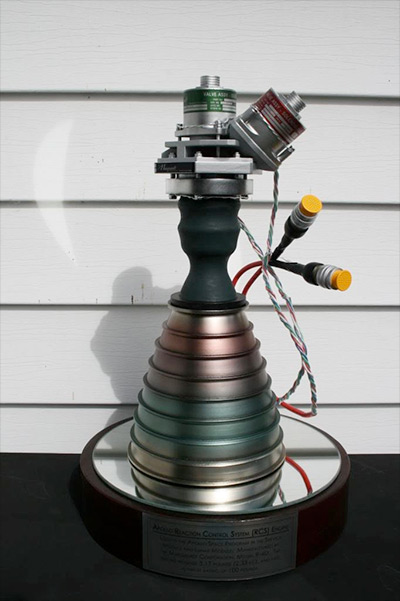 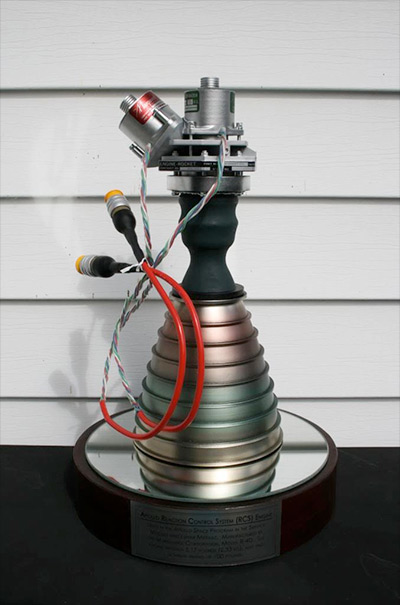


|
datkatz
Member Posts: 176
From: New York, NY
Registered: Mar 2009
|
posted 10-17-2013 02:54 PM
Beautiful work, Steve. As always. |
GACspaceguy
Member Posts: 2474
From: Guyton, GA
Registered: Jan 2006
|
posted 10-17-2013 07:30 PM
Amazing coloring on the thrust chamber. Wonderful work! |
Norman.King
Member Posts: 375
From: Herne Bay, Kent, UK
Registered: Feb 2010
|
posted 10-18-2013 02:09 AM
Outstanding. |
history in miniature
Member Posts: 600
From: Slatington, PA
Registered: Mar 2009
|
posted 10-18-2013 11:25 AM
Thank you everyone for the kind words and thank you Michael for the chance to work with such a talented designer and builder. |
the clocks running
Member Posts: 382
From: Rochester, NY
Registered: Jan 2012
|
posted 10-18-2013 12:52 PM
Incredible work as usual Steve! |