|
Author
|
Topic: Michael Key's 3D printed models, dioramas
|
apolloprojeckt
Member Posts: 1447
From: Arnhem, Netherlands
Registered: Feb 2009
|
 posted 10-08-2014 03:47 AM
   
quote:
Originally posted by keymichael1855:
It is a full scale lunar hammer replica, made from 3D printed parts.
Nice!!!! |
Retro Rocket
Member Posts: 445
From: Santa Paula, Ca,. USA
Registered: Dec 2007
|
posted 10-08-2014 07:17 PM
STOP... HAMMERTIME!!! |
Retro Rocket
Member Posts: 445
From: Santa Paula, Ca,. USA
Registered: Dec 2007
|
posted 10-10-2014 01:38 PM
How did you get such a nice finish on the handle? |
keymichael1855
Member Posts: 176
From: Virginia Beach, VA, USA
Registered: Feb 2012
|
posted 10-10-2014 08:27 PM
Hey JP, this model was ordered in white, strong, and flexible- non polished because it was too large. The finish is achieved by building up many layers of filler primer and lots of sanding. WSF is my favorite material for large models, because it is affordable and can be made smooth with a little work. Luckily this model didn't have details that could be sanded away, so I could be more aggressive on the smoothing. Hope this helps! |
history in miniature
Member Posts: 600
From: Slatington, PA
Registered: Mar 2009
|
posted 10-11-2014 06:52 AM
Michael that looks awesome, just like the real hardware! |
GACspaceguy
Member Posts: 2474
From: Guyton, GA
Registered: Jan 2006
|
posted 10-13-2014 09:06 AM
Loved it so much, had to own it.  |
keymichael1855
Member Posts: 176
From: Virginia Beach, VA, USA
Registered: Feb 2012
|
posted 10-15-2014 09:59 PM
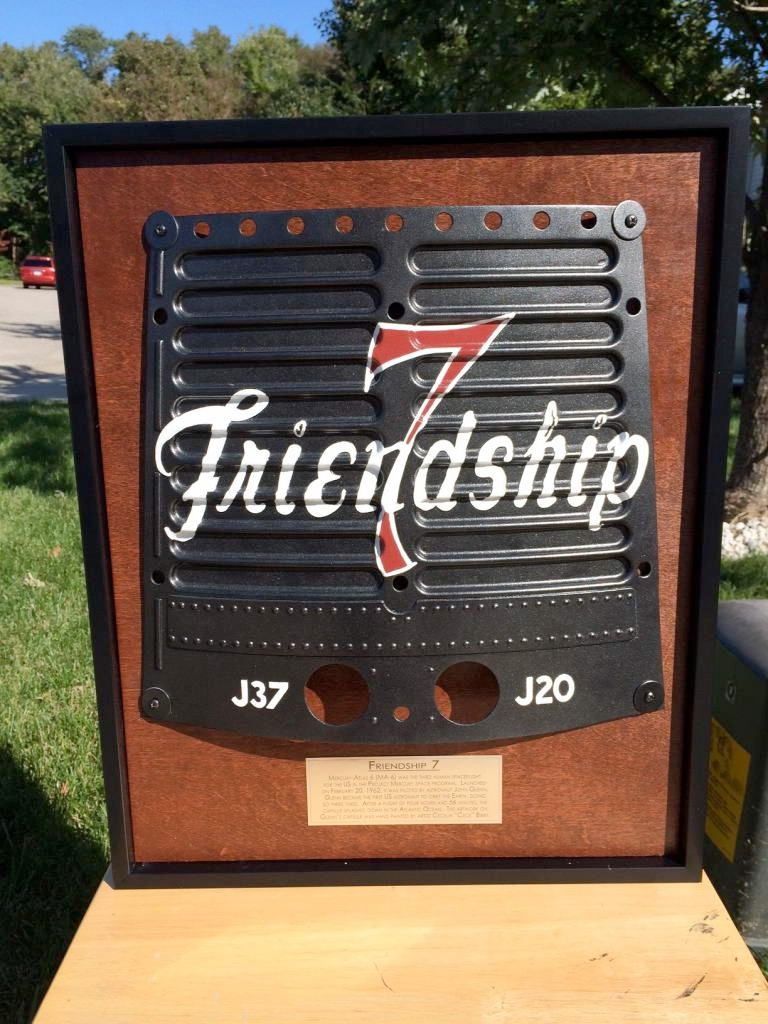
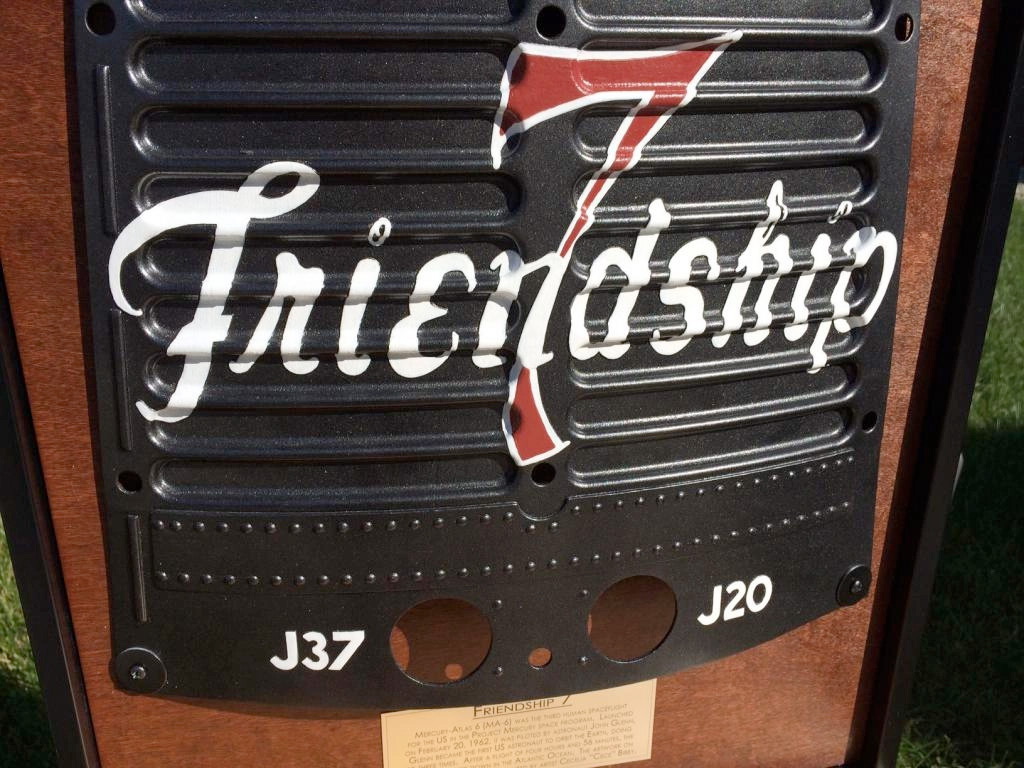
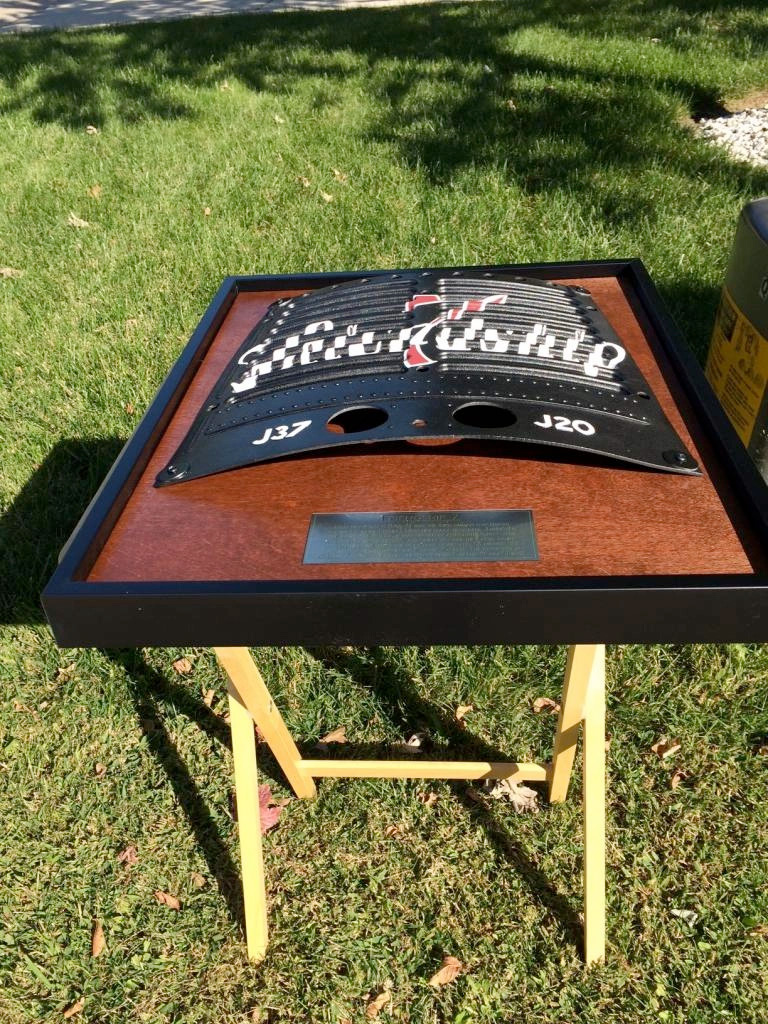
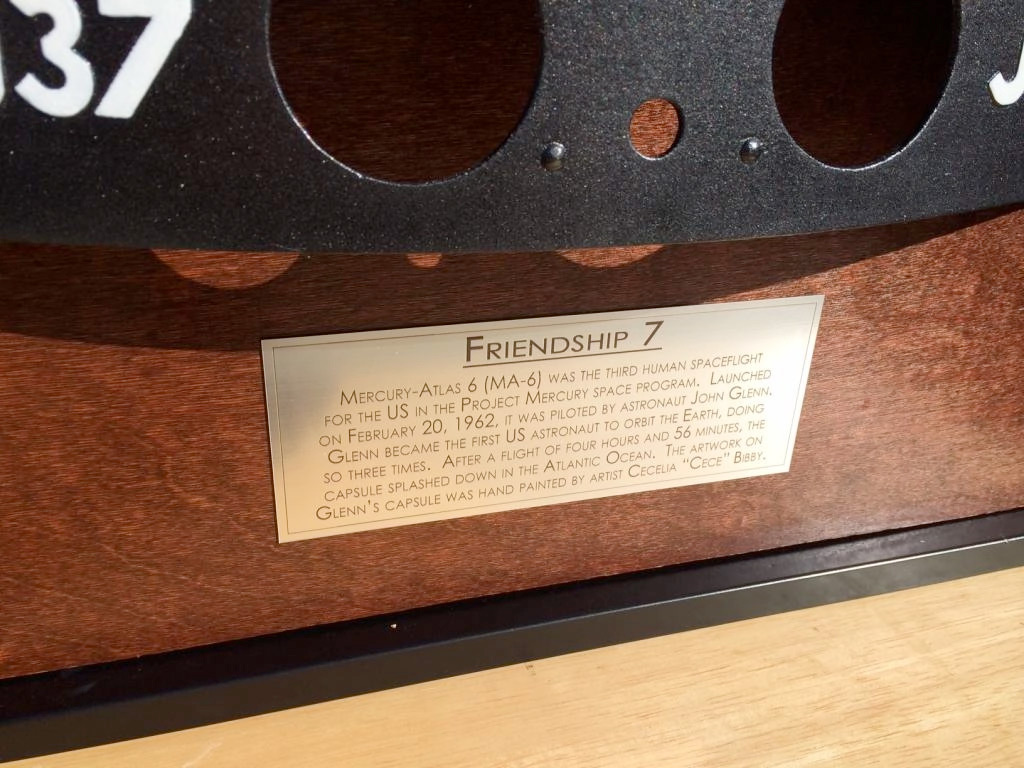
Fred and Steve, thanks for the nice words on the 1:1 hammer! Here is another project that I recently completed. It is a large scale Mercury shingle panel replica. This one is 1:1.25 scale, as a 1:1 printed part was almost twice as expensive as this one. The panel itself is about 16" square, and I produced the 3D model with the artwork slightly raised in order for me to use it as a guide to hand paint it. I'll be honest, I don't know how Cece did it, because it was a difficult part to paint and I had a "cheat sheet." It is amazing how she was able to attain the original result by "free-handing" it- very impressive and a true testament to her ability. She was very talented! Here are the pics of my replica:  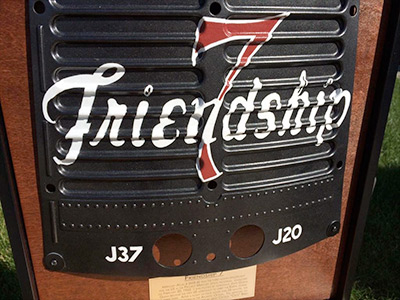


If you would like to see more pics of the build, you can click here. As always, comments are welcome. Thanks! |
apolloprojeckt
Member Posts: 1447
From: Arnhem, Netherlands
Registered: Feb 2009
|
posted 10-16-2014 01:19 AM
I love this one Michael, great job!!! |
Planetary
Member Posts: 24
From: Huntington Beach, CA, USA
Registered: May 2013
|
posted 10-25-2014 10:39 PM
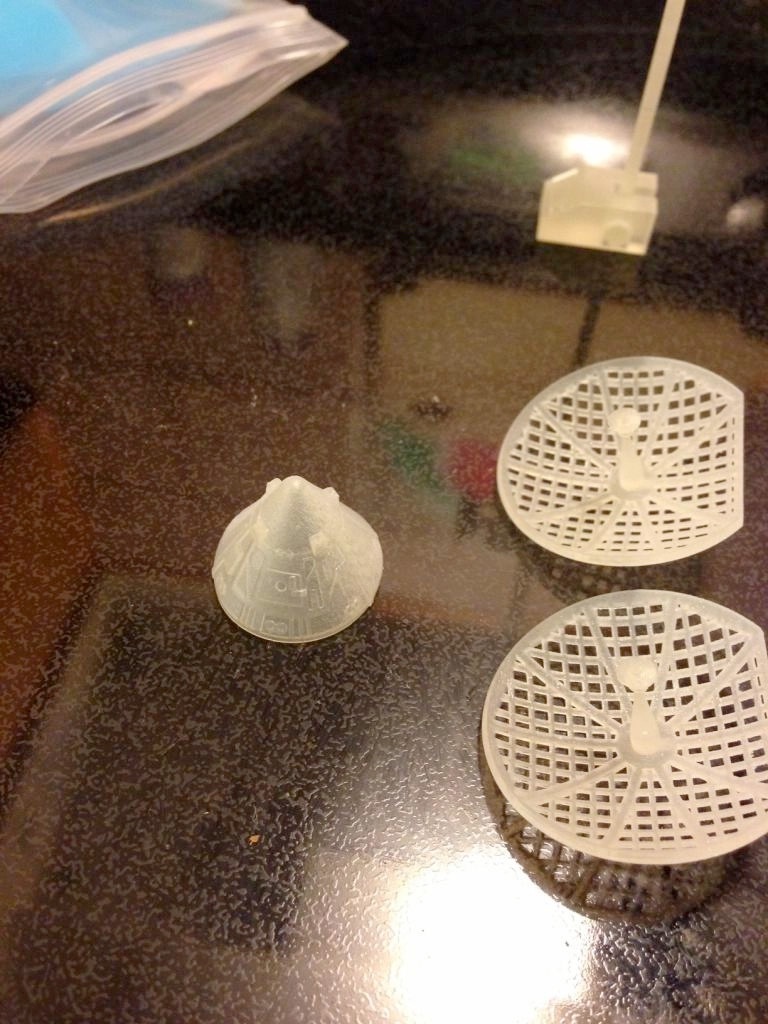
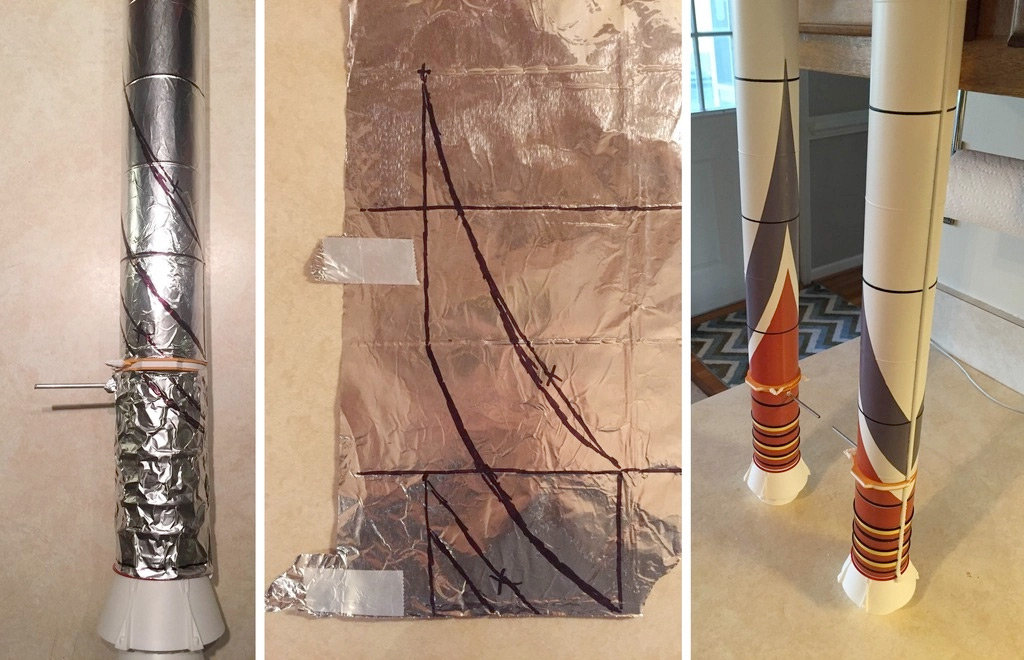
Okay, so I finally got around to ordering and including Michael Key's Shapeways 3D printed LES and BPC parts (ultra frosted detail, by the way). These are my very first 3D printed parts I've worked with so I went for something not only easy and simple but if I screwed them up, not a big dent on the wallet. This was essentially a painless way to get my feet wet with this medium. At first sight, the parts are a *huge* upgrade over the featureless respective parts included with the FameMaster Saturn V.Having read quite a bit about 3D printed parts in general, I still wasn't quite sure how easy or difficult these would be to clean up work with and paint, much less how much fine detail they'd have. First off, I got my parts under a week from when I submitted my order to Shapeways. They came in little zip lock baggies in a small padded box in perfect condition. Detail is indeed pretty amazing, especially the LES tower legs, skirt and motors which is all one piece (the LES tube shaped body and BPC cone are the other 3 pieces). I will say you can see tiny pattern marks like the part was shaped with a mill in some spots as well as some sandy looking "grain" on the inside of the tower legs that are nearly impossible to sand off in certain areas due to fear of damaging nearby raised detail or just plain inaccessible. I didn't want to try any chemical soaking tricks to smooth or "melt" off marks or grain like I've seen on YouTube clips for fear of destroying the parts. It just wasn't that big of a deal. I cleaned the parts by soaking them on a small glass jar of Bestine (they have a slightly oily feel out of the bag) for an hour, then scrubbed them gently with a toothbrush. At this point, as the parts dry, they go from a sort of translucent to near white color. I then cleaned the fine film left on the parts with warm dish soap and water and let them dry overnight. I needed to gingerly cut out a rectangular slot on the BPC base for the Service Module Umbilical that sits against the back of the Command Module. Next day I gave the parts a light dusting of rattle can Tamiya Light Gray surface primer which helped obliterate some of the unwanted etch marks and gave me a surface to sand smoother (where I could) and paint my final coat of Flat White acrylic with an airbrush. One problem I quickly ran into was that it's pretty much impossible to completely paint the four motors of the LES through the tower legs. So after airbrushing the parts Flat White and sealing them with Mr Hobby Super Clear Flat and letting them dry overnight, I *very* carefully cut the tower leg framework off at the skirt so I could easily paint with a tiny brush the four motors Gun Metal. Then I carefully super glued the tower back onto the skirt and glued the rocket body to the skirt/tower assembly and then glued the LES to the BPC. If I could make one design change suggestion, it would be to have the LES rocket body *and* the skirt and rockets as one piece and the tower frame the other piece for all scales instead of the skirt, rockets and frame the one part. The only minor issues aside from having to cut off and re-attach the tower to the skirt was that the BPC is a fraction to big at the base so it has a little slop and is a bit wobbly when it sits on the recessed Service Module lip. I considered lining the inside of the bottom ring of the BPC with .010x.040 strip evergreen styrene plastic to make the fit snug but just decided that giving the inside of the BPC a couple thick coats of white primer would do the job which for the most part worked. It should be mentioned that the BPC part is remarkably *very* thin, probably about .015 at its thinnest. This means it's pretty flexible and actually warped a bit out of round at the base when I cleaned it. My solution was I found a small empty paint jar that was exactly the same diameter inside as the outside of the BPC base so I simply fit it in the top of the jar and let it sit in the warm afternoon sun before primering. After that, it went back to its round shape and retained that shape.
One nagging detail is the geometry of the hatch doesn't follow the top and bottom contour of the BPC but at this scale, it's a very minor quibble. Overall, I am very pleased with the product and will buy more 3D printed upgrade parts for my 1/96 and 1/72 Saturn kits in the near future. I find the Ultra Frosted Detail material to be much like typical resin parts as far as grinding, cutting, polishing, gluing and painting. It's kind of a draw as far as the amazing detail and shapes that can be created with this process vs the tiny "pattern" that shows on really small parts — I don't know how good say, a LES/BPC would hold up at 1/200 scale, but I'm sold on larger parts and scales, especially parts that can be easily cleaned up to a really smooth finish. |
keymichael1855
Member Posts: 176
From: Virginia Beach, VA, USA
Registered: Feb 2012
|
posted 10-28-2014 07:23 AM
Planetary, thanks for your very thorough review on the BPC/LES for the FameMaster SV. You have done a beautiful job with them! It looks like you definitely did your research, knowing that Bestine is a good cleaner for the parts. I usually use acetone, but I think the result is similar. It even turns the parts the more opaque white color like Bestine does. Good suggestion on separating the parts differently to make the escape motors easier to paint. I've done so already with the 1:72 scale version, but haven't incorporated that change into all scales yet. The slightly oversized BPC is there to allow for tolerances in the printed material. Parts can vary in size depending on the orientation that it is printed. Others have ordered this part and had it fit nice and snug. Better a bit too big than too small! Would you mind if I used your pictures on Shapeways? I have some on there, but they are unpainted and don't show the detail that well. Hopefully this won't be the last 3D printed part that you use in your builds, whether they come from me or another designer. Well done on this one!!! |
Planetary
Member Posts: 24
From: Huntington Beach, CA, USA
Registered: May 2013
|
posted 10-28-2014 03:14 PM
Michael, sure no problem, feel free to use my photos on your site/page. And I will be buying more 3D printed upgrade parts as I have numerous kits of the Apollo Saturn that cry out for these sort of improvements.By the way, one suggestion I have for near-future Saturn V upgrade parts would be the second and third stage conical thrust structure parts. Basically the "cones" (and separate Cross Beam J2 engine mount part for the SII) with accurate stringers which for most modelers is 90% of the work accurizing especially the 1/72 Dragon and various 1/144 plastic kits. A modeler could add as little or as much wiring, tubing, feed lines etc as wanted. No one else makes these specific detail parts for the 1/72 kit and they would go a long way towards making that kit worth building. |
Ronpur
Member Posts: 1211
From: Brandon, Fl
Registered: May 2012
|
posted 10-28-2014 11:51 PM
This BPC looks like something I need for my 4D Saturn V! And since you have them in 1/144th scale, just how thin are they? Would they fit on a proper sized 1/144th scale CSM? (That I see you also have!) |
keymichael1855
Member Posts: 176
From: Virginia Beach, VA, USA
Registered: Feb 2012
|
posted 10-29-2014 02:44 PM
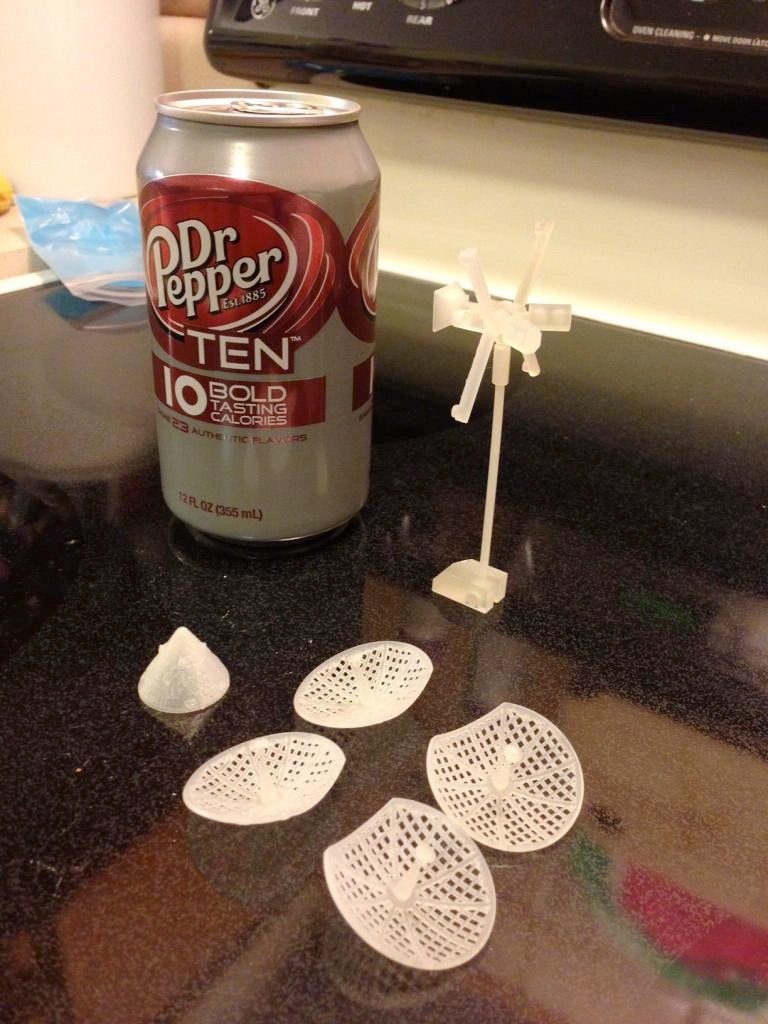
I've had several people order the 1:144 scale BPC, and I haven't heard anything negative about it not fitting- that is a good thing. Usually people are quick to point out that it doesn't fit, but often I don't hear back when it does. I know it fits over my 1:144 scale CM perfectly. As for thickness, most of these smaller parts are either .5mm or .3mm thick, or .02" or .012", respectively. They are VERY thin, but seem to work well. The detail on even the smaller parts is amazing. Here is the 1:200 scale BPC:  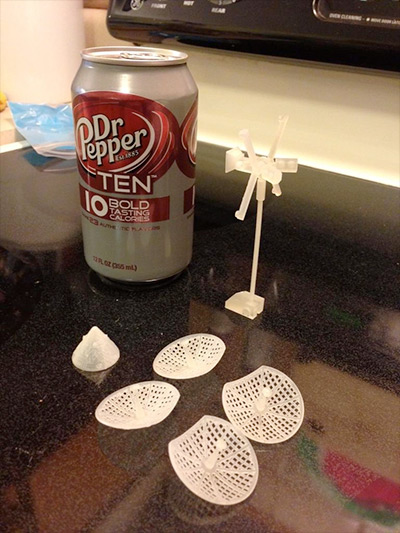
It's only .75" in diameter, but has all the detail of the larger scale versions. Anyway, hope some of this helps- thanks! quote:
Originally posted by Planetary:
...feel free to use my photos on your site/page.
Thanks for letting me use your pics on Shapeways! I have a lot of upgrade parts on there, so just let me know if you have any questions. Also, give me a little more information on what "cones" you might need on the Saturn V kits. Are they missing from the kits, or just not accurate? |
Planetary
Member Posts: 24
From: Huntington Beach, CA, USA
Registered: May 2013
|
posted 11-11-2014 11:46 PM
quote:
Originally posted by keymichael1855:
Also, give me a little more information on what "cones" you might need on the Saturn V kits. Are they missing from the kits, or just not accurate?
"Cone" was a poor choice of wording on my part. What I mean is the S-II and S-IVB aft end thrust structures for both stages. The best way I can show you is these two links to photos of Martin Rasmussens' incredible 1/48 scale scratch built Saturn V. The two photos show the respective Thrust Structures. The SIVB photo includes the long tube-like hydrogen feed line which I wouldn't recommend including as it's an easy part to scratch build and would only complicate the 3D printing of the part. The aft end of the visible bottom of the spherical hydrogen tank that the thrust structure attaches to on the S-IVB third stage could be included but the larger 1/96 and 1/72 Revell and Dragon kits include that part as part of those kits very inaccurate thrust structures and would simply need to be cut off the kits' part for use with a more accurate 3D printed part. |
keymichael1855
Member Posts: 176
From: Virginia Beach, VA, USA
Registered: Feb 2012
|
posted 11-19-2014 09:11 PM
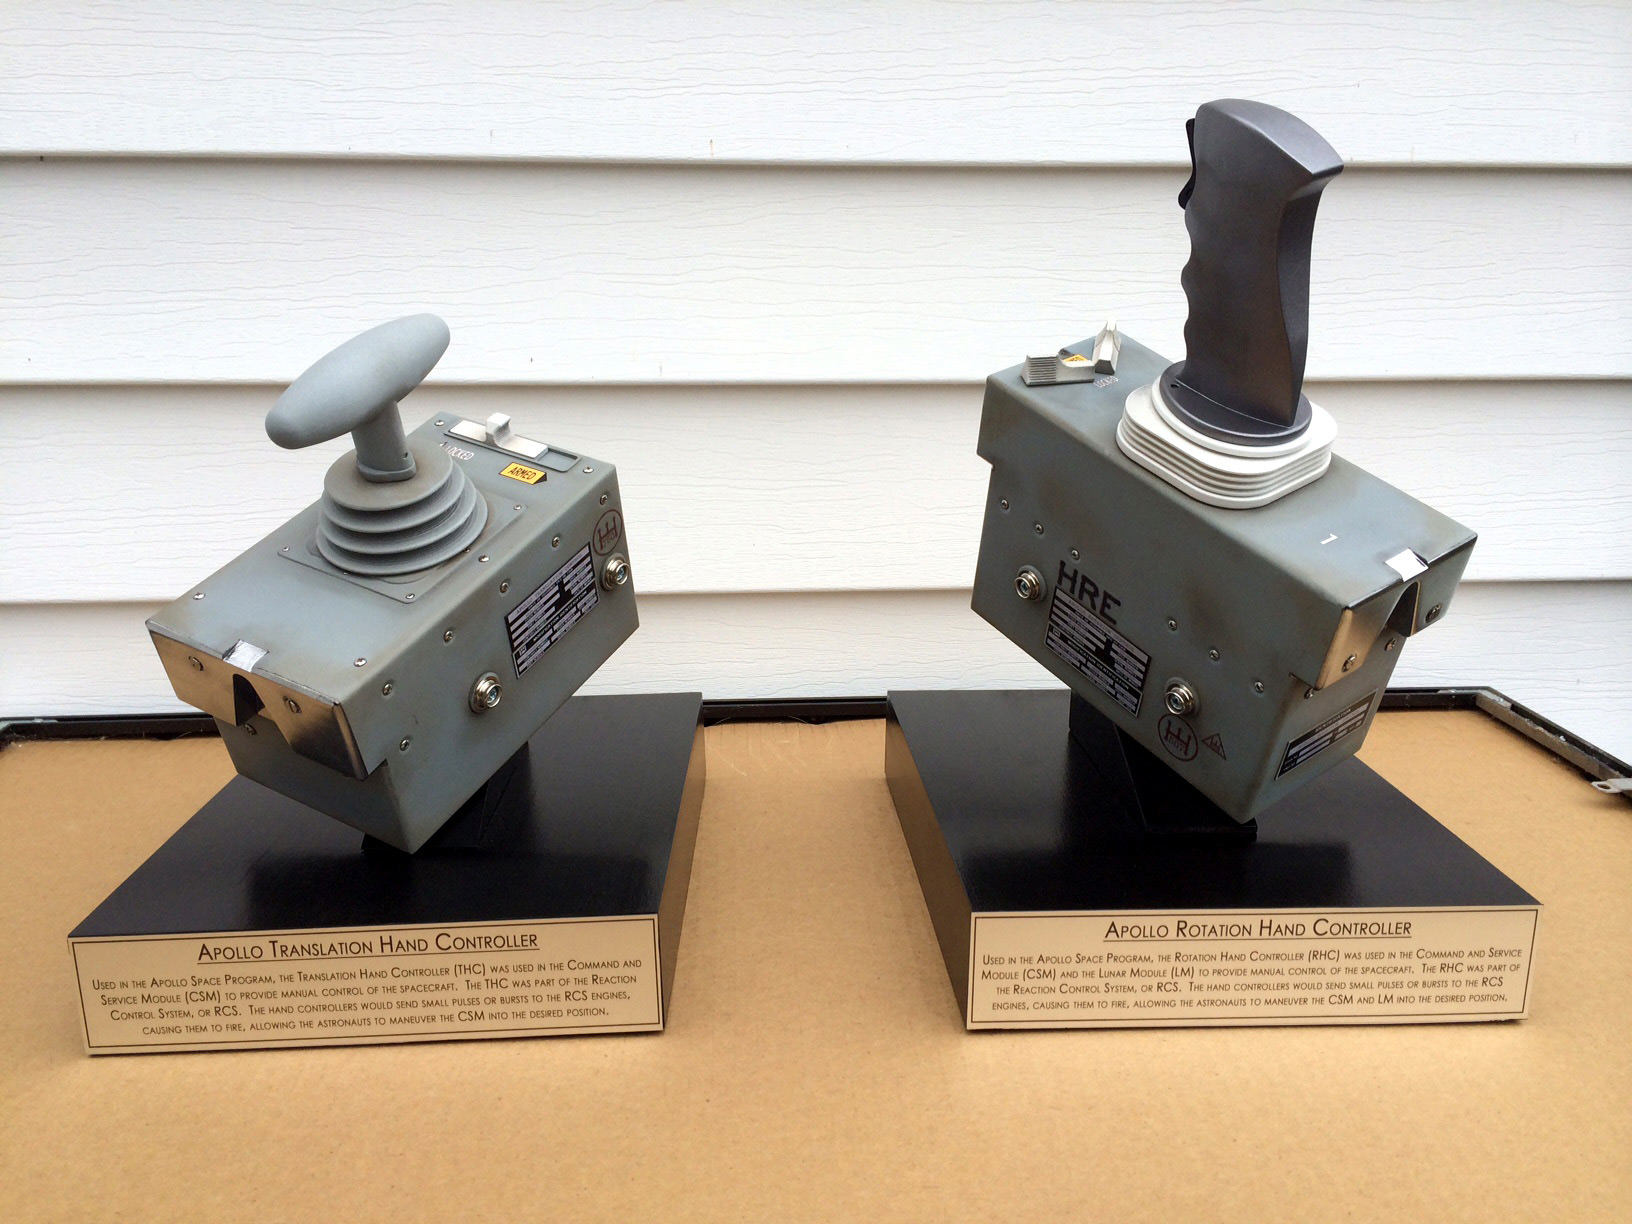
I know that Pascal has already built and posted a set of the Apollo CM hand controllers using my 3D printed parts, but I wanted to show my interpretation of them. These were requested by a friend and fellow cS member, and I just recently finished them for him. They have movable switches, and are held to the display bases with magnets- making them completely removable. I wanted to give him the flexibility to display them however he likes. He also wanted a "weathered" look to give them a post-flight look. 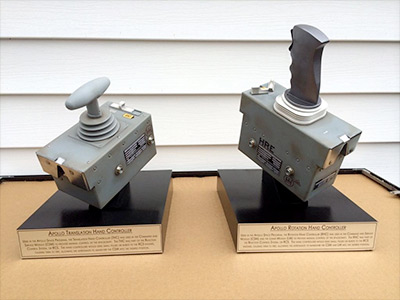 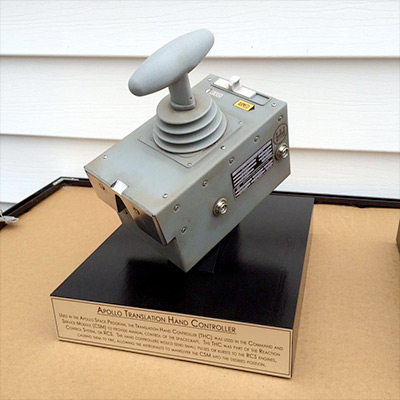
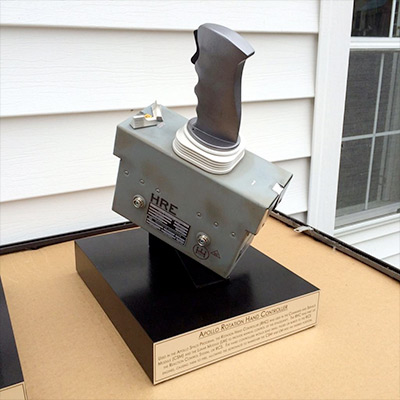
If you would like to see more pictures, you can click here. As always, comments are welcome! |
Jurg Bolli
Member Posts: 977
From: Albuquerque, NM
Registered: Nov 2000
|
posted 11-19-2014 09:44 PM
This is extremely cool, very impressive. |
mode1charlie
Member Posts: 1169
From: Honolulu, HI
Registered: Sep 2010
|
posted 11-19-2014 11:34 PM
Fantastic! Want. |
apolloprojeckt
Member Posts: 1447
From: Arnhem, Netherlands
Registered: Feb 2009
|
posted 11-20-2014 01:51 AM
Very nice! And well done. |
space1
Member Posts: 853
From: Danville, Ohio
Registered: Dec 2002
|
posted 11-20-2014 04:59 AM
A few comments. First, very nice attention to detail.Second, the labels really must state that these are reproductions or models. Also I hope that some marking has been made on the units themselves to distinguish them. Otherwise they are misleading, maybe not for the current owner but for everyone else. Third, please give proper credit for my images you are using on your photo page. ------------------
John Fongheiser
Historic Space Systems |
keymichael1855
Member Posts: 176
From: Virginia Beach, VA, USA
Registered: Feb 2012
|
posted 11-20-2014 08:23 AM
Thanks for the nice words Jurg, Burke, Pascal, and John! John, certainly no intended harm or misuse of your photos — sorry about that! I have added what I hope is proper credit for your images. If not, I will take them down. Your images were extremely helpful in recreating the control boxes — thanks! |
Jeff
Member Posts: 474
From: Fayetteville, NC, USA
Registered: May 2009
|
posted 11-20-2014 08:36 AM
As an owner of several of Michael's works of art, I can tell you that the weight is definitely a tip off as to the display not being real hardware... these are essentially plastic so they don't have the "real feel" of actual hardware. Absolutely terrific job as always Michael. |
GACspaceguy
Member Posts: 2474
From: Guyton, GA
Registered: Jan 2006
|
posted 11-20-2014 03:50 PM
Those are fantastic!! |
space1
Member Posts: 853
From: Danville, Ohio
Registered: Dec 2002
|
posted 11-20-2014 08:10 PM
Michael, thank you for adding the photo credit.I still think it is important to note on a placard, and ideally somehow on the item itself, that an item is a model. Imagine someone listing items for sale from your estate and literally quoting the label on one of these high fidelity items. And then imagine the accusations of fraud from a hapless buyer. |
Ronpur
Member Posts: 1211
From: Brandon, Fl
Registered: May 2012
|
posted 03-31-2015 07:56 PM
I received your 1/144th scale CSM and BPC yesterday. They are amazing! Did you do the launch escape tower too in 1/144th scale? The Airfix one won't fit the BPC, since they did not correct this part for their model upgrade. |
keymichael1855
Member Posts: 176
From: Virginia Beach, VA, USA
Registered: Feb 2012
|
posted 04-02-2015 07:03 AM
Ronpur, thanks for the positive feedback on the 1:144 scale CM and BPC! I'm always amazed at the level of detail that the printers can achieve at that small of a scale. Yes, I do have the escape tower at 1:144. It should fit the BPC just fine. If you have any questions, please let me know. Thanks! |
NASA Glenn
Member Posts: 79
From: Cleveland OH
Registered: Feb 2007
|
posted 10-26-2015 09:34 AM
Michael, could a kit for the Gemini Titan be possible in 1:48 and 1:96 scales rather than the Topping scale? Complete or even partial to use with acrylic tube would be great. |
keymichael1855
Member Posts: 176
From: Virginia Beach, VA, USA
Registered: Feb 2012
|
posted 10-27-2015 03:38 PM
Glenn, can I assume that you would use a 1:48 or 1:96 Gemini capsule kit as a starter for the project? Then use acrylic tube to form the main body? Sounds like you would need at least the interstage portion with the openings to fit the tubes. If you will contact me directly, hopefully I can help you. Thanks! |
keymichael1855
Member Posts: 176
From: Virginia Beach, VA, USA
Registered: Feb 2012
|
posted 02-03-2016 07:53 PM
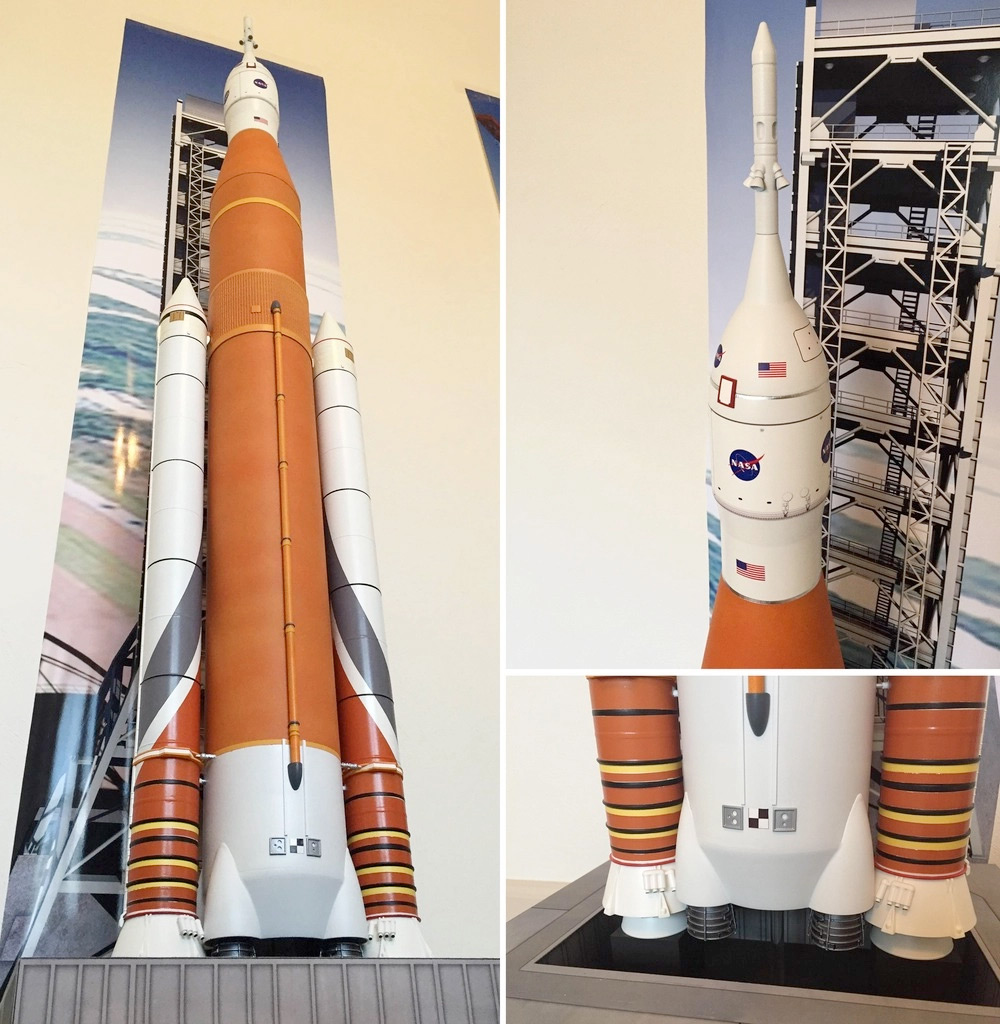
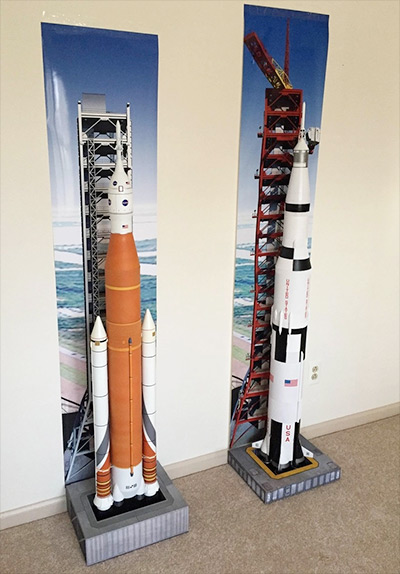
It has been quite a while since I have posted a model build, so here is a project that I've been working on for a few months. It is a 1:72 scale Space Launch System (SLS) diorama with MLP and LUT. It was built using my 3D printed parts, acrylic tubing, resin SSMEs, and the SRBs and propellant line from the 1:72 scale Revell Shuttle Stack. As always, comments welcome! 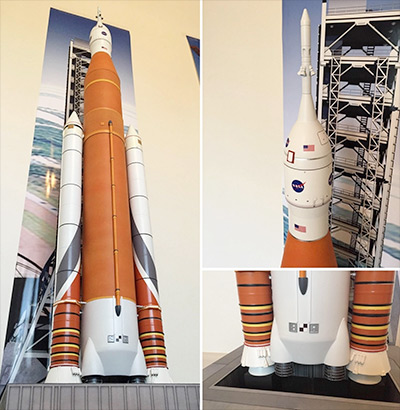
|
Jurg Bolli
Member Posts: 977
From: Albuquerque, NM
Registered: Nov 2000
|
posted 02-03-2016 08:40 PM
That is very cool! |
mode1charlie
Member Posts: 1169
From: Honolulu, HI
Registered: Sep 2010
|
posted 02-03-2016 10:48 PM
Very cool! |
apolloprojeckt
Member Posts: 1447
From: Arnhem, Netherlands
Registered: Feb 2009
|
posted 02-04-2016 02:02 AM
Top Piece!!! |
GACspaceguy
Member Posts: 2474
From: Guyton, GA
Registered: Jan 2006
|
posted 02-04-2016 04:48 AM
Trying to decide when to have you make us one, fantastic!!! |
jgoldader
Member Posts: 19
From:
Registered: May 2011
|
posted 02-04-2016 05:25 AM
That's just... Wow...Did you have decals made for the SRBs, or did you mask and paint? |
keymichael1855
Member Posts: 176
From: Virginia Beach, VA, USA
Registered: Feb 2012
|
posted 02-04-2016 08:24 AM
Thanks for the nice words! I used decals for the "racing stripes." I wrapped an SRB in foil and roughly traced where the stripes should go. I then unwrapped the foil and scanned it in. I used CAD to clean up the linework, then Photoshop for the final artwork. Time consuming, but once I had one half of one SRB, it was just mirroring and copying to get the rest. They were huge — it took three sheets of letter sized decal paper for the pair! 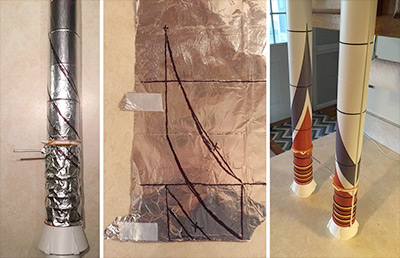 |
madmonk911
New Member Posts: 4
From: Liverpool Merseyside UK
Registered: Sep 2014
|
posted 02-04-2016 03:02 PM
First of all, I would like to thank Michael for producing such a striking model of the SLS. As the proud recipient of the SlS,I would like to say Michael has again done me proud with such a great piece. It took quite a bit of figuring out, but got there in the end, keeping me informed with the build, asking for my input and any suggestions that I wanted to include. It won't be long before I have something else for him to get stuck into. Thanks again Michael. |
keymichael1855
Member Posts: 176
From: Virginia Beach, VA, USA
Registered: Feb 2012
|
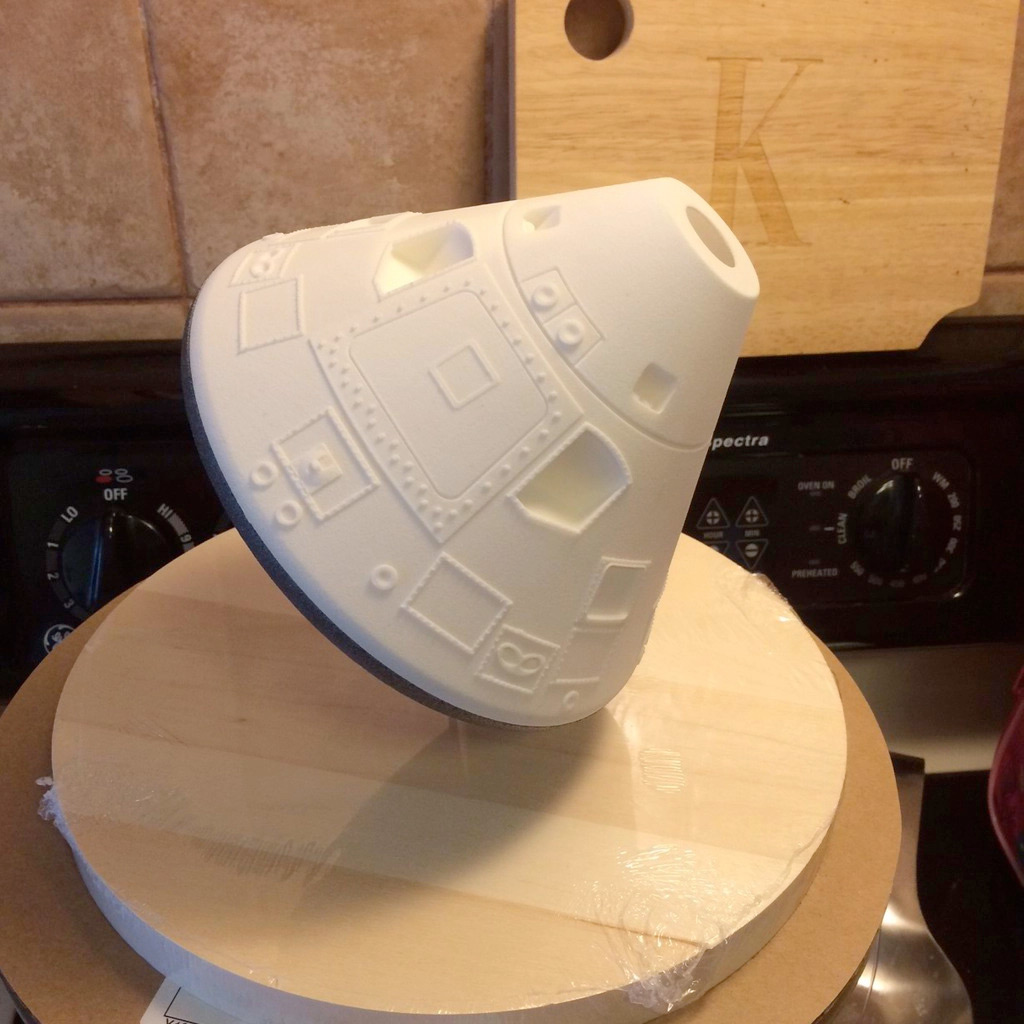
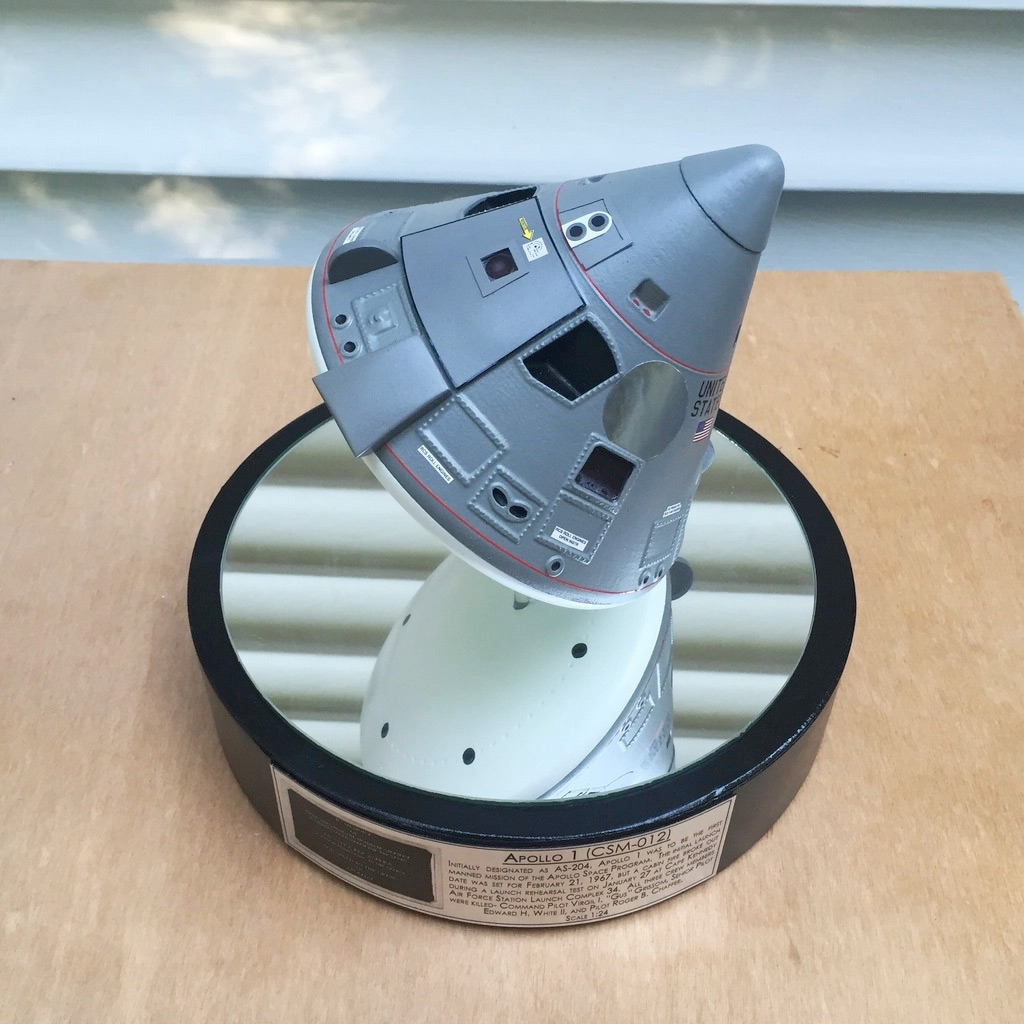
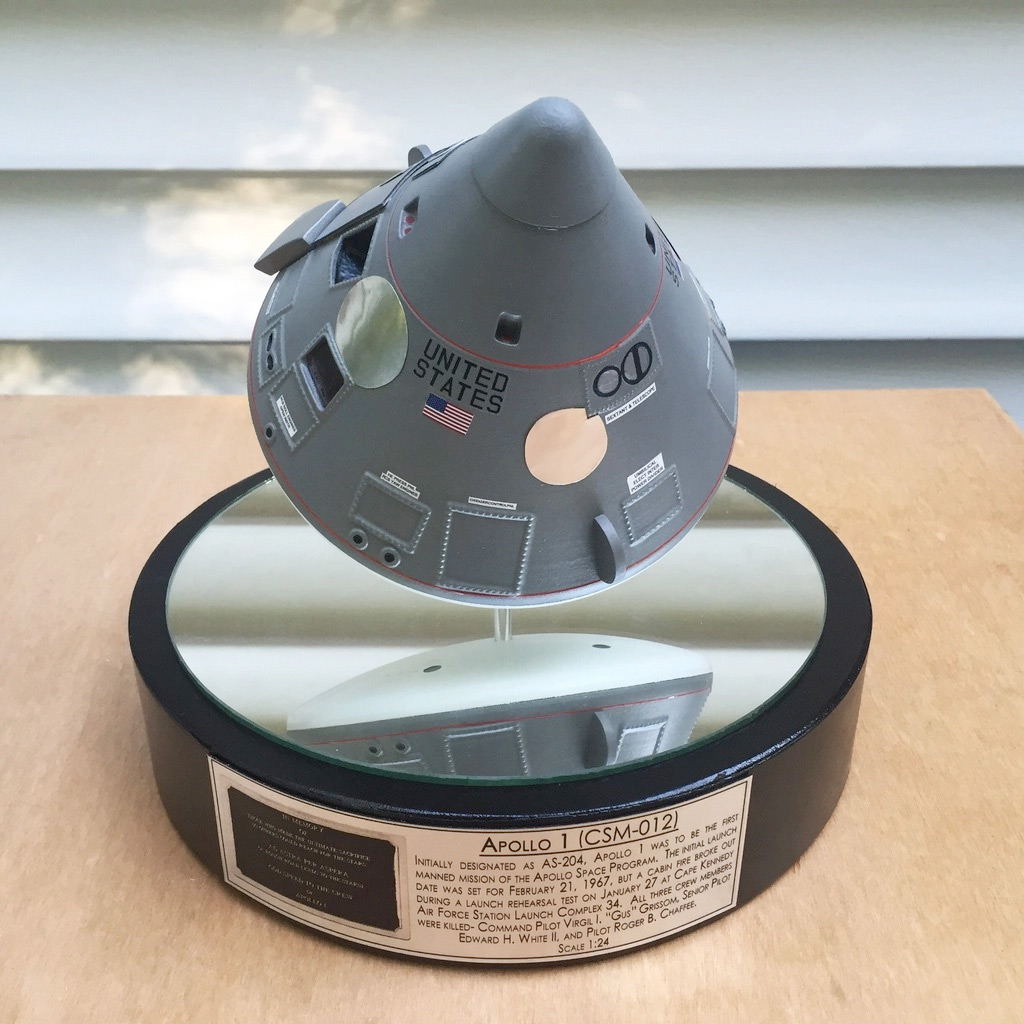
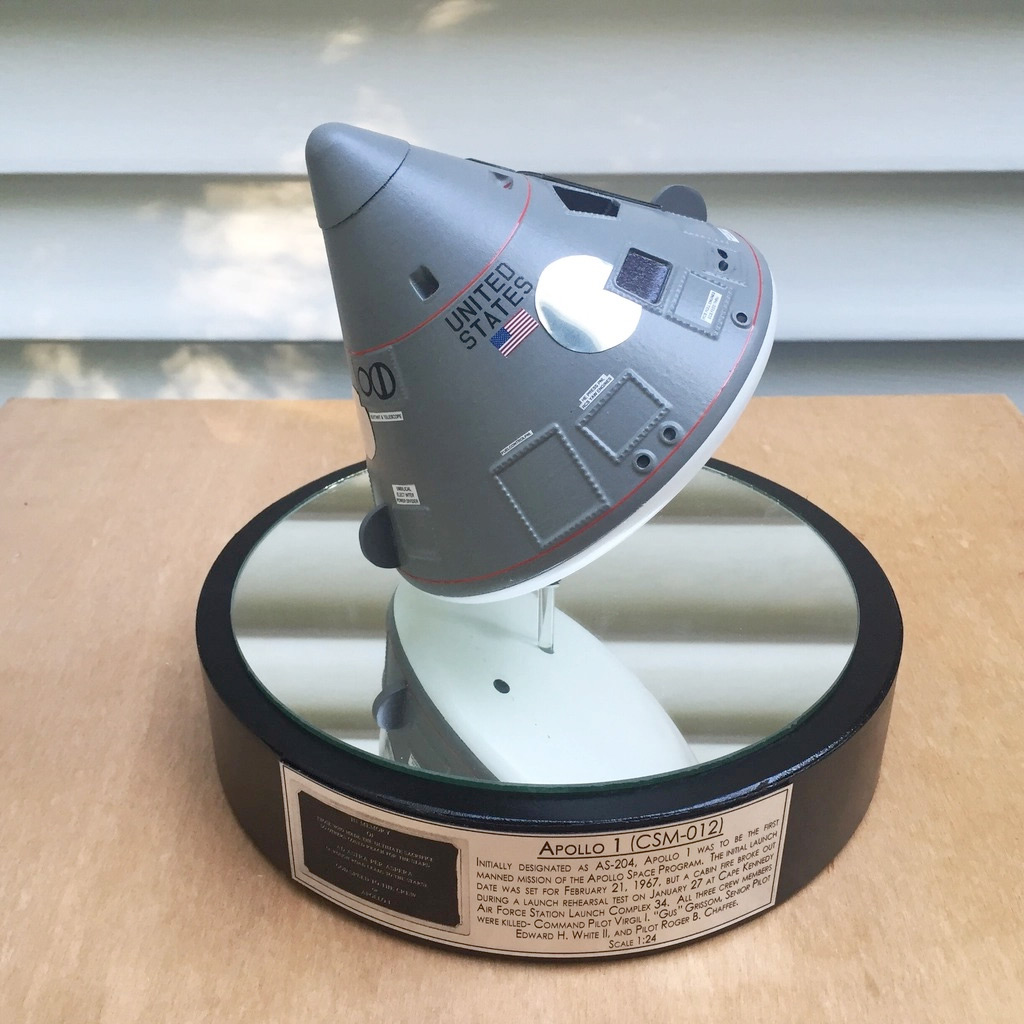
posted 08-11-2016 08:53 PM
So I had an extra 1:24 scale 3D printed Command Module that I was using as a test fit part for another project, and I wanted to do something different with it. I decided that I wanted to attempt to turn it into a Block I CM to represent Apollo 1. Here is how it came out — comments welcome!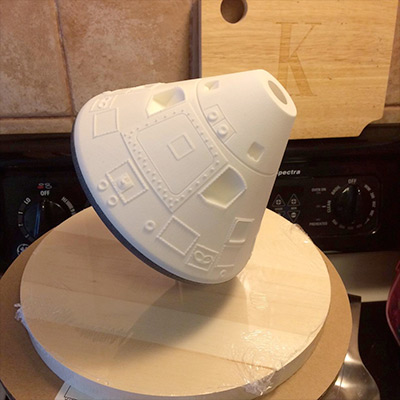 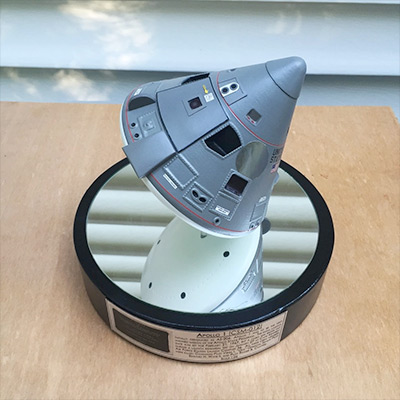


|
Jeff
Member Posts: 474
From: Fayetteville, NC, USA
Registered: May 2009
|
posted 08-13-2016 06:34 AM
Michael, Great job on the conversion and a very nice tribute to the crew of Apollo 1. |
history in miniature
Member Posts: 600
From: Slatington, PA
Registered: Mar 2009
|
posted 08-13-2016 09:56 AM
Michael that looks awesome!! |
mode1charlie
Member Posts: 1169
From: Honolulu, HI
Registered: Sep 2010
|
posted 08-13-2016 03:41 PM
Great job as always!One question (I assume the answer is yes given your level of researching a subject, but just because I don't know): there was no kapton foil on the Apollo 1 capsule, correct? If not, why not? Was that never planned for Apollo 1, and if not why not? |
Ronpur
Member Posts: 1211
From: Brandon, Fl
Registered: May 2012
|
posted 08-13-2016 04:54 PM
That is awesome! It is so different from the Block II! |