|
Author
|
Topic: FameMaster 4D Vision cutaway space shuttle
|
NASA Glenn
Member Posts: 79
From: Cleveland OH
Registered: Feb 2007
|
 posted 07-18-2008 12:05 PM
   
Has anyone seen one of FameMaster's 4DVision cutaway shuttle models in person? |
Mr Meek
Member Posts: 353
From: Chattanooga, TN
Registered: Dec 2007
|
posted 07-20-2008 12:55 PM
I can't help but notice that the flight deck/mid-deck hatch is in the wrong place. Oh well. It still looks neat. |
Philip
Member Posts: 5952
From: Brussels, Belgium
Registered: Jan 2001
|
posted 07-29-2008 10:02 AM
Looks like the lower deck of the orbiter isn't that detailed after all? |
Robert Pearlman
Editor Posts: 42982
From: Houston, TX
Registered: Nov 1999
|
posted 07-30-2008 08:57 AM
The pictures seem to show that the middeck includes the lockers, the bathroom, the internal airlock and the sleep stations. The only major thing missing are the seats but you can pretend they are stowed for on-orbit ops.  |
Mr Meek
Member Posts: 353
From: Chattanooga, TN
Registered: Dec 2007
|
posted 07-30-2008 01:26 PM
So, who's going to make a 1:72 SRB/ET cutaway to complete the stack? Surely you could scratch-build it out of an existing set. |
compucrap
Member Posts: 20
From:
Registered: Aug 2008
|
posted 08-01-2008 07:24 PM
I have one of these kits and I have to say the detail is amazing. I had planned on repainting it, but was so impressed with the prepaint job that I decided to hold off on superdetailing one. I plan to superdetail the next two and keep one for myself.Anyone who's considering getting one should go for it. Took about 45 minutes to assemble (it came about 80% already assembled.) |
Jay Chladek
Member Posts: 2272
From: Bellevue, NE, USA
Registered: Aug 2007
|
posted 09-18-2008 10:20 AM
The more I see the model the more I like it as they've done more stuff to the TPS then I've seen on other orbiters (such as the AFRSI blankets on the payload bay doors).Looks like I'll be wanting to save up money for this one. And yes, putting one on a stack is something I was planning to do as well. |
compucrap
Member Posts: 20
From:
Registered: Aug 2008
|
posted 09-18-2008 11:30 AM
Yes, the new orbiter details are amazing. It has a fully accurate tile pattern, and a somewhat accurate pattern for the thermal blankets. I toyed around with the idea of repainting it but decided against it. |
ilbasso
Member Posts: 1522
From: Greensboro, NC USA
Registered: Feb 2006
|
posted 02-08-2009 03:32 PM
I got my cutaway shuttle and put it together last weekend. The final assembly (body to wings) was an EXTREMELY tight fit — it's not coming apart again! I picked up a 1/72 Monogram Shuttle stack a couple of months ago, and I'll be getting onto merging the kits. |
apolloprojeckt
Member Posts: 1447
From: Arnhem, Netherlands
Registered: Feb 2009
|
posted 02-22-2009 11:32 AM
Nice shuttle, but I have build this model combination also, there are few details on this 4D shuttle that are not good, wrong shape main head engines, seats are not in good position in the cockpit. No windows in payload bay... |
Robert Pearlman
Editor Posts: 42982
From: Houston, TX
Registered: Nov 1999
|
posted 06-06-2009 07:02 PM
I finished assembling the cutaway space shuttle today and of all the different orbiter models released since the start of the program, this is so far my favorite. I was most concerned about the detailing on the flight- and mid-decks, but even with minor problems (the aforementioned inter-deck hatch location and the lack of aft flight deck windows), it is still superior to some of the custom-built models I have seen. Here's a couple of photos -- 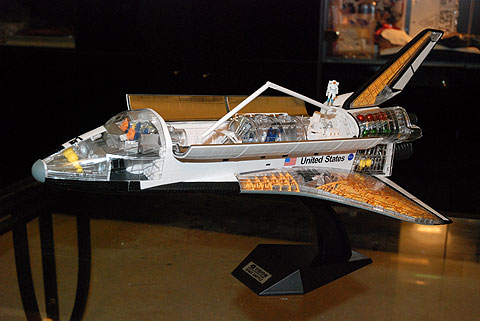 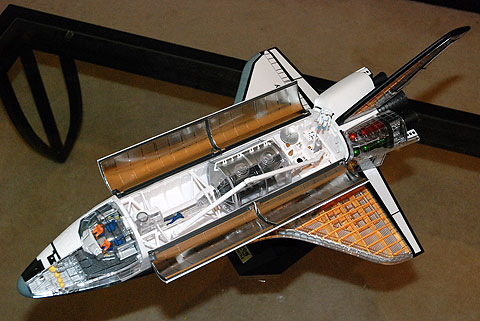
|
RocketmanRob
Member Posts: 268
From: New York City USA
Registered: Mar 2005
|
posted 06-06-2009 08:21 PM
How was the model assembled? Is it a snap tight style or something that gets glued together like a traditional model? |
Robert Pearlman
Editor Posts: 42982
From: Houston, TX
Registered: Nov 1999
|
posted 06-06-2009 08:26 PM
It is a snap-together model toy rather than a model kit (requiring glue). All the parts are pre-painted. It does take some time to assemble (though judging by the instruction book, it was originally planned to be more complicated; fortunately, it comes partially built out of the box). |
apolloprojeckt
Member Posts: 1447
From: Arnhem, Netherlands
Registered: Feb 2009
|
posted 06-07-2009 01:40 AM
If you want to see the building progress of my 4D shuttle (October 2008): Here a slide show. I have a lot of change about the 4D Shuttle. When is was ready I have it sold to someone in the USA. |
Henk Boshuijer
Member Posts: 450
From: Netherlands
Registered: May 2007
|
posted 06-07-2009 04:01 AM
I have this model for some time now and I think it is a great model. It would be nice if someone could make an upgrade kit for the flight deck and middeck section. The models snaps together so it would be easy to replace the flight deck part. |
E2M Lem Man
Member Posts: 846
From: Los Angeles CA. USA
Registered: Jan 2005
|
posted 10-19-2009 12:04 PM
Yippee! Got mine over the weekend at the California Science Center in Los Angeles. I am working this one for the Columbia Space Center's opening this weekend. A lot of work ahead. The flight deck needs work and I may drill out the flight deck access hatches and leave the mission specialists' seats out. Luckily, I have a full size mockup to copy from here in Downey.  |
lewarren
Member Posts: 269
From: Houston, TX, USA
Registered: Aug 2001
|
posted 10-19-2009 09:40 PM
I'm looking for a customization kit with more accurate cockpit seats. |
E2M Lem Man
Member Posts: 846
From: Los Angeles CA. USA
Registered: Jan 2005
|
posted 10-20-2009 08:25 PM
It definitely needs the seats. Maybe from a Monogram orbiter? I have opened up the middeck access hatches (missing on kit) and the flight deck windows to the payload bay.Have to add more nose thrusters, and cut away the incorrect Canada arm grasper (it looks just like the one on the 1974 Orbiter mockup that we have here in Downey). The payload bay EVA handrails need to be painted yellow, and U.S. Flag and Canadarm decals as well as other markings (ESA/ Spacelab, etc.) from an add on sheet. But... where is the orbiter bathroom, KU band antennae, payload bay TV cameras and main hatch? But, that said, it is a beautiful piece of work that is stunning and has some great engines and plumbing, as well as flight, mid-deck, and Spacelab and a great puzzle that only goes together one way, you can't mess this up. |
Voodoo1200
Member Posts: 59
From: Leander, Tx USA
Registered: Feb 2009
|
posted 10-23-2009 07:14 PM
Where can I find the external tank and SRBs? |
ilbasso
Member Posts: 1522
From: Greensboro, NC USA
Registered: Feb 2006
|
posted 10-23-2009 07:44 PM
Monogram had a 1/72 scale shuttle stack but it has been out of production for a long time. You can still occasionally find it on eBay. I found one on Craigslist quite by chance earlier this year. It's a very large box! |
Voodoo1200
Member Posts: 59
From: Leander, Tx USA
Registered: Feb 2009
|
posted 10-24-2009 09:34 AM
Could you just post the dimensions of each with a few pics of the attachment points. I was going to make mine from aluminum. |
apolloprojeckt
Member Posts: 1447
From: Arnhem, Netherlands
Registered: Feb 2009
|
posted 10-24-2009 11:06 AM
I think that will be weight very heavy or is it not solid? |
Voodoo1200
Member Posts: 59
From: Leander, Tx USA
Registered: Feb 2009
|
posted 10-24-2009 07:58 PM
I was going to make mine hollow aluminum. |
GoesTo11
Member Posts: 1309
From: Denver, CO
Registered: Jun 2004
|
posted 10-27-2009 09:12 PM
How well does it go together? I bought mine today but probably won't be able to unpack and assemble it until the weekend. Any tips? |
j0s9
Member Posts: 140
From: Clinton, MA, USA
Registered: Oct 2009
|
posted 10-27-2009 09:26 PM
Once finished it looks amazing. Be careful with the assembly, you must take everything out, and with it I mean, separate the whole shuttle, at the end you will need to do so in order to fit all the items. Get a scissor for the plastic bags where the pieces are. For the rocket motor system try to go out to in, otherwise you are gonna get confused with all the pieces. When placing the tires place the doors then the tires (front tire doors need some patience). And that is pretty much it, hope you enjoy it. I really did. |
perssj
Member Posts: 73
From: Sweden
Registered: Jul 2006
|
posted 10-31-2009 04:56 AM
First of all: The 4D space shuttle is a very nice model and a joy in my collection. Everybody who sees it is very impressed.But I have a question about the engine compartment. When trying to assemble it, it seems that one piece is missing, and there are two samples of another piece. Hence the number of pieces is correct but it does not seem to fit correctly. It looks like item 66 is delivered twice, and item 69 is missing. Has anybody else had this problem, or is mine a Monday-sample? I've recently contacted the supplier. I hope they can correct it. |
j0s9
Member Posts: 140
From: Clinton, MA, USA
Registered: Oct 2009
|
posted 10-31-2009 08:57 AM
Item 66 looks very similar to item 62, the difference is the hole on the side for item 65. Try to assemble it looking the figure of the piece on page 12 and not looking the item number. |
perssj
Member Posts: 73
From: Sweden
Registered: Jul 2006
|
posted 11-02-2009 10:17 AM
I sent some photographs to the manufacturer, and they confirmed my problem.They are going to send me replacement parts. Good service! |
jdcupp
Member Posts: 45
From: Cookeville, TN, USA
Registered: Jul 2009
|
posted 11-03-2009 09:45 AM
My son said, "found a new toy?" I said, "museum quality detailed replica." Had only minor difficulties with assembly, but really enjoyed putting it together. It looks great next to my ISS model (of course, not the same scale). Thanks again! |
E2M Lem Man
Member Posts: 846
From: Los Angeles CA. USA
Registered: Jan 2005
|
posted 11-03-2009 12:50 PM
I want to suggest to the crafty modelers on the thread that they can add some more detail with RealSpace Models 1/72 decal sheet created a few years back for the Monogram shuttle stack kit. It has crew entry hatch and window decals, as well as SRB/ET markings for those of us that are doing that. Add some ESA decals and some paint and flags in the cargo bay and you are set with a museum quality model you will love! |
TRS
Member Posts: 721
From: Wellington, New Zealand
Registered: Mar 2003
|
posted 11-08-2009 04:22 AM
I've just finished mine - looks great.Small quibble that I couldn't get the to section of the outer 'frame' to fit properly by the crew compartment so ended up slicing the tabs off and using super strong adhesive. And a tip - do the engines BEFORE you put the body back onto the underside - that way you can easily get the transparent cover for the engine section on because if is a dog to do in the order they suggest. |
CaptSpry
Member Posts: 33
From: San Diego, CA
Registered: Feb 2012
|
posted 03-04-2013 04:43 PM
So I just got one of these and I love it. However, I am missing the nose cone, of all things, which is the last piece to go on the shuttle. Does anyone know how to get a replacement for a missing piece? |
mike_nz
Member Posts: 16
From: Canterbury, New Zealand
Registered: Jun 2012
|
posted 03-05-2013 02:42 AM
Try emailing [email protected]. I had a very successful outcome with the company ordering a replacement part of the 4D Saturn V - so I would think you should have no trouble getting the missing part for your shuttle hopefully. It was delivered promptly too - very good service! |
CaptSpry
Member Posts: 33
From: San Diego, CA
Registered: Feb 2012
|
posted 03-05-2013 10:10 AM
Perfect, thanks for the info! I have the Saturn V also, very nice models and were a lot of fun to put together. |
CaptSpry
Member Posts: 33
From: San Diego, CA
Registered: Feb 2012
|
posted 03-12-2013 03:27 PM
Great customer service... they are shipping my missing piece this week. |
Planetary
Member Posts: 24
From: Huntington Beach, CA, USA
Registered: May 2013
|
posted 11-11-2015 06:52 PM
Resurrecting this old thread....I am kit bashing a 1/71 full stack using the old Monogram Tank and SRBs along with the FameMaster Shuttle. I'm at the point where I'm ready to drill the attach points on the underside of the Shuttle to the rest of the near-finished stack so pulled the 4D Shuttle from the 5 year old unopened kit from the garage and discovered much of the body of the shuttle comes already pre-assembled. However, much of the interior is still in pieces in their baggies so I have no choice but to take apart the hull. Problem is, it appears once the body is assembled, it's almost impossible to take it back apart without breaking tabs. First question is - is this the way this kit has always been packaged (it was new in box sealed, by the way) and second, anyone have pointers on how to gingerly take the body apart to do the interior? |


