|
Author
|
Topic: Opening a Saturn V flight control computer
|
Jurvetson
Member Posts: 93
From: Los Altos an SF, CA, United States
Registered: Sep 2011
|
 posted 04-27-2016 04:58 PM
   
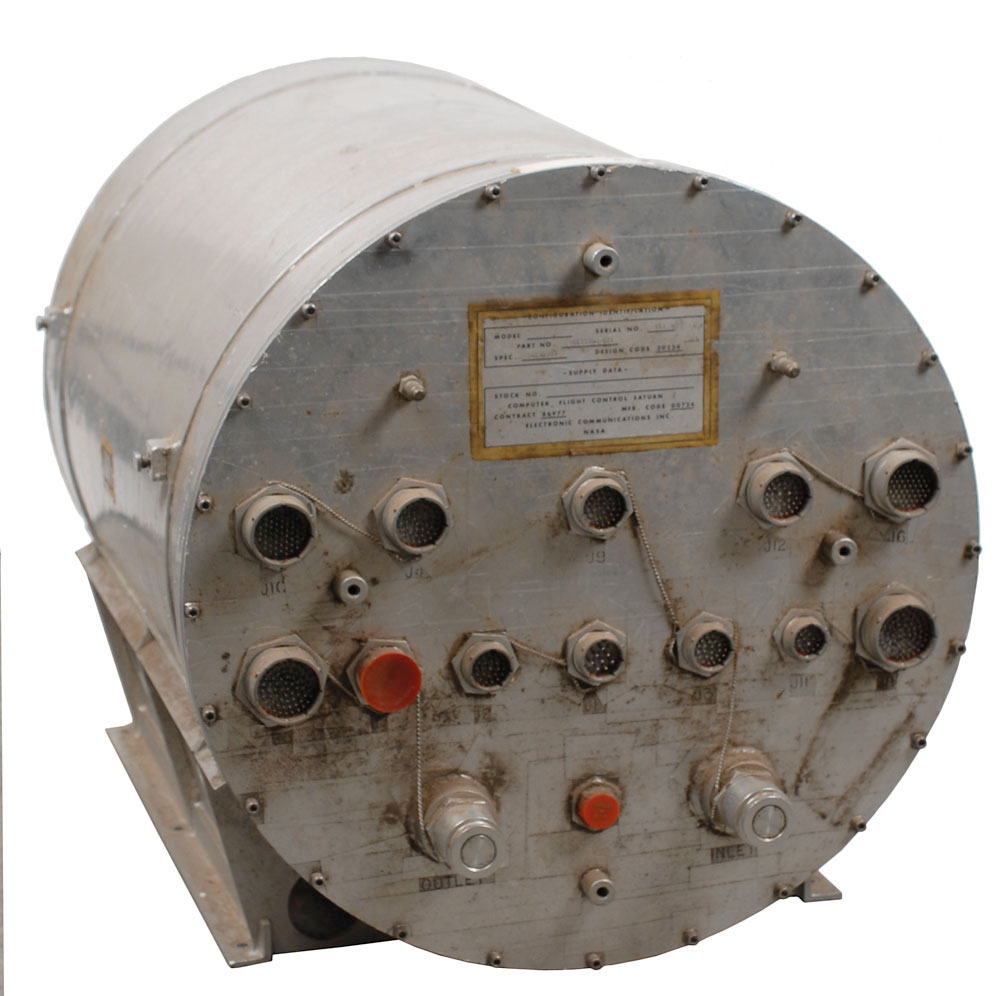
I am considering opening the case on this Saturn V Flight Control Computer to photograph the innards. The case has not been opened yet, and I am wondering if anyone has advice or guidance on such an undertaking. Thanks.  |
schnappsicle
Member Posts: 396
From: Houston, TX, USA
Registered: Jan 2012
|
posted 04-28-2016 07:41 AM
No real advice from me, but I personally wouldn't open it. Every time I take something apart, I manage to piece it back together with fewer parts and only the minimum amount of screws. I wouldn't want anything like that to happen to something of such historic significance. |
David Carey
Member Posts: 782
From:
Registered: Mar 2009
|
posted 04-28-2016 10:47 AM
Congratulations, Steve. The wiring harnesses that terminate on the end plate, where a ring of bolts are present, may restrict opening it from that end. Or could be an internal cage. I'd say relative safety of taking a peek would depend on knowing how it is constructed and meant to be disassembled. I've never seen the appropriate document or diagram but someone else may have what you need. Fabulous item. |
space1
Member Posts: 853
From: Danville, Ohio
Registered: Dec 2002
|
posted 04-28-2016 11:30 AM
My congratulations as well.It is quite possible that the inside has components which are fully encapsulated. An alternative to opening the unit would be to have it X-rayed. Even through a metal casing the imagery can be very interesting and revealing. Look for services which offer digital X-ray scanning. |
Jurg Bolli
Member Posts: 977
From: Albuquerque, NM
Registered: Nov 2000
|
posted 04-28-2016 11:54 AM
What are the dimensions on this fabulous item? |
Buel
Member Posts: 649
From: UK
Registered: Mar 2012
|
posted 04-28-2016 12:39 PM
Wow this looks fascinating. Is there any chance you could video the 'big reveal'? |
David Carey
Member Posts: 782
From:
Registered: Mar 2009
|
posted 04-28-2016 02:08 PM
Given the side view shown in the Smithsonian's example I'd conclude the perimeter ring of bolts is likely what would be removed to expose an internal cage which supports the electronics. The outer housing appears to create a pressure/purge vessel and the two ports labeled 'inlet' and 'outlet' would likely be used for gas exchange or even perhaps glycol or other loop for cooling? Inside, I suspect you'd find something similar, if not identical, to that of a wire photo shown in a Tumblr post. |
Buel
Member Posts: 649
From: UK
Registered: Mar 2012
|
posted 04-28-2016 05:01 PM
quote:
Originally posted by David Carey:
Inside, I suspect you'd find something similar, if not identical, to that of a wire photo shown in a Tumblr post.
Well that photo really brings it home just how intricate everything was. It's been said many times, but what a feat of engineering. |
Tim Collins
Member Posts: 45
From: Harrisburg, PA
Registered: Mar 2007
|
posted 04-28-2016 06:06 PM
Hey Steve, recently (within the past three months) I came across a photo of the electronics within the unit. As I recall, the analog circuit boards are more of a semicircle (not rectangular cards) and there are tons of them, installed in three or four level/layers of card cages. If interested, I can probably dig around and find it again? At the time I was doing some research on the LVDC memory modules, and came upon this in a description and illustration of hardware in the IU. |
mikej
Member Posts: 481
From: Germantown, WI USA
Registered: Jan 2004
|
posted 05-02-2016 06:02 PM
The U.S. Space & Rocket Center has opened up a Flight Control Computer for their "Mind of Saturn" (Instrument Unit) exhibit. I'll send some photos of the FCC to your email.You might try contacting the USSRC to see if they actually put the exhibit together or if they outsourced it. Ed Stewart, the curator (strictly speaking, the "Director of Exhibits and Curation") posts here on collectSPACE under the screen name "SprocketCur", so you should be able to find his email address that way. |
DG27
Member Posts: 173
From: USA
Registered: Nov 2010
|
posted 05-03-2016 01:04 AM
First, congratulations on a great acquisition. I think it will make a great display either as is or opened up. If you decide to open it up here is what I have to offer. Having taken apart a lot of things (avionics boxes, engine components, and suits) and successfully putting them back together, I recommend the following: - Have a dedicated work area, with a clean work surface. Formica top or white masonite works well. If it is a table, make sure it is sturdy and will not collapse or tilt over if a heavy object is placed on it and someone leans on the table. Make provisions to keep round objects from rolling off the surface. Have some soft padding or foam sheeting available to help cradle or hold things.
- Supplies - Have a note pad for taking notes. Have a camera for photographing where parts went. Have small bags for parts. Use Sharpie markers for marking the bags of removed parts. Paper towels or lint free cloths for cleaning as you dismantle the unit.
- Use the right tool. If you don't have the correct tool, then stop and get one. Incorrect tools or poor fitting tools will damage the hardware.
- Write everything down. Don't assume you will remember where something went if you want to put it back together later. (You won't remember everything. Trust me. A lesson I learned the hard way.) Make a diagram when removing parts and bolts or screws. Number and label the diagram and bag and tag teach part. Lots of bolts may all look the same before they are removed but actually may be different lengths depending on the internal structure they are inserted into. This provides you the option of putting it back together exactly the way it was before. Use lots of bags and mark each one.
- Start off by cleaning the exterior. Gently wash it off using a soft sponge and water. Based on the photograph, it looks like there is a lot of dirt on it especially around the connectors. Be careful not to rub off the ink stampings near the connectors. Use common sense when cleaning. The connectors are hermetically sealed so they can be cleaned out. Use a soft bristle small brush, like a tooth brush, to clean the dirt out around the connector pins. Dry out with compressed air. Get some cap plugs to cover the connectors after cleaning them. There are a few cap plugs still on some of the connectors.
- Research your unit. Get as much documentation or photographs that show what you can expect to find inside. This will help you in understanding how it comes apart. A quick internet search shows some photos of the insides and there is a video clip on You Tube. Other CS members have offered some photos as well.
- Based on the photos I've seen and from the looks of the unit exterior, the lid is held in place with the ring of bolts. The connectors should not need to be touched. The inlet and outlet liquid connectors are for cooling. The liquid connectors appear to be self sealing quick disconnects so the cooling tubing may still have coolant in it.
- I assume the unit was purged with a dry inert gas to remove moisture when it was assembled. Opening the lid will vent the gas out. It should be at atmospheric pressure, so the lid should not blow off. But always use common sense when opening something up. If the unit has a positive over pressure then be cautious. The seals may be stuck so a very gentle tap with a rubber or plastic faced mallet will help. Don't hammer on the unit. Also avoid trying to pry the lid off with a flat screw driver. It will chip the lid and possibly gouge the seal. There are what appears to be 4 small bosses on the lid. If they are threaded, they can be used to attach fixturing to help pull the lid off or hold it once it is removed. If you reassemble the unit I suggest re-purging it or inserting desiccant into the unit especially if you are in a humid or salt air environment.
- Based on the photos the entire cylindrical card stack should slide out of the housing in one piece. Have an idea how to hold onto it when removing it and what you will rest it on and how you will rest it once it is out. Always assume that you may damage something, to look at different ways of holding or setting something down. The guts will be a large cylindrical stack of cards. Don't let it roll off the table.
- I think you will be pleased with what you find inside and I think it will make a great display. It looks to be a fascinating piece of hardware.
Hope this helps. Congratulations again. |
Jurvetson
Member Posts: 93
From: Los Altos an SF, CA, United States
Registered: Sep 2011
|
posted 05-03-2016 04:32 PM
Thanks so much everyone. I would be interested in any documentation and photos that you know of. |
CMikeW
Member Posts: 89
From: United States
Registered: Apr 2013
|
posted 05-03-2016 09:11 PM
QDs look like fluid QDs. I think I'd try to find out if the Flight Control computer was liquid cooled before I'd break into it. |
SpaceAholic
Member Posts: 4437
From: Sierra Vista, Arizona
Registered: Nov 1999
|
posted 05-03-2016 10:01 PM
Meth/water cocktail anyone? |
music_space
Member Posts: 1179
From: Canada
Registered: Jul 2001
|
posted 05-08-2016 10:27 AM
I did open this Voskhod instrument and followed most of the advice above. It is fascinating to look at: I have no regrets. I will eventually fit the stand with LED micro-spots. |
Paul78zephyr
Member Posts: 675
From: Hudson, MA
Registered: Jul 2005
|
posted 05-13-2016 01:03 PM
quote:
Originally posted by David Carey:
Inside, I suspect you'd find something similar, if not identical, to that of a wire photo shown in a Tumblr post.
Based on the photo/caption in the above post you may want to contact this fellow. |
Paul78zephyr
Member Posts: 675
From: Hudson, MA
Registered: Jul 2005
|
posted 05-13-2016 03:35 PM
If this is the inside of the FCC.Then this pic seems to show the bare chassis (on right). |