Exhibit space
Displaying your collectionby Dr. Rob Sumowski
I have always longed to share my collection with more people but without a stream of new visitors coming into my house, there have been few opportunities beyond Internet forums and the occasional gathering.
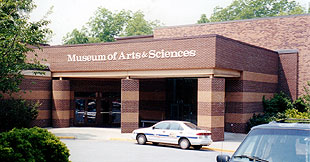
That is, until I approached the Macon Museum of Arts and Sciences with the idea of displaying several pieces from my collection during Space Day 2000.
When I first approached the director of the museum's planetarium, he remained skeptical. While he acknowledged that a collection such as mine seemed interesting, he wasn't quite sure what to expect from a home grown exhibit. That said, he agreed to give it a try and I was allowed one carpeted wall in the museum's children's gallery.
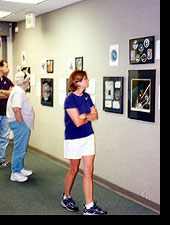 The response from visitors was wonderful. I stood off to one side like a proud and doting father, silently willing patrons to walk into the area where my collection was displayed and take a look. The response from visitors was wonderful. I stood off to one side like a proud and doting father, silently willing patrons to walk into the area where my collection was displayed and take a look.
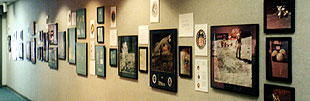
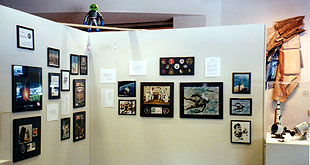
Skip ahead two years: open since May 11, and scheduled to continue through early July, my second exhibit is now underway.
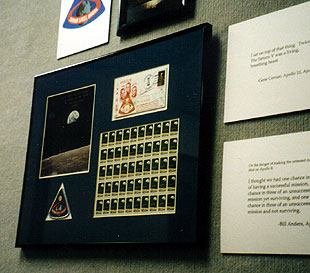
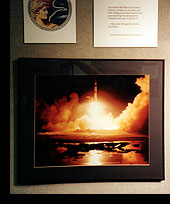
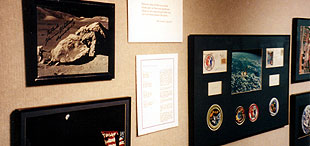
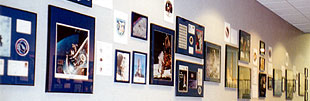
It has grown to include over 60 framed displays and photographs, each corresponding to flights beginning with Mercury-Redstone 3 and progressing through STS-1. An original narrative, interspersed with notable quotes, guides patrons through the exhibit.
Delighted with the attention my own collection is receiving now, I would like to help other collectors reach into their communities and start similar exhibits. This guide was written to help you get started preparing your items for display.
Framing
Any way you slice it, framing a collection can cost a small fortune. If you are like myself, you will not be able to afford to frame all your pieces at once, so choose a few at a time.
When possible, I suggest using a professional framery. Novaspace Galleries is a great example. Kim Poor, as both owner and artist, knows and appreciates the archival nature of preservation, and has shared advice with me along the way. Understandably, Kim's services can be costly, but it's certainly well worth the investment.
Since I'm a teacher (translation: poor), my budget simply didn't allow for all my pieces to be professionally framed. To avoid breaking the bank, I shopped around for the individual components, and assembled the frames myself.
I chose standard black metal sectional frames: these are universal, sturdy, attractive, affordable, available in any size imaginable (in one inch increments), and were an option I could assemble myself. I found Wholesale Frames out of North Carolina to be dependable and reasonably priced. They ship to anywhere, and have literally saved me thousands of dollars.
In addition to my framed and matted displays are more than thirty 8x10 photographs that help tell the story of each flight. For these, I bought $2.00 wooden frames from Wal-Mart, removed the glass, then spray painted to match my mat color.
It's not a good idea to leave photos in these smaller frames for any extended period -- placed against glass, they can be severely damaged by exposure to moisture. To avoid this, I store the photographs in archival sleeves, only framing them a few days before each exhibit.
Matting
 I was fortunate to find a small, local frame shop run by a lady who adores memorabilia of any kind. She gave me the best price on mats and assisted designing each frame. I was fortunate to find a small, local frame shop run by a lady who adores memorabilia of any kind. She gave me the best price on mats and assisted designing each frame.
Together, we chose a single layered, deep blue, archival mat so all the displays would match. She has been careful to keep a surplus of the size and style in stock and has awarded my continued business with a sizeable discount.
Glass
You can either use UV protected or regular glass.
There is a debate as to whether UV glass really makes a difference. My buddy (and author of "Relics of the Space Race") Russ Still and I agree that we can't really tell much of a difference. Kim Poor adds that any type of glass tends to stop at least 50 percent of UV rays.
Since I'm already careful about keeping my collection away from sunlight, I chose regular glass and saved a bundle to boot.
Mounting signed photographs
When mounting 8x10" photographs under mats, I use archival mounting tape purchased from an arts supply store or framery. I suggest using as little tape as possible though, to avoid damage (even if only to the backside of photographs).
Russ Still has had a good deal of success with non-acidic, paper tape with a water-soluble adhesive. This is a really good idea, as any residue can be removed easily. There are also products such as small slip-corners and paper trays that allow for safe mounting.
I ran into a dilemma with my 16x20 photographs. Photos of this size tend to wrinkle horribly when matted. The altnerative was dry mounting.
An argument can and has been made that dry mounting decreases an autograph's value. I decided that although my ten autographed 16x20s were probably safest rolled up in tubes, I really wasn't able to enjoy them for fear that they might depreciate in value. I had no plans to sell any of them anyway.
I first attempted dry mounting with an unsigned 16x20. I would not suggest doing this yourself, there are simply too many opportunities to mess it up. I talked with Kim Poor, who has a great deal of expertise in this area, and who's advice was very helpful.
Kim suggested using thin archival rag board and a tissue adhesive. After several phone calls, I found yet another shop, this one with the experience in tissue mounting I needed. I spent an hour meeting with their technician, having him explain the process, show me the press, and demonstrate how he planned to dry mount my photographs. Once the technician saw one of my inscribed pieces, he understood my concern.
All said and done, the results were beautiful and helped to give the exhibit a polished, professional appearance.
Setting up the exhibit
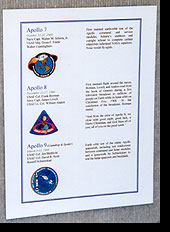 First, I took an inventory of the framed pieces I wanted to display. I also decided which single 8x10s would best assist telling the Apollo story, and set about writing my own narrative of the period. I used NASA's archives, a variety of book excerpts, and Kipp Teague's Project Apollo Archive as resources. First, I took an inventory of the framed pieces I wanted to display. I also decided which single 8x10s would best assist telling the Apollo story, and set about writing my own narrative of the period. I used NASA's archives, a variety of book excerpts, and Kipp Teague's Project Apollo Archive as resources.
I limited myself to no more than one page for each flight, with introductions to each program and descriptions of each launch vehicle flown. I then picked 25 of my favorite quotes and interspersed them throughout, to help the flow of the narrative. When it came time to print, I used 100 lb. cardstock, which the museum staff were kind enough to spray mount onto backer boards.
I used Microsoft Word to help design and organize the exhibit by using labeled text boxes to represent each photo and its relative position. This took approximately ten hours and eight separate pages, but proved invaluable once I arrived at the museum with over 60 frames to arrange.
I then worked with the museum's staff to place each display in its proper place and order, using my plans as a reference. The staff also had their own ideas, such as placing smaller pieces above larger ones to help give the exhibit an "anchored" appearance. I deferred to their judgement, as they were the professionals and knew much more about exhibit design than I.
Models
 To be clear, I do not consider myself a master modeler (a la Tracy Kornfield), though like Tracy, I have found that I am a lot more meticulous at model building at age 34 than I was when I was young. To be clear, I do not consider myself a master modeler (a la Tracy Kornfield), though like Tracy, I have found that I am a lot more meticulous at model building at age 34 than I was when I was young.
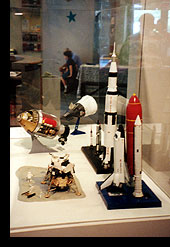
The models I used in my exhibit included the lunar diorama of Tranquility Base, an Apollo Command Module, Gemini spacecraft, Space Shuttle orbiter, and the "Man in Space" rocket set. I found the latter to be an effective tool for demonstrating the scale of each launch vehicle spanning the era depicted by the exhibit.
To display these, the museum set my models on fixtures with Plexiglas covers. Effectively protecting the models from the hands of children, it also had the added effect of making each appear much more professional than it really was!
Conclusion
The decision to exhibit my collection was by far one of the best I've made during my time enjoying this hobby. It may have cost a lot of money, and demanded hundreds of hours of research and legwork (not to mention the time needed to physically assemble so many pieces), but now I feel I have a public venue where I can share my latest additions with anyone who might be interested.
Displaying my collection has allowed me to bring the early space program to life for many people who might otherwise have overlooked this vital chapter in American history.
|