|
Author
|
Topic: Advice to repair damaged Apollo 13 artifact lucite
|
Skythings
Member Posts: 243
From:
Registered: Jun 2014
|
 posted 09-28-2014 09:44 AM
   
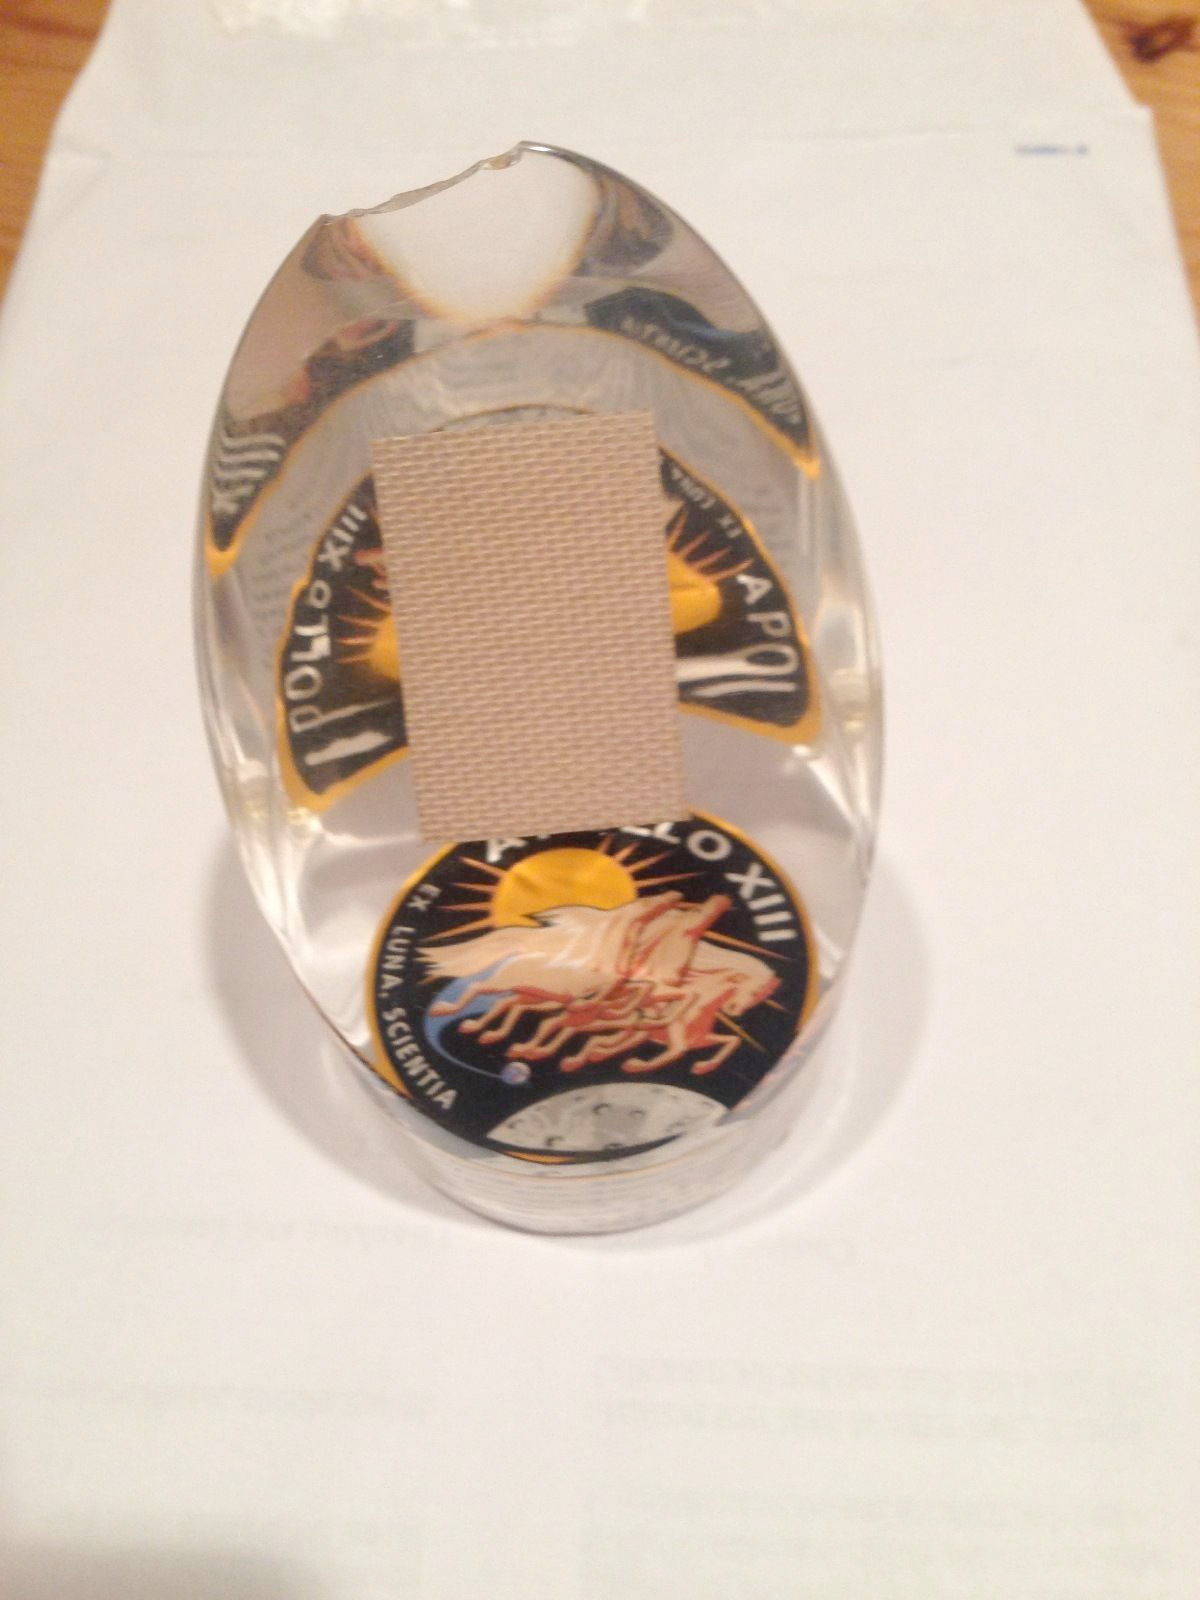
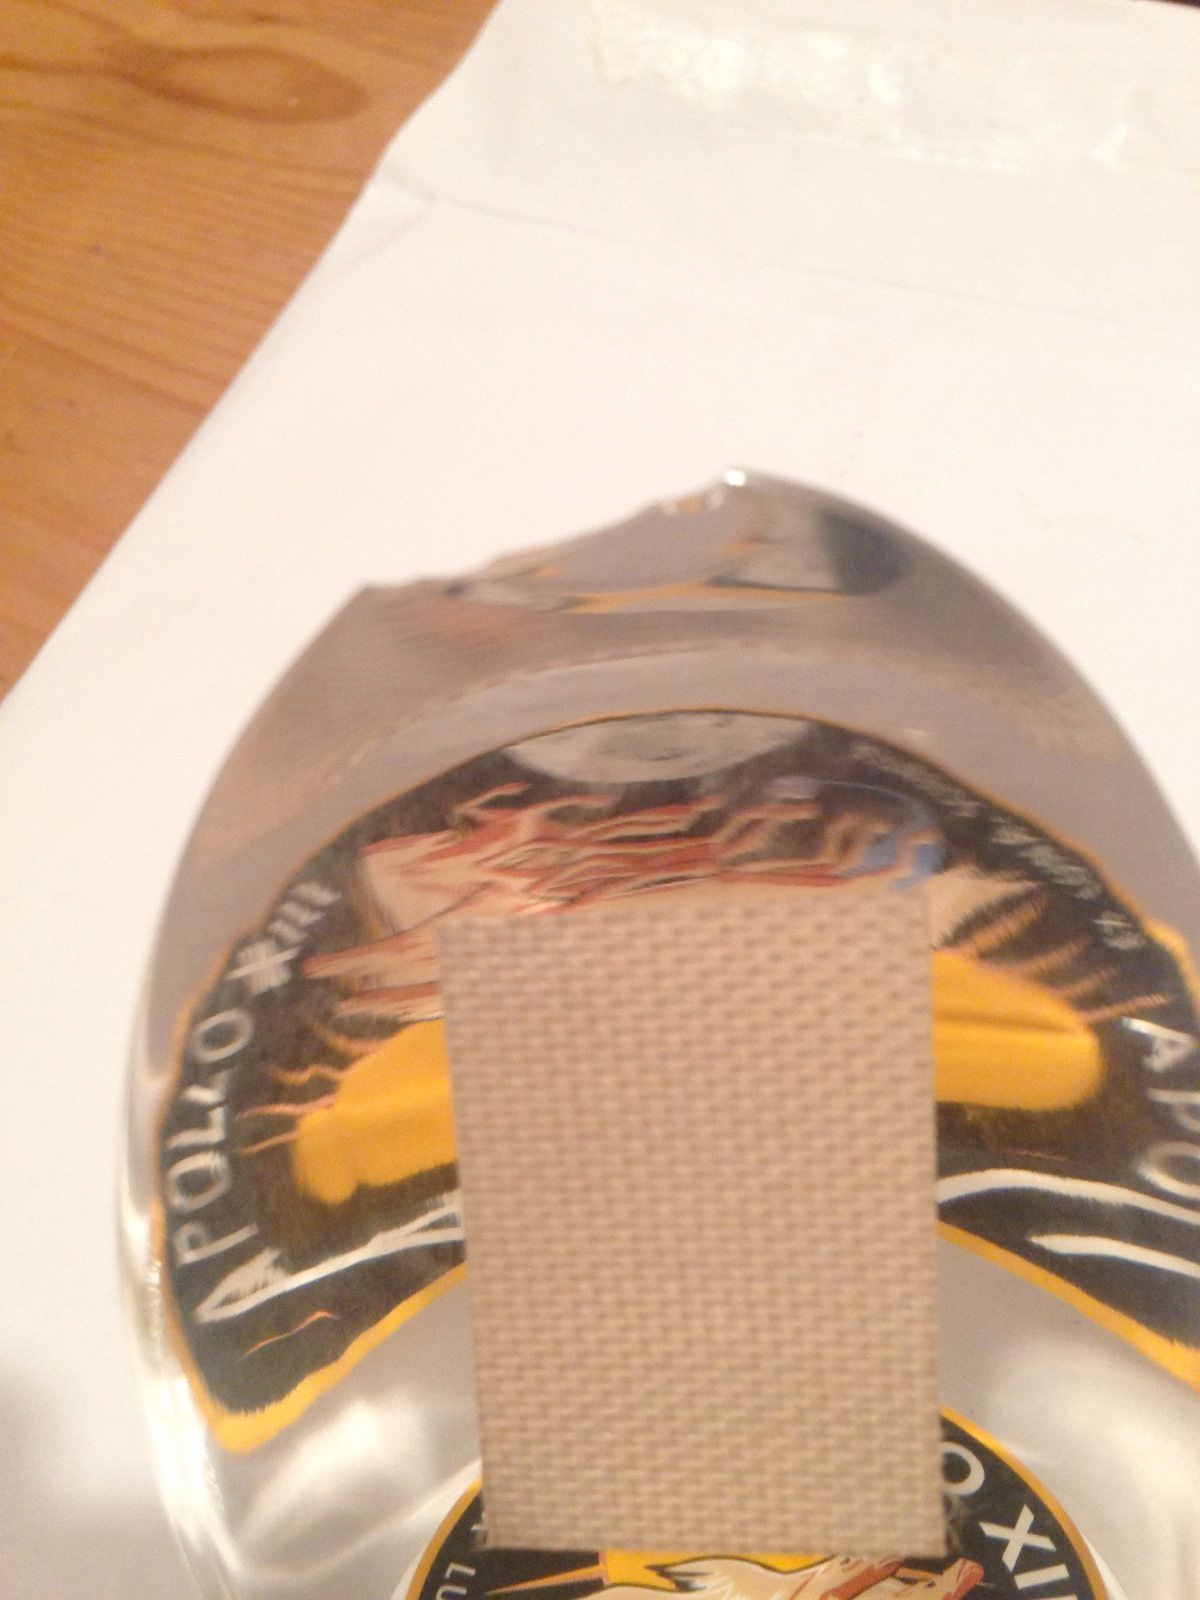
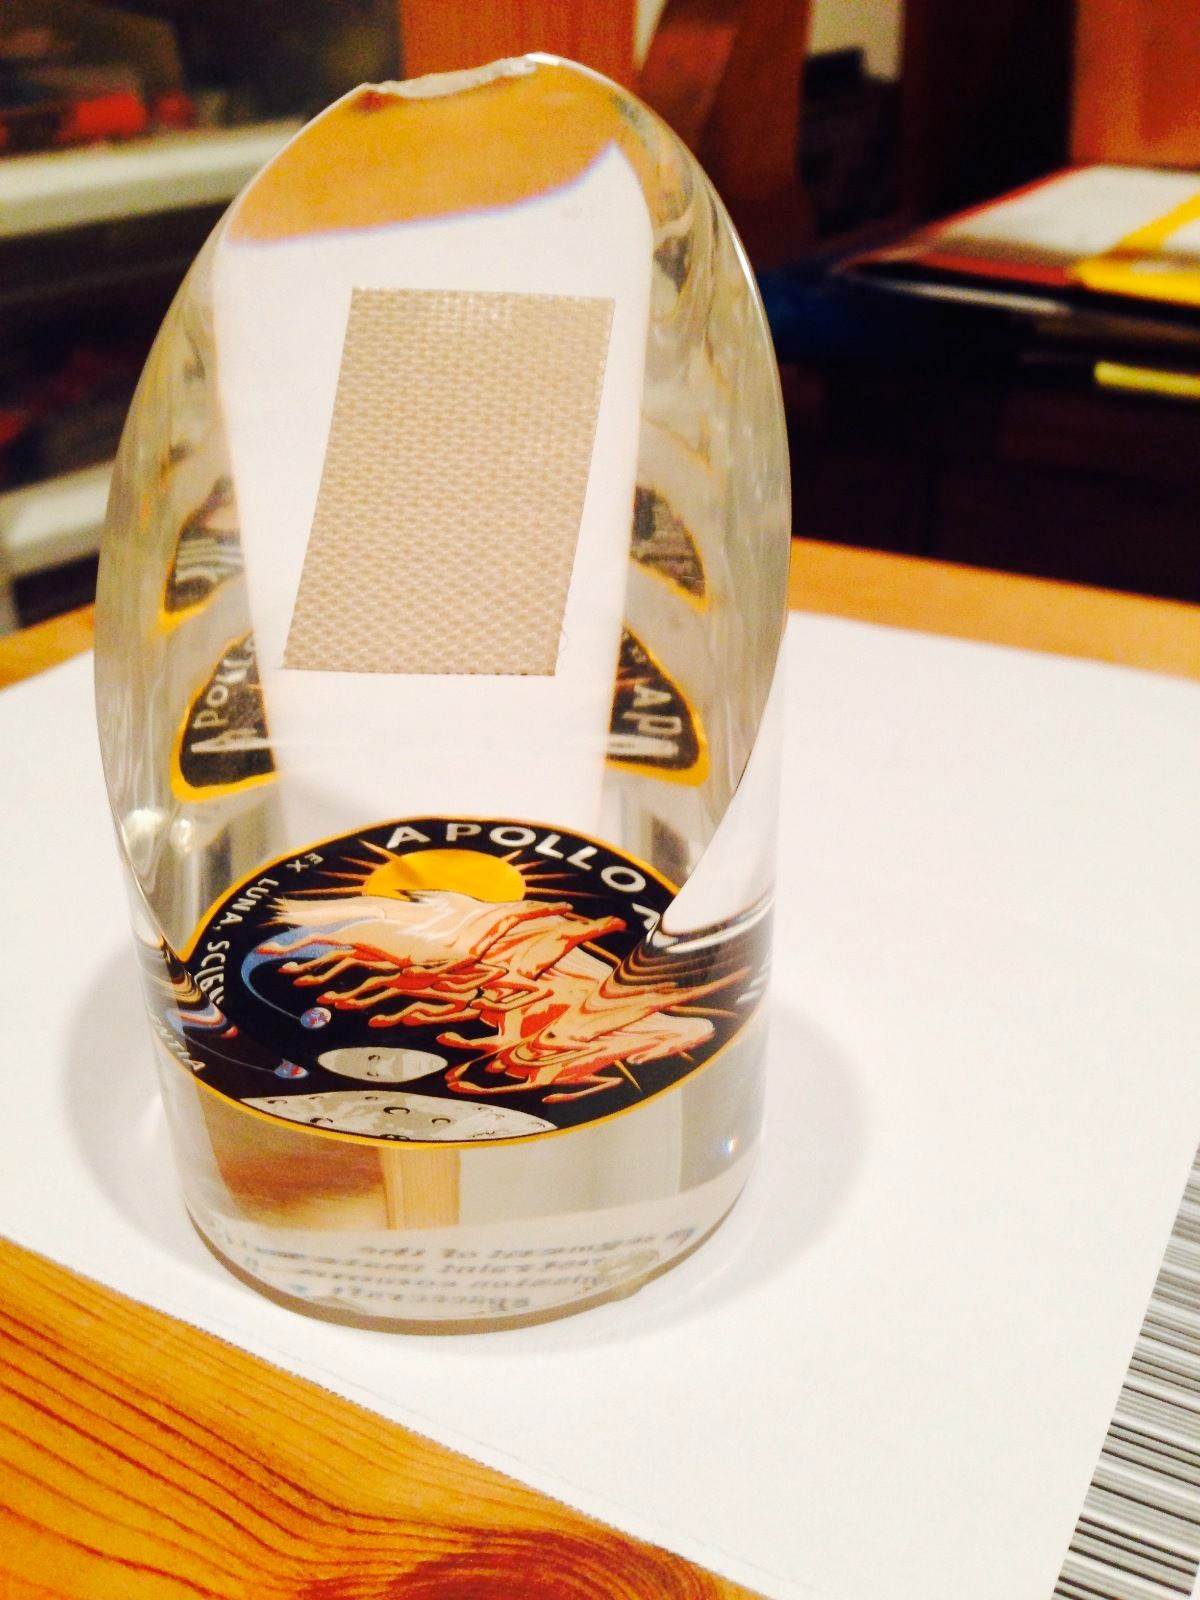
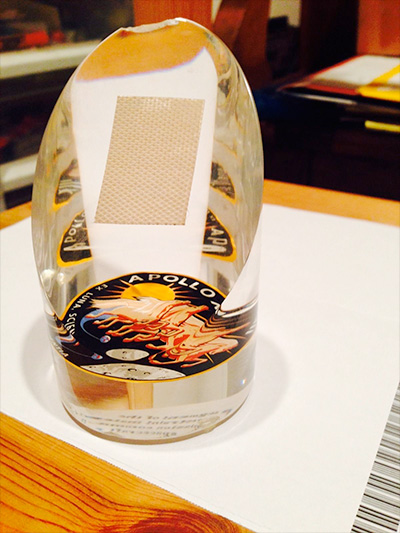
I just purchased a damaged Kansas Cosmosphere Apollo 13 lucite. Regrettably it was dropped on a solid floor. The top is missing a significant area of lucite and the underside is missing a small chip. I am not concerned about the underside. Only the top damage is visible when displayed.I know these are getting fairly rare to acquire and I have always wanted one in my collection so I decided to take the risk in making this purchase. I have $350 invested which I felt was reasonable. I'm sure others may not agree, but that's my problem. My intention is to attempt to restore and modify this historic item to an acceptable display level. I realize this item will always be altered and never be original. But hey, I still have a piece of Apollo 13 inside that damaged lucite. It will stay in my collection till my end days, so resale value is not a concern to me. I will keep images of the original damage to document the providence. So I am seeking your opinions, ideas and advice for the best way to repair this item. My initial thoughts are to cut or grind away the top 1/4 inch or so. I was thinking a straight line across the top front from left to right. The cut perhaps would be tapered towards the rear at say a 30 to 45 degree angle. This would leave a small block style area which I believe could again be polished almost to origin. Am I dreaming? A Google search offers information on working on lucite regarding types of blades and stones to use. There was also the option of laser cutting suggested. Are there other methods I should consider? Should I attempt this myself or send it out to a professional? Is there anybody on this site you would recommend to help me out? I do not intend to touch this until I have a firm plan in place. I appreciate and thank everyone for their advice in advance.  
|
garymilgrom
Member Posts: 1966
From: Atlanta, GA
Registered: Feb 2007
|
posted 09-28-2014 10:41 AM
I would use card stock and tape (no LiOH jokes please) to make the shape, fill with acrylic or clear epoxy then sand and polish to final shape.Tape a card to the angled front to extend that side over the damaged area. This is the most important "plane". Orient the piece so you can fill the defect. Fill beyond the curved backside, or try and shape the curved backside with more card stock. After your fill dries, sand with successively finer grits, ending around 1000 (need help here from modelers). Use a sanding block on the flat front plane. Then polish. Hopefully the fix will be much less noticeable, but don't expect it to look like a new, undamaged piece. I don't think that's possible. Good luck and let us know how it turns out. |
Mike_The_First
Member Posts: 436
From: USA
Registered: Jun 2014
|
posted 09-28-2014 10:49 AM
I was going to reply something similar, but in thinking about it further, wouldn't that still leave a visible "crack" (or fine line) between the old and the new? |
Skythings
Member Posts: 243
From:
Registered: Jun 2014
|
posted 09-28-2014 11:24 AM
quote:
Originally posted by garymilgrom:
Hopefully the fix will be much less noticeable, but don't expect it to look like a new, undamaged piece. I don't think that's possible.
This makes sense to me. If I don't like the look of the repair, I can always revert back to my first thoughts of removing the damaged area with a cut or grind. My concern with the sanding and polishing is I would have to sand the overlapping front area not currently damaged. I would be worried about damaging the front of the lucite if it goes wrong. How difficult will polishing this be? |
David Carey
Member Posts: 782
From:
Registered: Mar 2009
|
posted 09-28-2014 01:37 PM
Personally, I'd lean towards your original re-faceting idea (cutting off the jagged break and polishing) to make a truncated conical pyramid.Along with the difficulty of "plane-matching" new and old surfaces, adding material may risk color differences from aging effects and/or resin product. Adhesion and interface melding may also be challenging without really good surface prep. If I recall the placement of the swatch correctly, the fabric is close to the sloped surface so a uniform grind-back of the angled face beyond the break could be tricky. Something to consider though, if there is room. In all cases resurfacing results likely will rise and fall with the quality of saws (if used), lapping equipment, pads, polishing compounds, and 'touch'. I've never made a lucite quite like these but in parallel experiences, a hard lapping wheel surface pad is critical. Polishing pads with any compliance (i.e. foam-backed abrasive sheets) will tend to cause dishing/doming/edge-rounding and you'll lose a hard plane in any resurfacing. Finesse in applied polishing pressure can also play a big role - even, slow, and light is usually best. Successively finer grits/slurries/polishes with appropriate changes to the (hard) lapping pad are used to achieve the final squared-edge, mirror-like surface. I've generally found sanding blocks cause the 'touch' factor to become bigger than with a lapping wheel. Manually providing the grinding action while maintaining uniformity in pressure (for planarity) takes practice. Comments about a hard pad or polishing surface still apply if you go the manual block route. Just my semi-related experience though so I may be missing some critical differences. Your decision to go slow and develop a solid plan is smart; perhaps time will allow posts from experts closer to lucite artifact fabrication and repair. In any case, enjoy the new acquisition - chipped or not the object is the real deal as you say. [As a collector and parent, the listing made me empathetic to both the previous owner and the daughter who dropped the item ... probably wasn't the happiest of days in that household.  ] ] |
GACspaceguy
Member Posts: 2475
From: Guyton, GA
Registered: Jan 2006
|
posted 09-28-2014 02:15 PM
After 35 years in engineering supporting repairs on aircraft I have learned "Better is Good Enough's worst enemy". It might be best to leave it as is and tell the story when people ask. |
SpaceAholic
Member Posts: 4437
From: Sierra Vista, Arizona
Registered: Nov 1999
|
posted 09-28-2014 02:49 PM
A good plastic shop can segment the facet off and re polish so that the presentation will look fine. Artifact will be unbothered and provenance still intact. |
dragon001
Member Posts: 47
From: Allentown, PA, USA
Registered: Apr 2012
|
posted 09-28-2014 11:55 PM
Personally, I agree with Fred (GACspaceGuy). While the obsessive compulsive in me says send it out to have it cut down and polished - I would be afraid any attempts to fix might not go as intended. The best of intentions can go wrong.In my opinion, it doesn't look that bad, upon reading the subject and post I expected it to be a much larger missing area. My personal opinion, leave it be, lest it be damaged further! |
Skythings
Member Posts: 243
From:
Registered: Jun 2014
|
posted 09-29-2014 07:47 AM
Thank you folks for the advice thus far. Please keep the idea's flowing. Your thoughts have already helped me formulate a better plan so far. I have decided I will not attempt to repair this lucite on my own as I obviously do not have the experience necessary to do a professional job. David Carey demonstrated it is a bit more complicated than I was expecting it to be. I'll screw it up. I have decided I am now less comfortable with trying to resurface and blend as suggested by garymilgrom. I am leaning towards a cut/grind and polish. I have researched the Calgary area and there are a couple of plastic repair companies which seem promising. I am going to go visit them for a consultation and see how I feel about how they would approach this idea of a repair. Before doing that I thought I would contact the Kansas Cosmosphere to see if they would help me track down the original company they used to manufacture these lucites. I feel this company would be an excellent source for advice. If the folks who made these tell me to leave it alone, confirming GASspace and drangon001's advice I will do just that. Would anybody here have any leads or contacts on that front? |
nasamad
Member Posts: 2121
From: Essex, UK
Registered: Jul 2001
|
posted 09-29-2014 01:08 PM
I'm wondering how much material would need to be removed from the front sloping face of the lucite to lose the chip from the top? Would this take it too near the embedded artefact? It would then just look like a shorter lucite. |
mode1charlie
Member Posts: 1169
From: Honolulu, HI
Registered: Sep 2010
|
posted 09-29-2014 01:45 PM
Skythings, I think you're on the right path - get professional advice on how to go about this and don't try to DIY. I know if it were me, the gash/chip would bug me to no end, and would likely go the re-facet/grind/polish route, but not without people who are well-qualified. I also had the same thought as Adam (nasamad) - but that depends on how shallow the artifact is relative to the current surface and that I just don't know. |
Skythings
Member Posts: 243
From:
Registered: Jun 2014
|
posted 10-08-2014 11:47 AM
An update on my quest to have this lucite repaired. Once again, thank you to everyone who offered their advice here.I contacted several local Plastics Repair shops in my local area. They all requested photos but none replied or showed any interest by following up or even replying back to me. I expect they were nervous because it was one of a kind item. I contacted Jim Remar President/COO of the Kansas Cosmosphere and he graciously took time out his day to direct me to the company who originally produced the lucite displays. Thank you very much Mr. Remar. That was very appreciated and kind of you. I contacted the manufacturing company and they have been brilliant and very accommodating, not to mention very reasonably priced. The lucite is in transit back to Kansas for a re-cut and re-polish by the folks who know and understand this product. It should take a month or so, and I will be sure to get some images of the before and after. |
MrSpace86
Member Posts: 1618
From: Gardner, KS, USA
Registered: Feb 2003
|
posted 10-16-2014 12:25 PM
That is really good news! Make sure you post photos of the re-finished product!!  |
garymilgrom
Member Posts: 1966
From: Atlanta, GA
Registered: Feb 2007
|
posted 10-16-2014 04:19 PM
Couldn't ask for a better outcome. I look forward to the photos of the completed repair. |
Skythings
Member Posts: 243
From:
Registered: Jun 2014
|
posted 11-05-2014 06:20 PM
It has been several weeks and today my fully restored Apollo 13 Lucite arrived in the mail from Kansas. I am over the Moon! They did a wonderful job and I am so very pleased with the final restoration.The display is approximately 1/4 of an inch shorter and the front face is now much closer to the couch fabric encased in the lucite. The front face was shaved down below the point of the original damage. They even removed the chip on the underside. It has been polished to new condition and looks amazing. In my opinion if I was to show any accomplished Space Collector this piece, I expect they would not notice this piece was altered. Perhaps if you placed it beside another. Many thanks to both Doug & Eddie at Century Manufacturing in Bel Aire Kansas. These are the folks who originally cast these Apollo 13 lucites. Not only were these folks first class to work with, they only charged me $20 for all of their time and efforts. I wish there was something more I could do for them. With shipping included, my total cost for this restoration was $65.00. Here are the images of the restored Apollo 13 Kansas Cosmosphere lucite. |
Steve Zarelli
Member Posts: 731
From: Upstate New York, USA
Registered: Mar 2001
|
posted 11-05-2014 06:56 PM
Win. Congratulations and kudos to Century Manufacturing for doing it nicely without taking you to the cleaners! |
David Carey
Member Posts: 782
From:
Registered: Mar 2009
|
posted 11-05-2014 07:13 PM
That's superb. If it helps, I'd say your positive exposure of their company/services just did them a favor in return. |
neo1022
Member Posts: 281
From: Santa Monica, CA
Registered: Jun 2013
|
posted 11-05-2014 07:16 PM
Really nice! Great choice by the polishers--looks flawless!
|
GACspaceguy
Member Posts: 2475
From: Guyton, GA
Registered: Jan 2006
|
posted 11-05-2014 07:30 PM
Amazing, great work! |
Greggy_D
Member Posts: 977
From: Michigan
Registered: Jul 2006
|
posted 11-05-2014 08:27 PM
Looks fantastic! I'm half tempted to go chip mine now so it can also receive a "day at the spa". |
328KF
Member Posts: 1234
From:
Registered: Apr 2008
|
posted 11-05-2014 09:41 PM
That was first class of them to take such good care of that for you. With such a great price to begin with due to the damage and the ridiculously reasonable fee to repair it, you might just have the buy of the year. Congrats! |
MrSpace86
Member Posts: 1618
From: Gardner, KS, USA
Registered: Feb 2003
|
posted 11-07-2014 10:29 AM
That is awesome!! Loved seeing the pics |
MarylandSpace
Member Posts: 1336
From:
Registered: Aug 2002
|
posted 11-07-2014 03:53 PM
"I love it when a plan comes together" -- John Hannibal Smith. |
garymilgrom
Member Posts: 1966
From: Atlanta, GA
Registered: Feb 2007
|
posted 11-07-2014 04:10 PM
Excellent result. It looks beautiful. |
mode1charlie
Member Posts: 1169
From: Honolulu, HI
Registered: Sep 2010
|
posted 11-09-2014 12:06 AM
Looks great, and even better to hear a happy ending for a change. |