Space News
space history and artifacts articles

Messages
space history discussion forums

Sightings
worldwide astronaut appearances

Resources
selected space history documents

  collectSPACE: Messages
  Hardware & Flown Items
  Restoring Saturn IB launch control panels

Post New Topic  Post A Reply
profile | register | preferences | faq | search

next newest topic | next oldest topic
Author Topic:   Restoring Saturn IB launch control panels
ilbasso
Member

Posts: 1522
From: Greensboro, NC USA
Registered: Feb 2006

posted 03-13-2010 10:01 PM     Click Here to See the Profile for ilbasso   Click Here to Email ilbasso     Edit/Delete Message   Reply w/Quote
I've been working on and off since last summer to restore two Saturn IB control panels which I believe were last used in Firing Room 3 at Kennedy Space Center for the launch of the Apollo-Soyuz Test Project.

After several months of preparation - research, documentation, and planning - I reached a milestone this past week by having my S-IB Networks and S-IB Operations panels both wired up and connected to a Programmable Logic Controller (PLC). I wanted to share a few photos of the project thus far.

First, here's the back view of the S-IB Networks panel. The neatly-bundled white wiring is the original wiring for the panel. The wiring goes from the switches and indicators on the face of the panel to a backplane, and from there to circular connectors. My additions are the three heavy cables which branch into 120 smaller wires. I promise I'll clean this up once I am sure it all works!

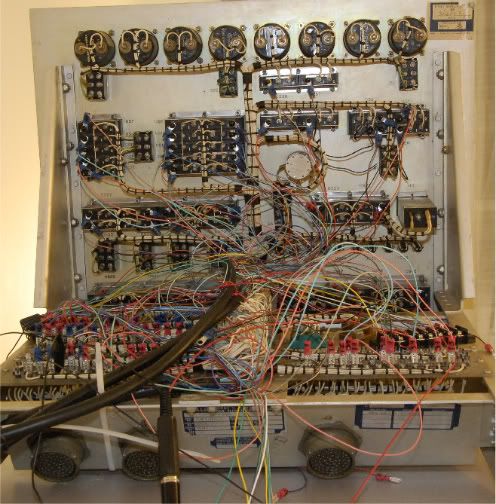
Since I still consider myself to be in test mode, I made temporary connections to the backplane with quick disconnects and also to some of the Roto-Tellite indicators using ring connectors that are slipped over terminals and held on with rubber antenna caps. I did not make any modification to the original wiring, nor did I make any permanent connections to any part of the panel. That way, the panel can be returned to its original state simply by removing the temporary connectors.

Here are some connections to the backplane.

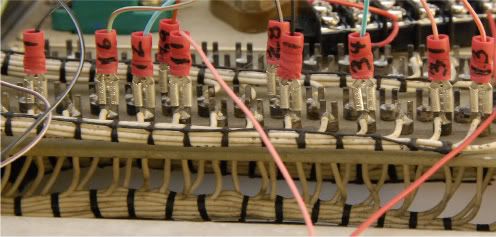
Here are a few of the connections to the Roto-Tellite enclosures for the indicator lights.

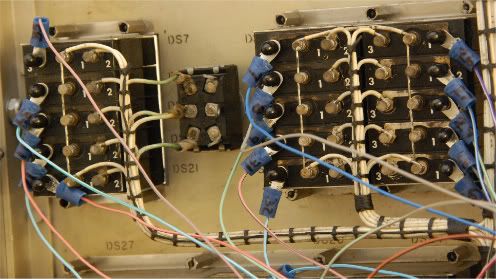
The face of the panel looks much better, I assure you!

I'm just starting now to enter the logic for driving the panel into the PLC. The switches and their associated indicators are not directly connected to each other. When you throw a switch, it registers as a program input, and then the program logic can send a corresponding output to one or more indicators. The PLC also has timers, so I will eventually integrate a timed countdown sequence that will progress appropriately - and stop if the switches aren't in their proper positions at the appropriate stage of the countdown.

Here is the Switch Selector section of the panel, showing a malfunction of the Switch Selector that has allowed two stages of the Saturn IB to be addressed by the same command.

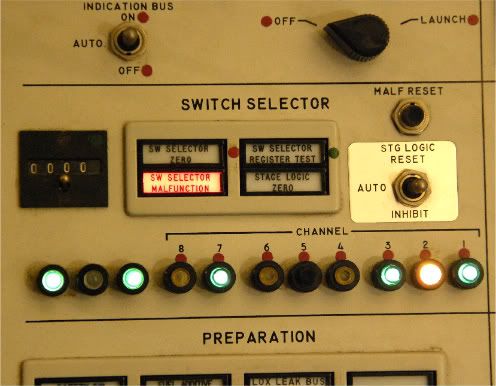
These sections of the panel prepare the S-IB stage for a plug-drop or simulated flight test, and also prep it for the ignition sequence. The heavy switches in the Ignition section have to be pulled out and then moved into place - there's no way you can accidentally throw the switches!

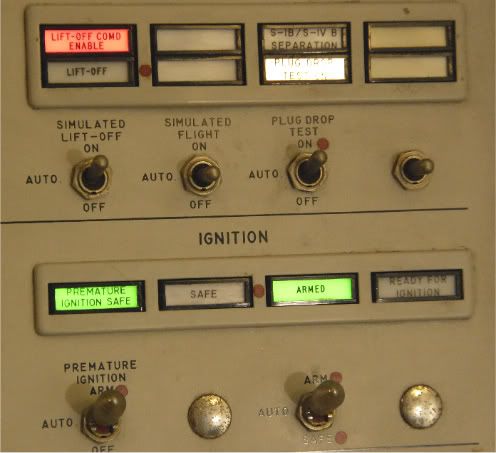
What's really exciting for me now is being able to throw a switch on the Networks panel, and see the corresponding indicator illuminate on BOTH the Networks and the Operations panels.

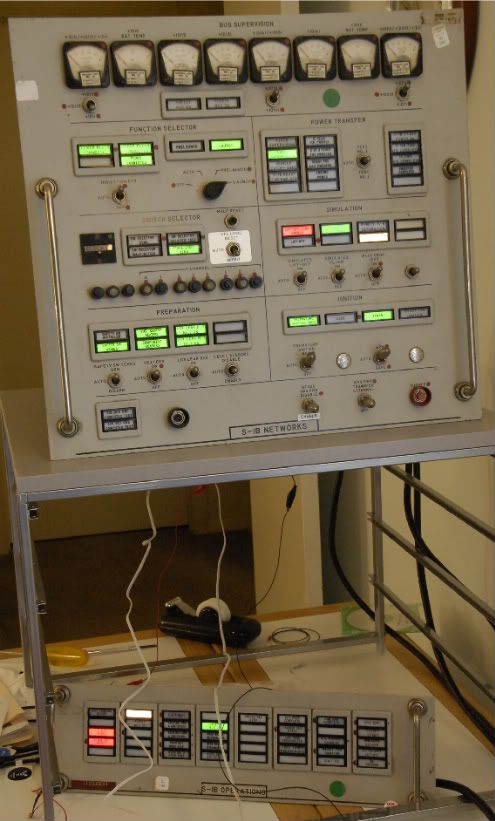
Eventually, I hope to integrate these two panels with a countdown and range time clock. In the meanwhile, I'm having a blast bringing these panels back to life for the first time since 1975. I'll have to wear my ASTP Firing Room access badge when I'm ready for my first public demo!

--Jonathan

garymilgrom
Member

Posts: 1966
From: Atlanta, GA
Registered: Feb 2007

posted 03-13-2010 11:43 PM     Click Here to See the Profile for garymilgrom   Click Here to Email garymilgrom     Edit/Delete Message   Reply w/Quote
Wow! Superb restoration on a beautiful artifact. Do you intend to use the multi pin connectors in the future?

Thanks for sharing. GM

stsmithva
Member

Posts: 1933
From: Fairfax, VA, USA
Registered: Feb 2007

posted 03-14-2010 06:47 AM     Click Here to See the Profile for stsmithva   Click Here to Email stsmithva     Edit/Delete Message   Reply w/Quote
Just amazing, Jonathan. It's great that you can combine your talent for electrical engineering (where did you pick that up, anyway?) with your love of space exploration history.

Steve

ilbasso
Member

Posts: 1522
From: Greensboro, NC USA
Registered: Feb 2006

posted 03-14-2010 08:44 AM     Click Here to See the Profile for ilbasso   Click Here to Email ilbasso     Edit/Delete Message   Reply w/Quote
Gary, I do eventually hope to use the Amphenol connectors sometime. They're expensive - new ones list for around $200 apiece - and I will have to map the backplane to the connectors. There are still about 30 wires connected to the backplane that I haven't been able to trace to the front of the panel.

I have not yet addressed the 8 meters on the top of the panel, which measured electrical bus voltage and battery temperature. There is also a digital counter in the Switch Selector section which I believe counted current pulses and kept track of how many commands had been issued on the Switch Selector system. The wires terminate inside the counter itself, so I can't trace it out without either cutting into a wire or breaking open the box.

Steve, I am not an electrical engineer, nor do I play one on TV! I know enough about electricity to keep from electrocuting myself. I'm sure a professional engineer would make much shorter work of this than I am, as I am feeling my way through the panel with a volt-ohmmeter and patience. This is truly an educational experience for me in many regards.

On the Myers-Briggs, I am an off-the-scale iNtuitive and Feeler, which means I would much rather be dealing with concepts and ideas and interpersonal relationships than detailed wiring. I would NEVER do this kind of work if it were not associated with the Apollo program, which holds such deep meaning and personal significance. I feel incredibly fortunate to be entrusted with this piece of history and I want to appropriately honor it by bringing it back to life again!

GACspaceguy
Member

Posts: 2474
From: Guyton, GA
Registered: Jan 2006

posted 03-16-2010 11:18 AM     Click Here to See the Profile for GACspaceguy   Click Here to Email GACspaceguy     Edit/Delete Message   Reply w/Quote
Wonderful!!!!

ejectr
Member

Posts: 1751
From: Killingly, CT
Registered: Mar 2002

posted 03-16-2010 11:48 AM     Click Here to See the Profile for ejectr   Click Here to Email ejectr     Edit/Delete Message   Reply w/Quote
Wow! Look at that hand lacing in the cable runs. You don't see that anymore since nylon tie wraps and wire channels. I worked in chassis construction for awhile, and that stuff is an art.

ilbasso
Member

Posts: 1522
From: Greensboro, NC USA
Registered: Feb 2006

posted 03-16-2010 01:00 PM     Click Here to See the Profile for ilbasso   Click Here to Email ilbasso     Edit/Delete Message   Reply w/Quote
I thought at first you were referring to my rat's nest wiring...

But yes, the hand-tied ribbons around the wire bundles are just incredible. There's no way I will ever cut into them.

Every time I poke around the back of this panel, I marvel at the skill that it took to put together just this small piece of the space program. And then to think about it multiplied thousands of times, in firing rooms and test facilities and vehicles and admin buildings etc. etc., you begin to get an inkling of the magnitude of the effort that it took to get Apollo to the Moon in such a short period of time.

All times are CT (US)

next newest topic | next oldest topic

Administrative Options: Close Topic | Archive/Move | Delete Topic
Post New Topic  Post A Reply
Hop to:

Contact Us | The Source for Space History & Artifacts

Copyright 2020 collectSPACE.com All rights reserved.


Ultimate Bulletin Board 5.47a


advertisement