|
Author
|
Topic: S-IB Operations control panel restoration
|
ilbasso
Member Posts: 1522
From: Greensboro, NC USA
Registered: Feb 2006
|
 posted 09-05-2009 03:34 PM
   
Early this summer, I acquired an "S-IB Operations" control panel, which I'm sure was at one time part of the Charles Bell space junk collection. I have been restoring it in my copious (hah!!) spare time, and I wanted to share the joy of "first light" with the cS community.This panel was from one of the Firing Rooms at KSC. It appears to have last been used during the ASTP launch in 1975. It shows the major countdown sequence items for the S-IB first stage, from initial prepping of the power networks and LOX loading, through the ignition sequence, and finally to engine cutoff and radio silence. The first task at hand was cleaning 30+ years' worth of grime off of the plastic labels in the indicator panels. You can see below that at the time of this photo, I had cleaned some and others were awaiting a cleaning. 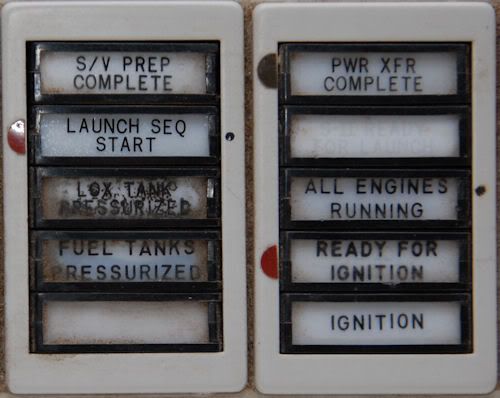 Here's a side-by-side comparison of the panel before and after all of the indicators were cleaned. 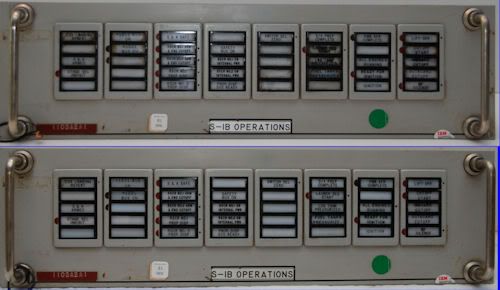 Another task was mapping the indicator lights to the 61-pin connector on the back of the panel. I haven't decided yet whether I'm going to try to power up this panel via the connector, or just use alligator clips to the terminals on the lamp sockets.  Finally, it's time to see if the lamps still work. These panels used standard aircraft 28V bulbs. I didn't want to poke around with 28V power supply at the start, so I hooked up a 9V battery to alligator clips for this test. |
ilbasso
Member Posts: 1522
From: Greensboro, NC USA
Registered: Feb 2006
|
posted 09-05-2009 03:49 PM
And now, for the first time in 34 years, these lamps are lit again...All Engines Running... 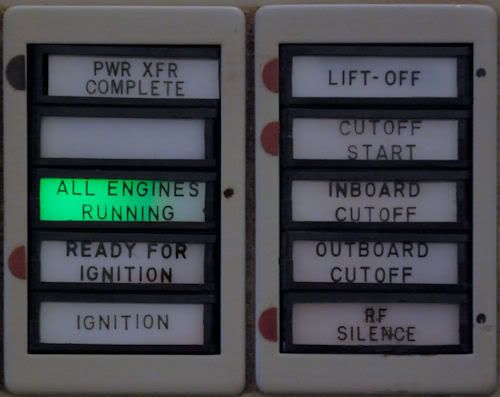 Ignition... 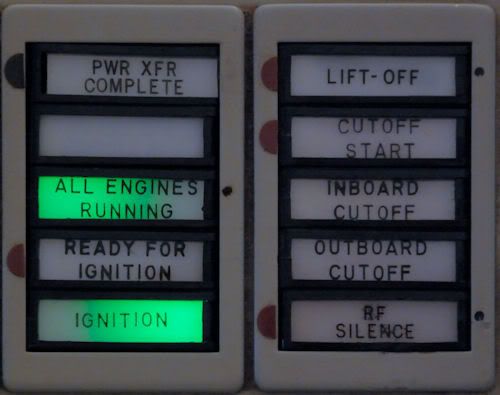 and Liftoff! We have a liftoff! 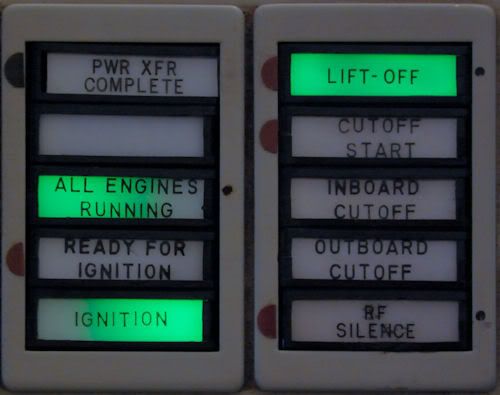 I hope you can imagine my thrill at seeing these lights go on again, rekindling the glory of the final Apollo mission. More to come!! ------------------
Jonathan Ward
Blogging at http://jonathan-spacejunk.blogspot.com
|
GACspaceguy
Member Posts: 2474
From: Guyton, GA
Registered: Jan 2006
|
posted 09-05-2009 06:42 PM
Very COOL!! |
LCDR Scott Schneeweis
New Member Posts:
From:
Registered:
|
posted 09-05-2009 07:09 PM
It certainly doesn't get much more emblematic then that. Me likes - congrats Johnathan!------------------
Scott Schneeweis
http://www.SPACEAHOLIC.com/ |
MadSci
Member Posts: 226
From: Maryland, USA
Registered: Oct 2008
|
posted 09-06-2009 12:13 AM
Almost as exciting as it was 30+ years ago! Thanks for sharing the rush with us! |
garymilgrom
Member Posts: 1966
From: Atlanta, GA
Registered: Feb 2007
|
posted 09-06-2009 06:23 AM
Another on time launch for the magnificent Saturn series. Good job! |
stsmithva
Member Posts: 1933
From: Fairfax, VA, USA
Registered: Feb 2007
|
posted 09-06-2009 07:22 AM
Great job with a wonderful addition to your collection.Steve |
Jurg Bolli
Member Posts: 977
From: Albuquerque, NM
Registered: Nov 2000
|
posted 09-06-2009 11:23 PM
I agree, this is great. Congratulation! |
rjurek349
Member Posts: 1190
From: Northwest Indiana
Registered: Jan 2002
|
posted 09-06-2009 11:31 PM
Wow, Jonathan - that is wonderful. Congratulations on a wonderful piece -- and thanks for sharing it with us. A true piece of history, dramatically displayed! |
Lou Chinal
Member Posts: 1306
From: Staten Island, NY
Registered: Jun 2007
|
posted 09-06-2009 11:41 PM
According to my instruments, you have a "GO" for launch! |
413 is in
Member Posts: 628
From: Alexandria, VA USA
Registered: May 2006
|
posted 09-07-2009 10:17 AM
My heart just skipped a beat. |
Joel Katzowitz
Member Posts: 808
From: Marietta GA USA
Registered: Dec 1999
|
posted 09-07-2009 01:37 PM
Just beautiful Jonathon. |
Jerry Brouillette
Member Posts: 147
From: Louviers, CO
Registered: Jul 2006
|
posted 09-07-2009 10:17 PM
Very, very nice! I felt something just looking at the pictures, it must be a thrill in person. Great piece! |
ilbasso
Member Posts: 1522
From: Greensboro, NC USA
Registered: Feb 2006
|
posted 12-08-2009 07:00 PM
Bumping this topic - I have been making some slow and steady progress on restoring this puppy!First task was to research exactly how this panel would have been used during a launch and countdown. Fortunately, there is a "Skylab Saturn IB Flight Manual" available online, dated September 30, 1972. It contained invaluable and detailed information on what happened and when, during both the countdown and boost phases of the Saturn IB's flight. Even more fortunate, it contained several direct references to another control panel that I'm also restoring - the S-IB Networks panel. This panel monitors the S-IB's electrical buses, power transfer, "switch selector," and ignition sequence. It also includes switches and indicators for "plug drop" tests (simulated countdowns). After dissecting the Flight Manual, I carefully mapped out the function of every indicator, gauge, and switch into a spreadsheet, along with the specific times in the countdown they would have been used, as well as any cross-dependencies with other functions (e.g., when light A goes on, lights B and C go off). This allowed me to start modeling the logic for programming the events controller. The demo I posted in September involved my PLC connected to only 4 of the 28 'populated' indicators on the Operations panel. Connecting the rest of them to the PLC meant that I had to get a 40-lead connector module and cable. Here's where one of my greatest weaknesses came in: I'm red-green colorblind, and these 40 wires are all color-coded! I humbly enlisted my wife's assistance in identifying the wires, and I temporarily labeled them with tape so that I wouldn't lose track of them. I then crimped on a ring connector at the end of each wire, labeling the insulator with the wire number. The ring connectors fit nicely on the terminals on the back of the Roto-Tellite enclosures. They're temporary, but they also avoid my having to make any permanent connection that would alter the panel. I may eventually find an appropriate plug to mate with the connector at the back of the panel, but that's later. Here's an overhead shot of the panel as I was connecting the wires. 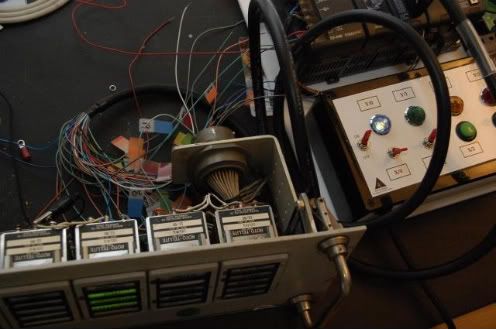 I then replaced the 28V aircraft lamps in each enclosure. I lost a lot of skin off of my thumb, trying to rotate some of those Bakelite enclosures which hadn't been turned in 40 years. (They all have manufacture dates of November or December 1965, and I doubt they've been serviced very often since then!) I saved the original lamps in a plastic bag, which will be kept with the panel. Then came another challenge - learning to program the PLC. I am neither an electrical engineer nor a computer programmer, but I know enough about both areas to at least enable me to learn some "advanced basics." I purchased some instructional materials on PLC concepts, but the only way to really learn was to start playing around. There are many different ways to do the same type of operation, some of which led to unexpected results. So, it took a LOT of trial and error before I finally figured out what I was doing. Last night, I reached the point where I had the complete logic for a "normal" countdown and launch as the Operations panel would display it. I am attaching two videos, which show time-compressed versions of the sequences. The first shows the countdown from LOX Loading up until the time that the Space Vehicle Preparation is considered complete (again, heavily time compressed, more to show the logic than the actual timing): The second video clip shows the last 5 seconds of the countdown, and then the 2-1/2 minute S-IB flight time compressed to 25 seconds: Next steps: Starting to integrate the S-IB Operations panel and the S-IB Networks panel, driving them both from the same PLC. I should be able to have switch throws on the Networks panel result in changes on the Operations panel. That will necessitate my replacing the lamps in the Networks panel, labeling and putting connectors on two more 40-wire cables, and writing more code...but it's immensely rewarding. I also obtained a surplus Countdown/Range Time clock from Cape Canaveral Air Force Station. Perhaps the end state of this project is to have both S-IB panels and these clocks synchronized! Now, if only I didn't have to work for a living and could spend all the time I want to on this project! 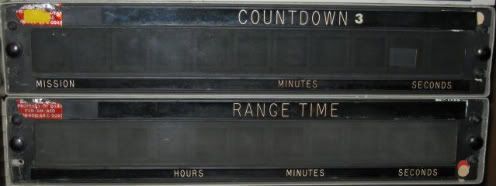 Jonathan |
GACspaceguy
Member Posts: 2474
From: Guyton, GA
Registered: Jan 2006
|
posted 12-09-2009 05:11 AM
Amazing project, fantastic results!!! |
space1
Member Posts: 853
From: Danville, Ohio
Registered: Dec 2002
|
posted 12-09-2009 06:37 AM
Congratulations on some excellent work!------------------
John Fongheiser
President
Historic Space Systems, http://www.space1.com |
minipci
Member Posts: 365
From: London, UK
Registered: Jul 2009
|
posted 12-09-2009 06:49 AM
To say I'm impressed would be a real understatement. It is amazing to see this working under your control.Just one question: There are red indicators at the end of one of the videos. Is that due to a different filter or to the lamps themselves? |
Robert Pearlman
Editor Posts: 42981
From: Houston, TX
Registered: Nov 1999
|
posted 12-09-2009 06:55 AM
Very cool Jonathan! Talk about space history coming alive... |
ilbasso
Member Posts: 1522
From: Greensboro, NC USA
Registered: Feb 2006
|
posted 12-09-2009 08:53 AM
quote:
Originally posted by minipci:
Just one question: There are red indicators at the end of one of the videos. Is that due to a different filter or to the lamps themselves?
Thanks for everyone's kind comments. There are indeed different colored filters on some of the indicators. Each panel has three or four plastic bits. Working from the back of the cell, they are a translucent (flimsy and easily breakable, as I found out the hard way) piece at the back, a colored gel (my panels have white, green, red, or blue), a thicker white piece, and then a transparent piece with the label inked on it. When I obtained these panels, the indicator labels were in pretty bad shape. In some cases, the gel appeared to have partially melted and oozed between the other layers of plastic. I had to carefully pry them apart and clean them. Mildly soapy water wasn't strong enough to get the grime off, so I used some denatured alcohol gently applied with a cotton swab. In a few cases, the alcohol started dissolving the label ink itself, so I quickly dunked them in water to dilute the alcohol. Here's a piece before and after cleaning: 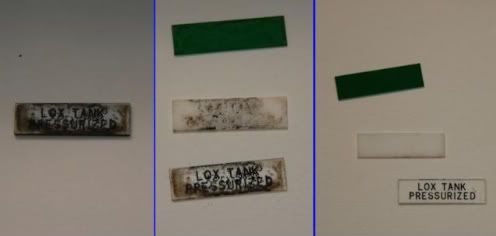 |
ilbasso
Member Posts: 1522
From: Greensboro, NC USA
Registered: Feb 2006
|
posted 12-09-2009 12:38 PM
I'm posting one more video - a "Bad Day" scenario. The vehicle has cleared the tower but begins to deviate from the planned course. The Range Safety Officer (me) presses the Red Button. This starts a 4-second automatic sequence which arms the Range Safety explosives, shuts down the engines, and finally "disperses the propellants" (i.e., blows up the fuel tanks). You'll see a lot of red lights go on! (Pay no attention to the Fireball XL5 model in the background.) |
GACspaceguy
Member Posts: 2474
From: Guyton, GA
Registered: Jan 2006
|
posted 12-09-2009 05:09 PM
Nice to see another cSer is an XL-5 fan. I too have that model on a shelf. |
minipci
Member Posts: 365
From: London, UK
Registered: Jul 2009
|
posted 12-10-2009 04:25 AM
quote:
Originally posted by ilbasso:
Working from the back of the cell, they are a translucent (flimsy and easily breakable, as I found out the hard way) piece at the back, a colored gel (my panels have white, green, red, or blue), a thicker white piece, and then a transparent piece with the label inked on it.
That's interesting to know. It is remarkable how good they look after cleaning. quote:
(Pay no attention to the Fireball XL5 model in the background.)
I couldn't help but notice it. Zoonie the Lazoon would have been sure to help out in the disastrous situation you were simulating.  |
rwhite502
Member Posts: 29
From: Reading, PA
Registered: Apr 2008
|
posted 12-10-2009 08:48 AM
Very nice... I should post some pics of the LH2 panel now that I have it all wired up, only took 168 output and 84 input points on the PLC - and consumes about 8 amps of 24V and can heat a small room as a result. |


